In this tutorial, we will be showing you how to install and run Wallos on the Raspberry Pi.

Wallos is an open-source finance tool designed to help you keep track of your subscription services.
It gives you a single interface to easily add and track any subscription you have signed up for.
The software can even send you a notification when a subscription renewal is coming up. This allows you to decide whether you want to stay subscribed or not before the renewal comes through.
With the rapid increase in subscription services, Wallos is an excellent self-hosted solution you can run on your Raspberry Pi to track them.
Wallos offers many features that make using this tool a breeze, such as allowing you to look up logos from within the web interface easily. It can even integrate with Fixer so that Wallos can convert different currencies to your local currency.
Equipment
Below is a list of equipment we used when setting up Wallos on the Raspberry Pi.
Recommended
Optional
This tutorial was tested on a Raspberry Pi 400 running the latest version of Raspberry Pi OS Bookworm 64-bit.
Tutorial Video
The video below will take you through all the steps to installing Docker and Wallos to the Raspberry Pi. If you are having trouble following the video, be sure to check out the written instructions immediately below the video.
Installing Wallos to the Raspberry Pi
Throughout this section, we will walk you through installing the Wallos software onto your Raspberry Pi.
Wallos provides Docker Containers for ARM64 and ARMv7 so you can run this on Raspberry Pi OS 32-Bit or 64-bit.
Preparing your Raspberry Pi
1. Before installing Wallos onto the Raspberry Pi, we should ensure the operating system is up-to-date.
We can achieve this by using the following two commands in the terminal.
sudo apt update
sudo apt upgrade -yCopy
2. With your Raspberry Pi now up-to-date, your next step is to install Docker.
Follow the guide we linked above. It shows you the whole process to have everything Docker installed correctly.
3. Once you have installed Docker, we must create a directory to store the Docker Compose file for Wallos on our Raspberry Pi.
You can create this directory by using the mkdir command as shown below
mkdir ~/wallosCopy4. With the directory created, we must change to it by running the cd command.
Over the next few sections, the commands wea re using will expect you to be in this directory.
cd ~/wallosCopyWriting a Docker Compose file for Wallos
6. With that setup, we can write a Docker compose file for Wallos on our Raspberry Pi.
This compose file tells Docker how we want it to run Wallos. You can begin writing this file by running the command below.
nano docker-compose.ymlCopy7. Within this file, you will want to write the following lines.
There is one thing you must set while writing this compose file, and that is the time zone.
To set the time zone, replace “<TIMEZONE>” with a valid TZ identifier. For example, we would use “Australia/Hobart” where we live.
version: '3.0'

services:
  wallos:
    container_name: wallos
    image: bellamy/wallos:main
    ports:
      - "8282:80/tcp"
    environment:
      TZ: '<TIMEZONE>'
    volumes:
      - './db:/var/www/html/db'
      - './logos:/var/www/html/images/uploads/logos'
    restart: unless-stoppedCopy
8. After you have finished typing out the lines above, save and quit by pressing CTRL + X, Y, and then the ENTER key.
Starting Wallos on your Raspberry Pi
9. We are finally at the point where can start up Wallos on the Raspberry Pi.
Thanks to setting up the Docker Compose file earlier, all we must do is run the command below.
By using the “-d” option, Docker Compose will detach from the current terminal session once it has started.
docker compose up -dCopyPlease note that this process can sometimes take a few minutes to complete. Luckily, Wallos uses the fairly lightweight “Alpine” flavour of the PHP container.
Viewing the Wallos Web Interface
Now that you have installed the subscription tracker to your Raspberry Pi, you will want to utilize it.
This software has a straightforward web interface that allows you to add subscription services that you want to track easily.
Accessing the Wallos Interface
1. To view the Wallos web interface, you will need to know the IP address of your Raspberry Pi.
You can get this IP address by using the hostname command in the terminal.
hostname -ICopy2. Once you know your IP address, you will want to go to the following URL in your favourite web browser.
Ensure you replace “<IPADDRESS>” with your IP before going to this URL.
http://<IPADDRESS>:8282Creating your Wallos Account on your Raspberry Pi
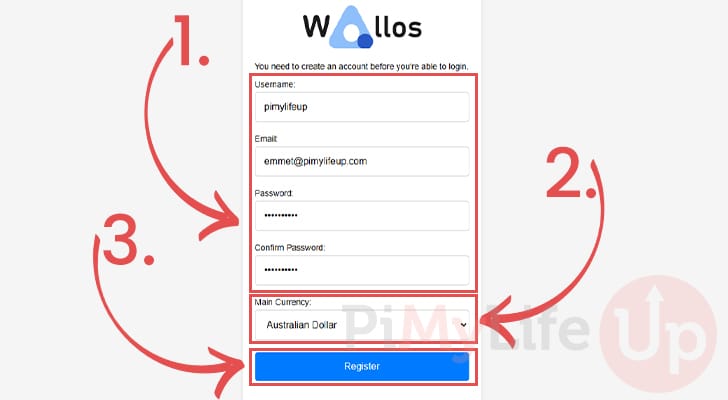
3. When you first open the Wallos web interface, you must create an account. Fill out the username and password you want to use to log in (1.).
You must also set your “local” or “main” currency (2.). Wallos will use this as the currency it needs to convert to within its statistics.
Once you have filled out your information, click the “Register” button (3.).
4. You will now be required to fill out the username and password of the account you just created (1.).
Once you have filled out that information, click the “Login” button (2.).
Adding your First Subscription to Track
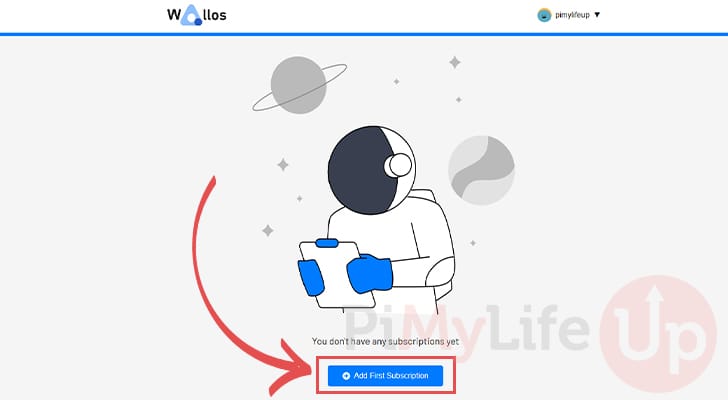
5. Now that you have Wallos open, you will want to add the first subscription you want to track.
To begin adding a new subscription, click the “Add First Subscription” button.
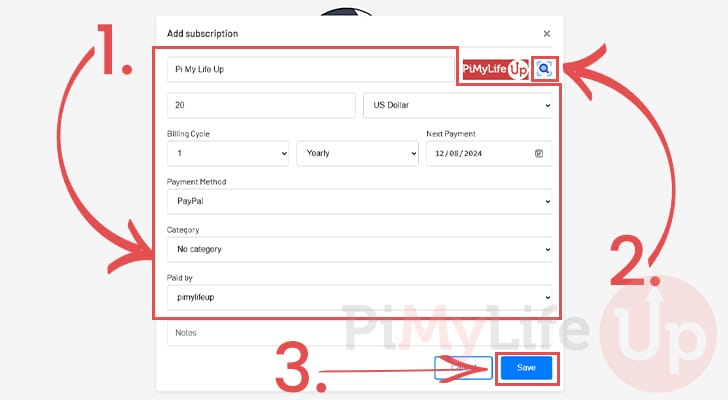
6. Now, use this dialog to fill in all the details for the subscription you want to track (1.).
After typing in the name for the subscription, you can click the “Search” icon (2.) to find a relevant logo easily.
Once you are happy with all the information you have entered, click the “Save” button (3.).
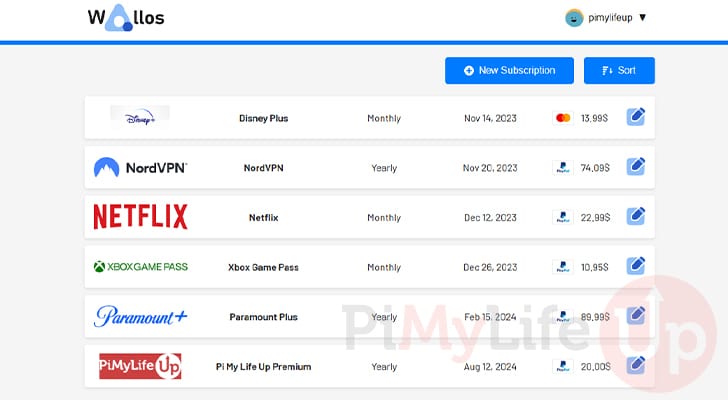
7. Below, you can see how our Raspberry Pi Wallos web interface looks after adding a few more subscription services.
With this interface, you can easily see your subscription services, how much they cost you, and when they are next up for renewal.
Updating Wallos on your Raspberry PI
With Wallos being a relatively new software, it gets updated quite frequently. Luckily, updating this subscription tracker is quite simple thanks to us using Docker.
In this section, we will show you how to pull the latest Wallos container and update your running installation.
1. We need to start by changing into the directory where we wrote our Wallos Compose file.
cd ~/wallos/Copy2. Once we are in the correct directory, you need to pull the latest version of the image.
To pull the latest image, run the command below.
docker compose pullCopy3. Finally, we can tell Docker Compose to restart Wallos on our Raspberry Pi using the following command.
When Docker starts the container, it will detect there is a newer image available and move to that when it starts back up.
docker compose up -dCopyConclusion
Hopefully, you will have successfully set up Wallos on your Raspberry Pi.
This software gives you a nice central location that you can use to keep track of your subscription services.
Please feel free to leave a comment below if you have any questions about installing this software.
If you liked this tutorial, be sure to check out our many other Raspberry Pi projects.


Hi, Thanks for sharing Wallos.
Just to let you know that wallos now has ARMv7 and ARM64 builds.
Regards.
Hi Ellite,
Thank you for dropping in and letting me know. I have updated the tutorial now to utilize the pre-built images.
Kind Regards,
Emmet