In this guide, I will take you through from start to finish on how to set up your very own Raspberry Pi time-lapse setup.
We make use of the official Raspberry Pi camera in this guide. You’re able to get this cool mini camera at any good electronic store that sells the Raspberry Pi.
I will take you through everything you need to know to get the time-lapse photo capturing set up and ready to go. The process is easy, and you will learn how to set up cron jobs, a bash script, and more.
This tutorial is also an excellent way to learn more about the Raspberry Pi camera and the things that you can do with it. The time lapse that you end up producing is cool and very easy to create.
Equipment
The equipment you will need in this tutorial is listed below.
Recommended
- Raspberry Pi Amazon
- Raspberry Pi Camera Amazon
- Power Supply Amazon
- Micro SD Card Amazon
- USB Keyboard Amazon
- USB Mouse Amazon
This tutorial was last tested on Raspberry Pi OS Bookworm running on the Raspberry Pi 5.
Video
If you are not much of a reading person, check out the excellent video on how to do the Raspberry Pi time-lapse.
It goes through step by step everything you need to do to get your Pi taking photos, so you can use them in a time-lapse video.
Installing the Raspberry Pi Camera
The most important step is correctly connecting the Raspberry Pi camera module to your Raspberry Pi board. This process is straightforward, but if you are new to this kind of stuff, you will find this section helpful.
Hardware
If you are using a Raspberry Pi 5, you may need to acquire a ribbon cable (Amazon) designed to fit into the new ports.
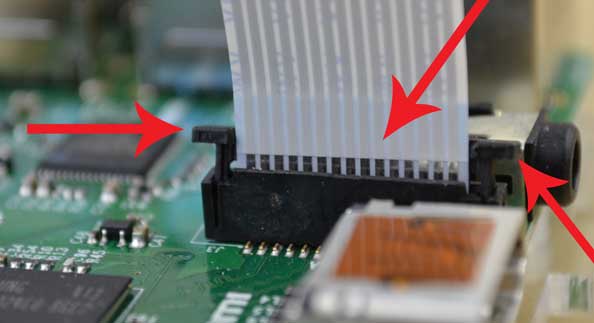
1. To install the camera, you will need to go to the ribbon cable port and pull gently with two fingers on either side of the connector. This port is labeled CAM/DISP 0 on the Raspberry Pi 5. The connector should be lifted slightly.
2. Now insert the cable with the metal leads facing away from Ethernet port or towards the Ethernet port on the Raspberry Pi 5.
3. Once lined up and the cable is inserted far enough, gently press the connector back down, and the cable will now be locked in place. You can test that it is locked in place successfully by gently pulling on the cable.
Software
To start this Raspberry Pi time lapse project, you will need a copy of the Raspberry PI OS installed to the SD card.
Confirm the software required to run the camera is installed to the Raspberry Pi by entering the following line into the terminal.
sudo apt install rpicam-appsCopyTesting the Camera
A quick note, if you are using a version of Raspberry Pi OS older than Bookworm, you will need to replace rpicam-still with libcamera-still.
1. Go to the terminal application and enter the following command.
rpicam-still -o cam.jpgCopy2. If you now type ls you will be able to see the image file now exists(cam.jpg). Open this image in the file browser or from your machine if you are using SSH.
lsCopyIf you are new to Linux, you may find the guide on the ls command helpful.
3. If the image is upside down, your camera is not positioned correctly. You can either fix the cameras position or simply flip the image by using the following command.
rpicam-still --hflip --vflip -o cam2.jpgCopy4. You can now confirm that the image is now facing up the correct position.
Now you can proceed to creating the script that will take the photos required for a Time-Lapse. You can either create a manual script that is fired using cron or use the built-in command.
Writing a Time-Lapse Script
It is time to write a script that will take a picture and create a file name with the date and time.
The script is straightforward, but remember, you will need to add –hflip –vflip flags if your camera is currently upside down.
If you are running a version of Raspberry Pi OS or Raspbian that is older than Boookworm, you will need to replace rpicam-still with libcamera-still.
1. Make a directory and call it timelapse by entering the following command.
mkdir ~/timelapseCopy2. Move into the timelapse folder by entering the command below.
cd ~/timelapseCopy3. Now we need to create a bash script called camera.sh using a text editor such as nano. You can do this by entering the following command.
nano camera.shCopy4. In this file, copy and paste the bash script below.
This script creates a string that contains the year, month, day, hours, and minutes. Lastly, it captures a photo and stores it with the specified date and time as the name.
#!/bin/bash
DATE=$(date +"%Y-%m-%d_%H%M")
rpicam-still -o ~/timelapse/$DATE.jpgCopy
5. Next, we make the script executable by running the chmod command below.
chmod +x camera.shCopy6. Now, test the script by running the following line.
sh ~/timelapse/camera.shCopy7. If it fails to run, look at the error message and try to debug the code. Also, try cross-checking with the code above.
You can confirm it ran by running the following command. There should be a single image with the timestamp as the file name.
ls ~/timelapseCopyIf it doesn’t fail, then we are onto the next stage, setting up a schedule for the script to run.
Schedule the Script using the cron
The script above is now complete, and while you can make further adjustments to it, we will keep it basic for this guide.
Next, we will need to schedule the script to run so we can run this over x amount of time, allowing us to capture hundreds or thousands worth of pictures.
1. Let’s open the crontab for editing by entering the following.
crontab –eCopyIf you have never used cron, it will prompt you to select a text editor. I recommend choosing nano as I find this the easiest to quickly learn.
2. Once in, scroll down to the bottom, you will find some helpful column headers that look like the one below. These are your guide for setting up a cron job.
Check out our tutorial on cron jobs to learn more about how the cron system works. Perfect if you’re starting out and would love to learn more.
# m h dom mon dow commandCopy3. Add the following line to schedule the time-lapse script to fire every minute. You can change this to whatever you would prefer.
* * * * * sh ~/timelapse/camera.sh 2>&1Copy4. Once done, exit and save by pressing CTRL + X, then Y. Lastly, press ENTER.
You should then get the following message.
crontab: installing new crontabCopy5. If you type in watch ls in our new timelapse folder, it should now start to fill up with images you can use in making a time-lapse.
You can shut down and move the Raspberry Pi to wherever you like. When you reboot the Pi, it will start taking photos again.
If you ever need to edit or remove the cron job, follow the same steps and edit or delete the line we added.
Using the In-Built Time-Lapse Mode
Instead of using the manual script and cron method, you can simply use the rpicam-still command to take all the photos required for a timelapse. Each method has its pros and cons, but if you are looking for something basic this command is perfect.
1. Make a directory and call it timelapse by entering the following command.
mkdir ~/timelapseCopy2. Move into this folder by entering the command below.
cd ~/timelapseCopy3. The command below will run for 60 seconds and take a photo every second. Each photo will be four digits long and increment by 1 per image. For example, 00001.jpg, 0002.jpg, and so on.
rpicam-still --timeout 60000 --timelapse 1000 -o ~/timelapse/%04d.jpgCopyI will briefly explain each option we use in the command below.
--timeoutis in miliseconds and controls how long the command will run before stopping. In our case, it will be 60 seconds.--timelapseis in milliseconds and determines how often a photo will be taken. In our case, it will be every second.-ospecifies where to output the files.
Creating the Time-Lapse Video
Both of these methods save the photos directly to the Raspberry Pi. Alternatively, you can set it up to save it to a USB stick, cloud storage, or network drive.
Transferring data from the Pi to a USB stick is a simple process. Just insert the USB into the Raspberry Pi and use the GUI (Graphical User Interface) to copy and paste the files onto the USB stick.
If you want to make a time-lapse out of your images, look at our 5 easy steps to turn time lapse images to video.
Below is the video we created from the images captured by our Raspberry Pi.
Deploying your Raspberry Pi Time-Lapse
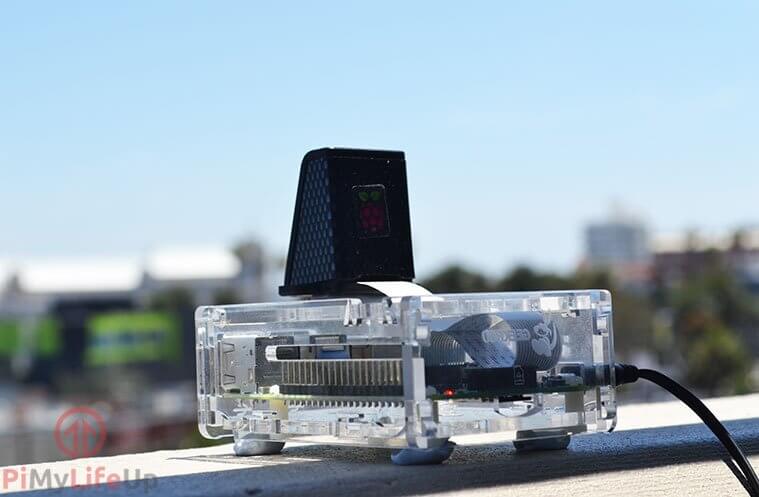
One of the most amazing things about the Raspberry Pi is how portable and energy-efficient it is. If you have a battery pack, you can run the time-lapse for a few hours, and the best thing is that you can place it anywhere you like.
Once you have set up the Raspberry Pi camera, script, and cron job, you can disconnect it and place it anywhere you like. You don’t need to have a display connected to the Raspberry Pi for it to work.
Conclusion
There you have it, your very own Raspberry Pi time-lapse that you are able to take some awesome photos now and then transform it into a fantastic time-lapse. I find it a great way to capture the sunrise or sunset.
I recommend checking out our plenty of other projects that use cameras. For example, we look at installing OpenCV, controlling a DSLR, and much more.
If you have any feedback, corrections, or anything else, please do not hesitate to leave a comment below.


Hi, I want to capture a still image every 3 hours and I have inputted the code
* */3 * * * sh /home/pi/timelapse/camera.sh 2>&1
The raspberry decided to take a picture once three hours later and then, it took a bunch of photos that I think are at a one minute interval. How can I solve this out?
Qhaliff try this:
0 */3 * * * sh /home/pi/timelapse/camera.sh 2>&1
Hi,
Thanks for the super quick response, I guess the best time to post here in the UK is early morning.
That worked, in as much as I no longer get the error not found. However, it now says
Every 2.0s: 1s
but there are no images within the ‘timelapse’ folder to ‘play’ with, any idea’s?
Thanks once again.
Every 2.0s ls is the correct output (Should be in the header). It means it’s running ls every 2 seconds.
Have you tested the camera to make sure it’s taking pictures ?
Try running
raspistill -o /home/pi/timelapse/test.jpgand see if it throws an error or outputs a picture.Thanks I got it working. Just one thing, is it possible to schedule the time lose to start/stop at a particular time as I want to record the sunrise/set. I’m not asking for the code as I want to research and learn this myself, however a simple yes or no and maybe a nudge in the right direction would be helpful.
Thanks again.
Hi,
I’m very new to this community and having fun learning.
However, I’ve followed your instructions to the letter, but when I type the ‘watch 1s’ command I get the following:-
Every 2.0s: 1s
sh: 1: 1s: not found
I have no idea what this means, or how to go about correcting it, any help from anyone would be greatly appreciated.
Hi Jason,
I believe it should be ‘watch ls’ not ‘watch 1s’
I hope that helps!
I followed your tutorial and I am trying to get my photos from the pi to a USB. I have everything setup but I can’t seem to copy the pictures created with your script to the USB. Every other file on my pi seems to copy fine but the ones I made with this script insist on me renaming them first.
There is a space at the end of the file name for each jpeg created. I’m not sure if that is the issue but I noticed it and couldn’t figure out why it was there. Any help would be appreciated.
I’m having the same problem. When I try to cut and/or copy the jpegs to a USB flash drive, I get a dialog box saying the file already exists. There is a space, or possibly a carriage return, at the end of the file name and in front of the file extension (.jpg) for each jpeg created.
I say possibly cuz when i list the files in the file manager, the file extension (.jpg) displays on the line below the filename.
I am using the “camera.sh” script I downloaded from this site.
Any thought on why this is occurring? Thanks
I may have found the problem. The copy of “camera.sh” I used had a carriage return at the end of each line. I used “dos2unix” to remove the CR’s, and then I got normal filenames.
Hi,
And thanks for all the info. very interesting. Would it be possible to save to a diffrent location rather than having all the images save to the SD card. Mybe to somewhere like Mircosoft Onedrive via wifi from the Pi. Would this be possible. ?
Hello, your script is a blessing, everything works 😀
Could you please help me out though, I would like my camera to take pictures every 6 hours, what should I change?
Thank you very much
Hi Lidia,
The following line should take a photo every 6 hours starting at midnight.
For example Midnight = 0, 6am = 6, 12 = Midday, 18 = 6pm.
* 0,6,12,18 * * * sh /home/pi/timelapse/camera.sh 2>&1or you can do it like this
This will take a photo every 6 hours from when the cron starts up.
* */6 * * * sh /home/pi/timelapse/camera.sh 2>&1Hope that helps!
Yes, thanks so much! You really helped me out 😀
Have a nice day :))
I can’t get the camera to take at 10 min, I have tried
*/10 * * * sh /home/pi/timelapse/camera.sh 2>&1and
10 * * * sh /home/pi/timelapse/camera.sh 2>&1What do I try next? Camera does fine on the 1 minute setting in this tutorial.
Thanks for the help
Hi Tony,
There is only 4 stars before the command but there should be 5. (Minute, hour, day, month, week)
See if this works and let me know if you’re still having problems!
*/10 * * * * sh /home/pi/timelapse/camera.sh 2>&1awesome that worked, must had something out of place or like you said missing *
got it put together and sitting in the wife’s gardening box, running on batteries.
Is this different for the Raspberry Pi 3? I tried but nothing I did worked. Is there a new update to either the Pi or raspbian?
Hi Joshua,
I am unaware of any changes that would have broken this tutorial. I will need to take a look into it.
Did you get any errors?
Hi
This was very helpful can i send the photo each time it is taken to an email address? I want to leave the Pi outside and see the photos when i log onto email.
Hello,
I think there is a mistake in your tutorial, if you follow it, the script file is in “timelapse” folder. eg:
>> * * * * /home/pi/timelapsecamera.sh 2>&1Thanks!
Hey Ax3l91,
I fixed this a while ago but forgot to say thanks for noticing the mistake! 🙂
is there a way to send the photo after each picture is taken to a FTP or via email
Raspistill can do timelapse on it’s own without needing to use crontab.
raspistill -vf -hf -w 1280 -h 720 -o time_%04d.jpg -tl 18000 -t 1080000
-vf is vertical flip since my camera is upside down
-hf – horizontal flip since the image is mirrored
-w – width. The native resolution is quite high so I just capture at 720p resolution
-h – height
-o Output file name and location. %04d tells it to use a 4 digit incremental number to name the files
-tl – duration between images. If this is low, say under 2 seconds you may want to use -bm for burst mode. This keeps the camera active and you’ll have fewer dropped frames
-t – total capture time. These are both in milliseconds so in the above example I was taking an image every 18 seconds for 3 hours which gives me 600 images and at 10 frames/second that is a 1 minute video.
How could i change this so it takes a picture every lets say 10 seconds?
Hi Liam,
The minimum amount of time for a crontab is 1 minute. The alternative would be to create a Python script or similar to take a photo every 10 seconds.
Can you use this up to the max frame rate of the camera? I want to take frames at short but varying intervals as determined by external physical occurrences.
Hi, I’m trying to do a timelapse of a house build and want to run it off a battery pack. I don’t want to be there everyday so need the battery to last for 1 week. Is there a way to shut down the pi after taking a photo, wait 10 minutes, reboot, take another photo etc?
thanks for your help.
Rich – I’ve been researching this also. There are a lot of details to running off of batteries. You could use a ‘”watchdog timer’ ckt, and you’d most likely need a ‘soft power down’ circuit that checks battery voltage and sends a low power signal to the pi for a shutdown. Then again, you may want a solar panel to keep your battery charged also.
I was wondering, if I only wanted this to take pictures during a set period of ‘hours’ a day say 6am – 9pm, what type of adjustment would be necessary?
is that possible.
Thanks. Great and quick guide to getting this setup.
Hi Kevin,
This is certainly possible!
The following line will run every 5 minutes between 6am and 9pm. (If you don’t want to run every 5 minutes remove the /5 and it will run every minute)
*/5 06-21 * * * /home/pi/camera.sh 2>&1If you haven’t already you will need to make sure your timezone on the Pi is correct as well otherwise it will run incorrectly. This can be set in the raspi-config tool
Hope that helps!
Hello, thank you for this great explanation. Is it possible to make a picture every second or 10 sek. or 30 sek.? This would be great.
Thank you.
As I understand, Crontab only allowed shortest interval at 1 minutes. For interval shorter than that, perhaps a Python script could help?
How could you take snaps more often than 1 minute intervals? If I want a 30sec video over 1 hr at 25fps then I need a capture every 5secs.
Thanks.
is it possible to do this with a webcam if it is is my crontab wrong
1 * * * * sh/media/FA90-79AA/piwebcam/timelaps.sh 2>&1
the timelaps.sh works is it the diferent location i want to save the file in
How can i change the time between the images. In your example it takes a picture every minute. I want to change this to 10 minutes or 30 minutes. Must i change a * to a number for example 10 ?
Hope that you can help me out.
Hi Edgar,
Below is the typical layout for crontab scheduling.
# minute | hour | day of the month | month | day of the week | command
If we wanted this to run every 10 minutes we would change the minute value to 10 so it would be.
*/10 * * * * * sh /home/pi/camera.sh 2>&1
This would be every 10 minutes of every hour, every day, every month run this script.
Please let me know if you need more information!
He Gus,
Thanks for the reply. Today i made a test run and it works perfectly. i made a mistake. I want to have a picture every 5 minutes but now i have a picture every hour on 07.05, 08.05, 09,05 🙂
So i made a change to
0,5,10,15,20,25,30,35, etc..
I also added a ncftput after the run to ftp backup the pictures to my nas.
Thanks for you tutorial and fast reply!!!
I tried to schedule my Pi to take pictures every 10 minutes with the following:
10 * * * * * sh /home/pi/camera.sh 2>&1
However it did not work???
When I changed it to the following everything worked:
*/10 * * * * * sh /home/pi/camera.sh 2>&1
I have seen it on the web both ways and would think the first command should work fine.
Why do you Have to you the */10 to get it to work?
Thank you,
Luke
What does the “2>&1” part mean at the end of the crontab text – needs a bit more explanation.
Hi Graham,
2>&1 will prevent the crontab from sending an email. To do this we redirect 2 (stderr) to 1 (stdout). Since all the output is redirected to a file it will not generate an email of the output.
In summary:
> Means Redirection
2 is the descriptor for stderr (Standard Error)
1 is the descriptor for stdout (Standard Out)
& is the symbol for a file descriptor (If you don’t have it the 1 would be considered a filename)
For more information check out: http://unix.stackexchange.com/questions/163352/what-does-dev-null-21-mean-in-this-article-of-crontab-basics