If you just followed my Raspberry Pi time-lapse guide, then you probably want to know how to turn your images into a fantastic video very much like the example below.
If you’re just starting out and need to follow the guide you can find it here at Raspberry Pi time-lapse.
Converting all your captured images is luckily a very simple process as long as you have the right pieces of software.
In this guide we will explore generating a timelapse from images by using both a paid piece of software such as Adobe Premiere as well as showing you how you can utilize a free software called Avidemux to do the same thing.
Video
In the video below we showcase you an example of what a finalised timelapse can look like when recorded by the Raspberry Pi camera like in our camera timelapse guide and then converted into a video.
Our written steps below will showcase you all the easy steps to generating a nice looking timelapse video just like what we have below.
Using Time Lapse Software
I will detail how to create your timelapse using two different software packages with one being free while the other you will need to pay money.
Adobe Premiere Pro
Adobe Premiere Pro is an excellent tool for video editing that has a lot of features and functions you’re able to use. I currently subscribe to the creative cloud that allows me access to all the Adobe applications such as Premiere Pro, Photoshop, After Effects, Lightroom and much more.
If you’re interested in the Creative Cloud, you can find more information at the Adobe Creative Cloud website.
Let’s get started, there are two methods you can use however I can never seem to get the first one to work for me, but it is worth a shot. (I think it has something to do with how my images are numbered.)
Import Image Sequence
This technique didn’t quite work for me, but it might work for you so I will detail it here.
1. First, create a new project for time lapse. (No need to change any settings)
2. Go into File -> Import (CTRL + I)
3. Select the first image of the sequence and tick image sequence just above the file name box.
4. This step should create a time-lapse of all your images. (It only got about 1-2 seconds worth of my videos)
5. After this drag and drop from the project window into the timeline.
6. You’re now ready to export.
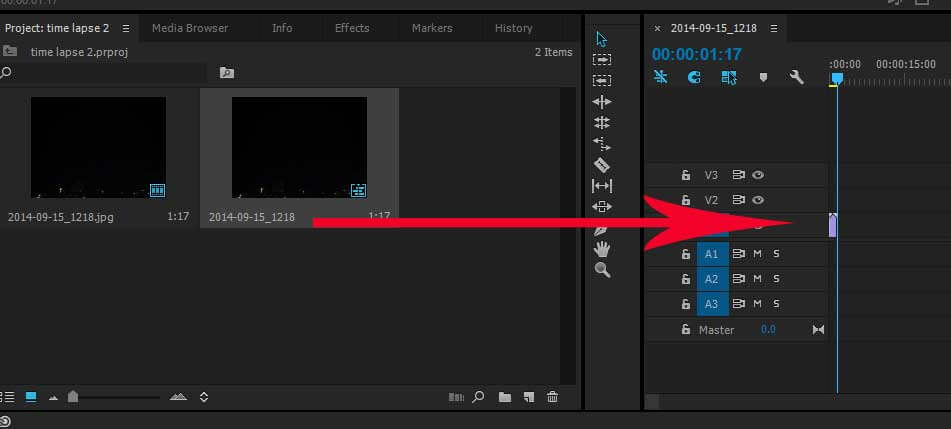
Import All Images
1. Go into File -> Import (CTRL + I)
2. Select all the images you wish to use in your time lapse. This process may take a while to import if you have lots.
3. Drag and drop all your images across, keep in mind they may not all be in order. (If that is the case drop and drop your first lot then your second lot and so on)
4. Select all images (CTRL + A) and right click and go to speed/duration.
5. Make the duration 8 frames and tick Ripple Edit, Shifting trailing clips.
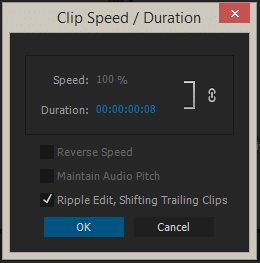
6. You can tweak the duration until you get the effect you’re after. Once done simply export the video and it is now ready to use.
There you have a Premiere Pro time lapse done in some concise and easy steps, and if you don’t have the luxury of owning it, then you can use the free software below or the many others that are available on the internet at the moment.
Avidemux
Avidemux is a free video editor that can be used as free time lapse software. This software is perfect for anyone who can’t afford the Adobe products. You’re able to download it over at Source Forge.
1. Download and install Avidemux, once that is done, open it up.
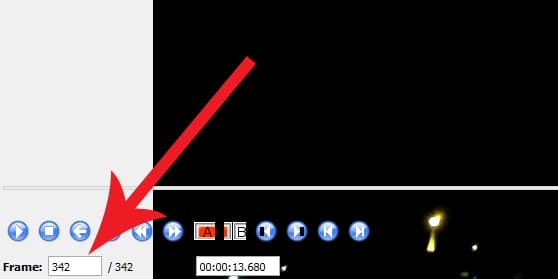
2. Now open the first image in the sequence of images, it should auto-populate the rest of your time lapse.
3. If it doesn’t auto populate go to append and go to the last image that was added. If you look at the frames down in the bottom left corner, this will tell you how many images you have currently added.
4. Once done, just go to File -> Save -> Save Video.
5. Save the file with the extension .mp4 (e.g. timelapse.mp4)
There you have an Avidemux time-lapse, it’s pretty easy. There is plenty more you’re able to such as bulk edit pictures to get different effects such as higher contrast, brightness, make it black and white the possibilities are endless.


Another way to do this, perhaps more in the spirit of the Pi and free software, would be to use ffmpeg. It’s free and terminal-based.
Avidemux is free and open source, and the instructions are already in the tutorial. However, ffmpeg would be a great addition, so I’ll look at adding it in the near future.
Am I the only bothered by the fact the steps require spending $50 plus on software for a video from a $35 computer used by hobbyists?
That’s why there are steps for Avidemux, It’s free.
What should I do if Avidemux doesn’t auto-populate?
And yes my name is also Gus, great to see other’s out there!!!
I couldnt’t play my video after saving. Is there anymore more to do in Avidemux ?
Thanks.
Hi Tejeet,
I have looked into this and fixed up my instructions.
When you go to File->Save->Save Video make sure you save the video with a file extension (.mp4). Eg. I would save my video as timelapse.mp4
Hope this helps, let me know if you’re still having trouble!