In this tutorial, we take you through the steps on how to take screenshots on the Raspberry Pi.
It’s pretty straightforward but keep in mind this process may vary depending on the operating system you’re using. This guide assumes you’re using the latest version of the Raspberry Pi operating system.
There are many reasons why you might want to screenshot on the Raspberry Pi. It can make explaining an issue you’re having a lot easier. You also might want to do it as part of some Raspberry Pi how-to tutorials.
In this tutorial, we will make use of a software package called Scrot. This package is a screen capture software that makes taking screenshots incredibly easy. It’s a command line tool but you can easily hotkey it to a key on the keyboard or even add it to the menu on Raspberry Pi OS.
Equipment List
If you are curious, this is the list of equipment that I made use of for this Raspberry Pi screenshots tutorial.
Recommended
Optional
- Raspberry Pi Case Amazon
Installing the Scrot Software
In the latest version of Raspberry Pi OS, Scrot is already installed, so you’re able to skip this installation process. If you’re unsure, then you can easily check and install if it isn’t already on there.
1. If you’re on an older version of Raspberry Pi OS and unsure if Scrot is installed or not, then you can run the following command to check.
scrotCopy2. If the operating system responds with “command not found” then you will need to install Scrot. To do this, run the following command.
sudo apt install scrotCopy3. That’s all you need to do to get the software installed. You can confirm that it is working correctly by typing the following command.
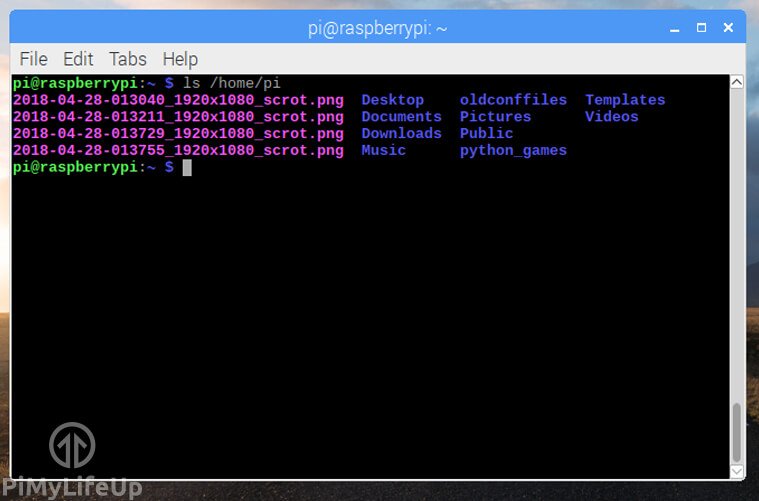
scrotCopy4. If no error occurs, then you can safely assume it’s working. You can also check the default folder, the home user directory.
ls ~CopyThe images will have the timestamp, resolution and lastly “scrot” at the end.
Next, I will go through the steps of some methods you may find handy for when you go to take screenshots on the Raspberry Pi.
How to take a Screenshot
The process of taking a screenshot is super easy, especially if Scrot is already pre-installed on the Raspberry Pi OS.
Using the Keyboard Hotkey
If Scrot is already installed, then you should find that the print screen button on your keyboard will take a screenshot.
You can test the keyboard shortcut by pressing the print screen button and then checking the ~ folder. If there are screenshots inside this folder, then the keyboard is working correctly.
Using the Terminal
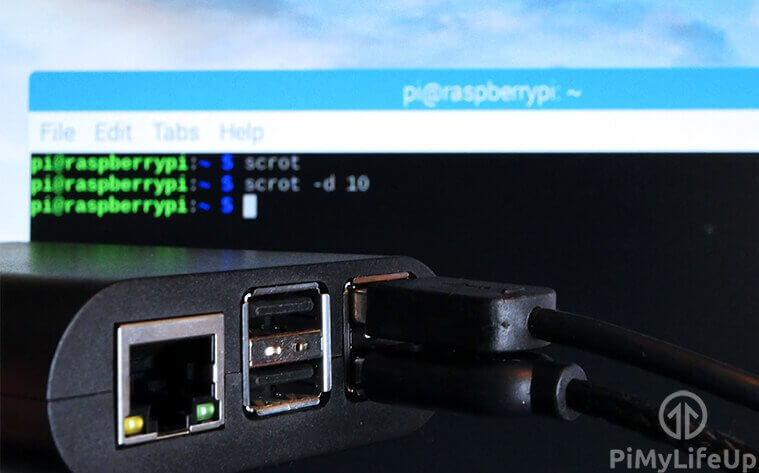
You can also use the terminal to trigger a screenshot event. To trigger a screenshot simply enter the following command in and hit enter.
scrotCopyTaking a Delayed Screenshot
There are times when you will need to add a delay to the screenshot action. For example, you can’t take screenshots while you have the menu open, so a delay works perfectly if you need to capture this.
In the terminal, enter the following command to take a screenshot after a ten-second delay.
scrot -d 10CopyYou can change the number to whatever delay you want it to be. Make sure you have -d before the number.
Change the Screenshot Save Location
You might want to set a custom name and location for the screenshot. It can be done by simply adding the location and name after the scrot command. For example, if I wanted to name a screenshot example and have it stored in the downloads directory, I would do the following.
scrot ~/Downloads/example.pngCopyAlways make sure you append the name with .png
That’s all you need to do for changing the screenshots location via the command line.
Mapping the Screenshot Command to the Keyboard
If the screenshot command isn’t already a hotkey, then you can add it with a bit of a change to the Pi’s configuration file.
To add a hotkey, you will need to add it to the lxde-pi-rc.xml file. You can open this file by running the following command.
sudo nano ~/.config/openbox/lxde-pi-rc.xmlCopyHere is an example of adding the print hotkey. You will need to add this to the keyboard section of the file. <keyboard></keyboard>
The following few lines will bind the scrot command to the print screen key on the keyboard. You can always change the command, so it has a delay or saves to a certain spot.
<keybind key="print">

<action name="Execute">

<command>scrot</command>

</action>

</keybind>Copy
Once you have made this change, save the file and exit by pressing ctrl x, y then enter.
Now enter the following command to have your changes be loaded in.
openbox –restartCopyYour screenshot key should now work whenever you press it.
Conclusion
I hope that this Raspberry Pi screenshots guide has shown you enough to be able to set your Pi up for screenshots. If you have run into an issue or notice a mistake in the tutorial, then please feel free to leave a comment below.


Excellent Post. Everything I was looking for and more. Thanks very much.