This project will show you how to run SerpBear on the Raspberry Pi.
SerpBear is an open-source and free tool that allows you to track how you rank for a particular keyword easily.
This tool even allows you to get notified when a change occurs for any chosen keyword allowing you to keep on top of how you are going. It even integrates with the Google Search Console to show you additional information, such as visit count and impressions.
The Raspberry Pi makes a fantastic place to set up SerpBear as it is a low-powered device that is relatively cheap to keep running 24/7.
Over the following sections, we will show you how to install and run SerpBear on your Raspberry Pi.
Equipment
Below you will find a list of the equipment we used when setting up SerpBear on the Raspberry Pi.
Recommended
Optional
This tutorial was tested on a Raspberry Pi 400 running the latest version of Raspberry Pi OS Bullseye.
Preparing your Raspberry Pi for SerpBear
We must set up some additional software to run SerpBear on the Raspberry Pi. The main software we will rely on to run SerpBear is Node.JS and Git.
Node.JS is the software that runs the SerpBear software, and Git is the one used to clone the code from its official package repository.
1. Before going any further, we should ensure that the package list and the packages themselves are the latest available versions.
You can update the package list and upgrade any out-of-date packages using the following commands.
sudo apt update
sudo apt upgradeCopy
2. Once the update completes, we can move on to installing the software we require to run SerpBear on our Raspberry Pi.
The only piece of software that we can install at this point is the “git” package. This package is used to grab the code for Serpbear from the official GitHub.
sudo apt install gitCopy3. Before continuing any further you will need to also have Node.JS installed.
Please follow our guide on installing Node.JS to the Raspberry Pi before continuing.
4. SerpBear requires a third-party service to grab results from Google and check how your domain name ranks for a particular keyword.
There is a variety of services, but for this guide, we will be personally using Scraping Robot. Other services supported by SerpBear are ScrapingAnt, SerpAPI.com, and proxy servers.
Both Scraping Robot and ScrapingAnt offer considerable free plans.
Sign up for one of these services and make a note of the API key, as you will need it later.
Installing SerpBear on the Raspberry Pi
Now that we have everything we need, we can install SerpBear on the Raspberry Pi.
Cloning SerpBear
1. Our first step is to clone the SerpBear code to our Raspberry Pi.
After installing the git package earlier, we can clone the code using the following command.
git clone https://github.com/towfiqi/serpbear.gitCopy2. Once git finishes cloning the code, you can change to the “serpbear” directory using the cd command as shown below.
cd serpbearCopyConfiguring SerpBear
3. To configure SerpBear, we need to generate some random strings that will be used for both encryption and the system’s API key.
Let us start by generating a 68-character long string that we will use for SerpBear’s encryption key. Save this, as you will need it in a couple of steps.
openssl rand -hex 34Copy4. With a nice random long string generated for our encryption key we can now generate one for our API key.
Generate a random 38-character string for SerpBears API key using the following command.
openssl rand -hex 19Copy5. We can now use the nano text editor to begin creating the “.env.local” file.
This file is where all of the configuration details are kept for SerpBear.
nano .env.localCopy6. You will want to enter the following lines within this file.
While typing in these lines you will need to replace several elements.
[PASSWORDHERE]– Replace this with a secure password that you will use to log in to SerpBear’s web interface.[SECRETEHERE]– Swap out this text block with the key that we generated in step 3.[APIKEYHERE]– Finally, replace this text with the API key generated in step 4.
USER_NAME=admin
PASSWORD=[PASSWORDHERE]
SECRET=[SECRETHERE]
APIKEY=[APIKEYHERE]
SESSION_DURATION=24
NEXT_PUBLIC_APP_URL=http://localhost:3000Copy
7. Once you have entered all of your data, you can save and quit by pressing CTRL + X, then Y, followed by the ENTER key.
Building and Running SerpBear on the Raspberry Pi
8. The last task we must complete before we can build and run SerpBear on our Raspberry Pi is creating a directory called “data“.
We can create this directory by using the following command within the terminal.
mkdir dataCopy9. For our next step, we must install any packages SerpBear requires to operate.
You can install all dependencies by running the command below.
npm installCopy10. Once all required packages have been installed, we can compile SerpBear.
To compile the software run the following command within the terminal.
npm run buildCopy11. Finally, let us run SerpBear for the first time. We will show you how to configure this to start at boot later in this guide.
Running SerpBear this way will allow you to view the logs in the terminal as you set up the software.
npm run start:allCopyAdding a Scraper to SerpBear
12. SerpBear on your Raspberry Pi works using a third-party service such as “ScrapingAnt” or “ScrapingRobot” to grab results from Google. The reason SerpBear uses these services is that Google will rate limit and restrict a connection when a large number of requests are made.
To set this, we must first access the SerpBear web interface. This is reachable by going to “localhost” or your Raspberry Pi’s IP address.
http://IPADDRESS:3000You can get the IP address of your Raspberry Pi by using the hostname command with the “-I” option.
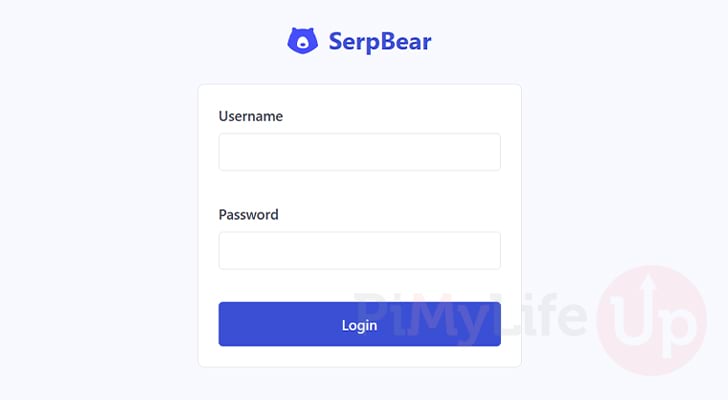
13. After browsing to the SerpBear web interface, you must log in to continue.
The username should be “admin“, and the password will be the one you set in the “.env.local” file we created earlier.
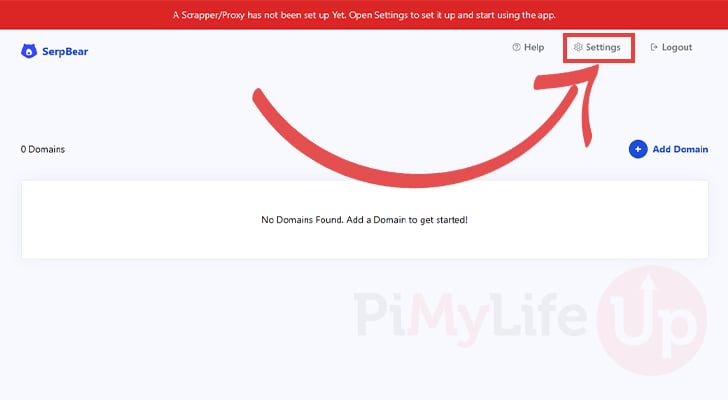
14. With SerpBear open, you will see a warning at the top of the page saying that you haven’t set up a “Scraper/Proxy“, which we will solve now.
Open the “Settings” menu by clicking “Settings” in the top menu bar.
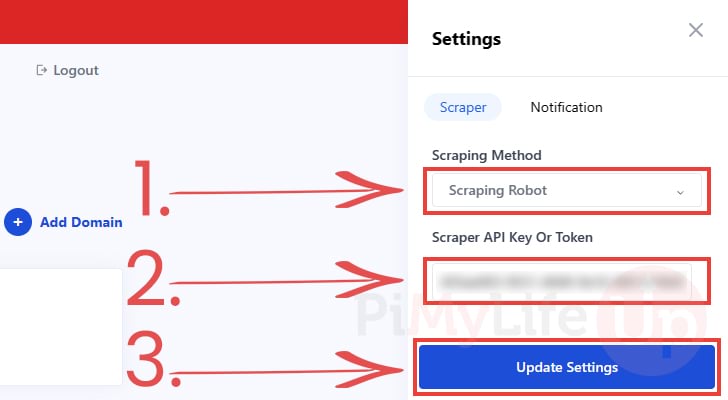
15. The settings panel will now open from the right side of the screen.
We must first set the “Scraping Method” (1.). In our case, we are using the Scraping Robot service, so we set the option to that.
Next, we set the API key we retrieved from the service we are using (2.). SerpBear needs this key to talk with the third-party service.
Finally, click the “Update Settings” button to confirm these changes (3.).
Setting up SerpBear as a Service on the Raspberry Pi
16. Returning to your terminal session to your Raspberry Pi, you can now temporarily stop the Serpbear server.
You can stop SerpBear by pressing CTRL + C on your keyboard.
17. Now that we have SerpBear configured, we should set it up as a service on our Raspberry Pi.
By setting SerpBear as a service, we can get it to start at boot. To achieve this, we will be installing another Node.JS module called “pm2“.
You can install this module by using the following command within the terminal.
sudo npm install -g pm2Copy18. We should also install the “pm2-logrotate” module. This module is used to rotate logs for services that are managed by the “pm2” module.
Install this module by running the command below.
pm2 install pm2-logrotateCopy19. Now that we have the “pm2” module, we can use it to start SerpBear on our Raspberry Pi.
To start up the core part of SerpBear, you will want to run the following command.
pm2 start npm --name "SerpBear" -- startCopy21. We also need “pm2” to start and manage the SerpBear cron manager. This script is used to check your keywords for updates continually.
You can start the cron module with “pm2” using the below command.
pm2 start npm --name "SerpBear Cron" -- cronCopy22. After starting the two modules, we need to save the changes by running the command below.
Saving allows “pm2” to start up SerpBear once your Raspberry Pi powers back on.
pm2 saveCopy23. We finally need to configure pm2 itself to start on boot so that it can begin running SerpBear on start-up..
To get “pm2” to generate the start up command, please run the command below.
pm2 startupCopyAfter running the above command, you should see something like the following appear in the terminal. You will want to copy and paste this line into the terminal and execute it.
sudo env PATH=$PATH:/usr/bin /usr/lib/node_modules/pm2/bin/pm2 startup systemd -u pi --hp /home/piCopyUsing the SerpBear Web Interface
Now that you have SerpBear installed and running on your Raspberry Pi, you will want to add your domain name and some keywords for the software to track.
In this section, we will walk you through how to put the SerpBear web interface to use.
1. First, ensure you are on the SerpBear web interface. If you have forgotten, you can access this by going to the following address in your web browser.
Ensure that you replace “IPADDRESS” with the IP belonging to your Raspberry Pi.
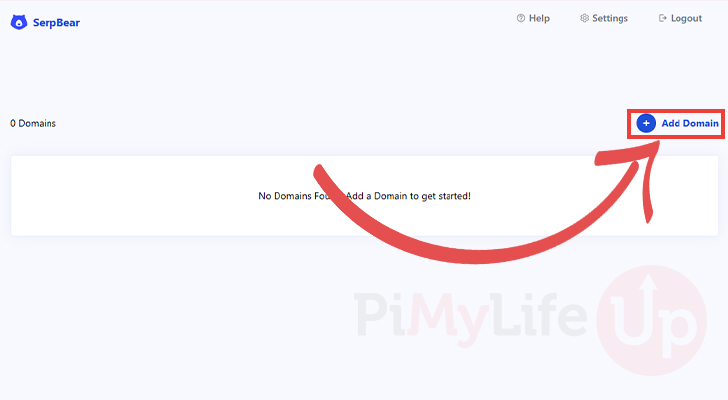
http://IPADDRESS:30002. Once you are back on the SerpBear dashboard, you must add a new domain to track.
To begin, you will want to click the “Add Domain” button.
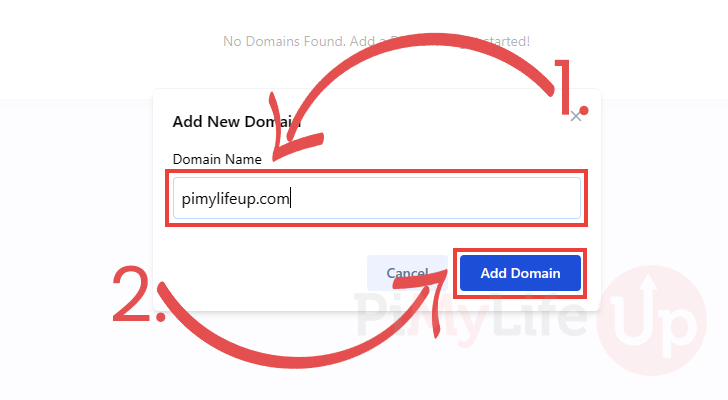
3. You will now be prompted to specify the domain name you want to track keywords for.
Type in a domain name (1.), then click the “Add Domain” button (2.).
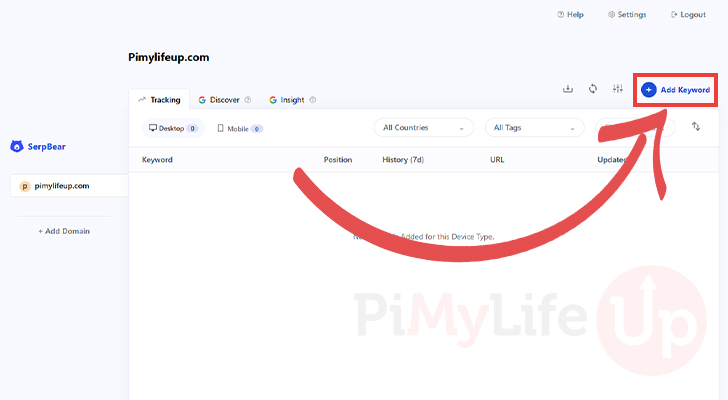
4. Upon creating a new domain, SerpBear will take you to a dashboard where you can see all keywords you are tracking for it. At the moment, this screen will be blank, like shown below.
To add a keyword to track, click the “Add Keyword” button.
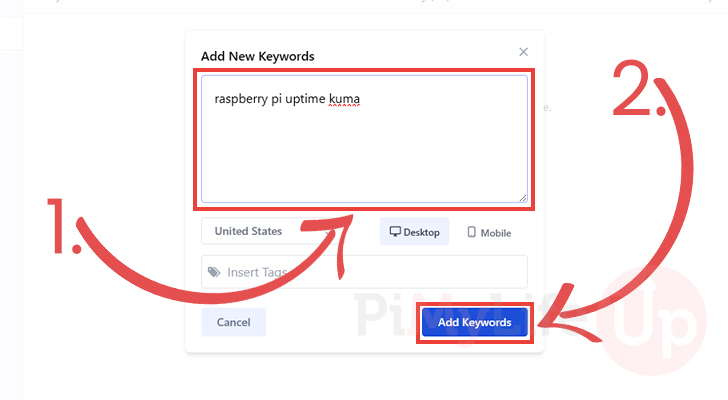
5. You can use the new popup screen to add new keywords (1.). In addition, you can add multiple keywords simultaneously. Just ensure each one is on a new line.
Using this screen, you can also control whether SerpBear should check Google’s “Desktop” or “Mobile” version and the particular country.
Once you are happy with everything, click the “Add Keywords” button (2.).
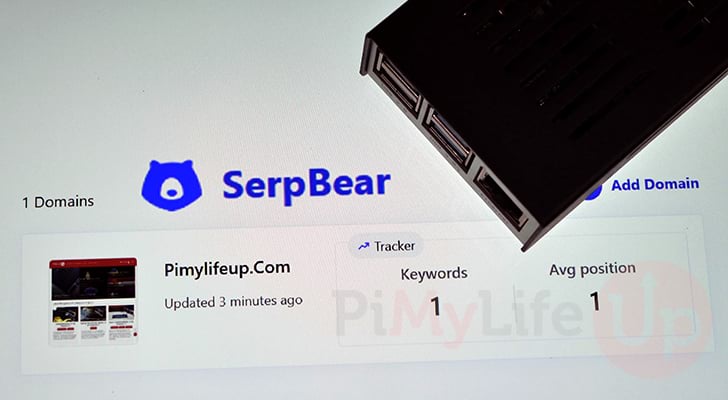
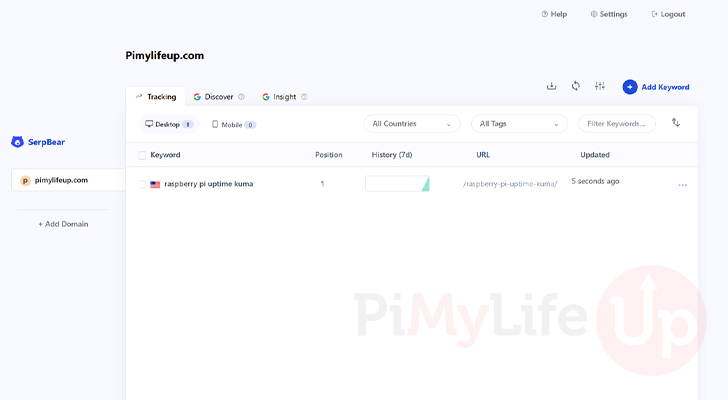
6. SerpBear will immediately begin tracking the keyword you just added to the dashboard.
Conclusion
At this point in the tutorial, you should now successfully have SerpBear set up on your Raspberry Pi and now tracking your keywords.
SerpBear is an excellent free software that allows you to track how your website is doing on Google. If you are only tracking a small number of keywords, then you can even get away with the free plans offered by services like Scraping Robot.
Please comment below if you have questions about getting SerpBear to run on your device.
If you enjoyed this tutorial, be sure to check out our many other Raspberry Pi projects.


Super helpful, thank you so much for writing this article!
Beautifully written. Comprehensive, easy to follow. I cannot imagine a way this article could be improved.
Thank you Damon, I really appreciate the kind feedback.
Kind regards,
Emmet
Hello. Thank you for the tutorial. I have questions:
1. Can it works on raspberry pi 3b+ ?
2. Can it works on another tipe of SBC, orange pi for example?
Thanks. Doni
Hi Doni,
This tutorial should work fine on a Raspberry Pi 3B+ it should also work on most competing SBC devices. As long as the devices specs are somewhat decent and it can run a Debian like operating system, then this tutorial should work fine.
Cheers,
Emmet