This guide will show you how to take a screenshot in Ubuntu.
The Ubuntu operating system comes with a variety of different ways that you can take a screenshot.
A screenshot is a photo of what is currently on your screen. Ubuntu allows you to take a screenshot of the entire desktop, a specific window, or an area you select.
Over the following few sections, we will be exploring how to take a screenshot using either the desktop app or keyboard shortcuts.
Of course, to take a screenshot in Ubuntu, you will need to use the desktop version. You should have a keyboard attached to your device for the easiest way to take a screenshot.
Taking a Screenshot in Ubuntu
There are two different ways that you can take a screenshot in Ubuntu. One is to use keyboard shortcuts, and one is to use the “Screenshot” application.
Taking a Screenshot using Ubuntu’s Keyboard Shortcuts
Let us start by exploring how to take a screenshot on Ubuntu using keyboard shortcuts.
Before we begin, we should note that when you use the keyboard shortcut, the image is automatically saved to the “Pictures” directory in your home folder. The file name will begin with “Screenshot” and include the date and time.
If a “Pictures” directory does not exist, it will be saved into the base of your home folder.
The keyboard shortcuts to take a screenshot are the following.
- PrtSc – Takes a screenshot of the entire Ubuntu desktop.
- ALT + PrtSc – This keyboard shortcut will take a screenshot of the currently selected window
- SHIFT + PrtSc – Takes a screenshot of a selected area. Click and drag to select the area.
If you only want the screenshot passed to the clipboard and not saved, then make sure you use CTRL alongside the other keyboard screenshots.
Now let us dive further into these screenshot keyboard shortcuts to give you a better idea of what each does.
Taking a Screenshot of the Entire Desktop
To take a screenshot of the entire Ubuntu desktop, you can press the “PrtSc” or “Print Screen” key on your keyboard.
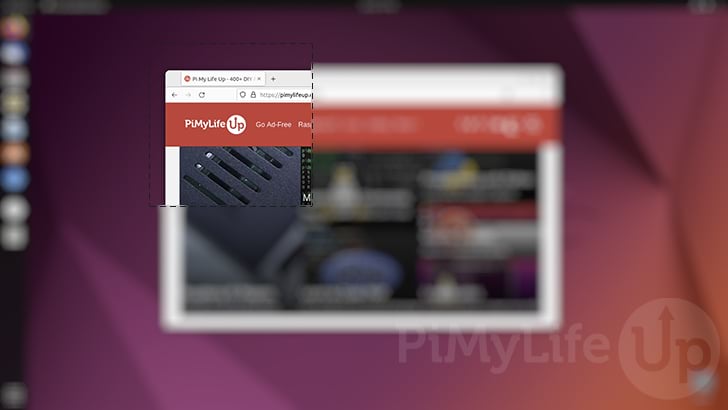
Remember that the “entire desktop” means that Ubuntu will capture everything currently on the screen, as indicated by our example below.

Taking a Screenshot of the Current Window on Ubuntu
You can take a screenshot of the currently selected window on Ubuntu by pressing ALT + PrtSc on your keyboard.
By using this keyboard shortcut, the operating system will take a screenshot of whatever window is currently active.

Taking a Screenshot of a Selected Area
The final way to take a screenshot using the keyboard is to press SHIFT + PrtSc. Using this keyboard combination, Ubuntu will allow you to select which area you want to screenshot.
Once you have pressed this keyboard combination, click and drag to set the area you want to screenshot. Once you unclick, that is the area that Ubuntu will grab.
Using the Screenshot App on Ubuntu
Alternatively, Ubuntu has a built-in app that you can use to take screenshots. This section will walk you through opening this application and its various options.
The following steps are for those who are running Ubuntu 22.04 and newer. However, the steps should be relatively the same for both past and future versions of Ubuntu.
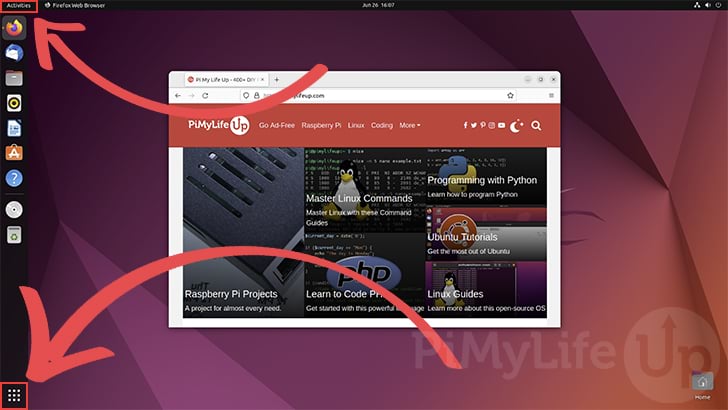
1. To get to the screenshot application you first need to open the activities screen.
You can open this by clicking either the top-left or bottom-right of your screen.
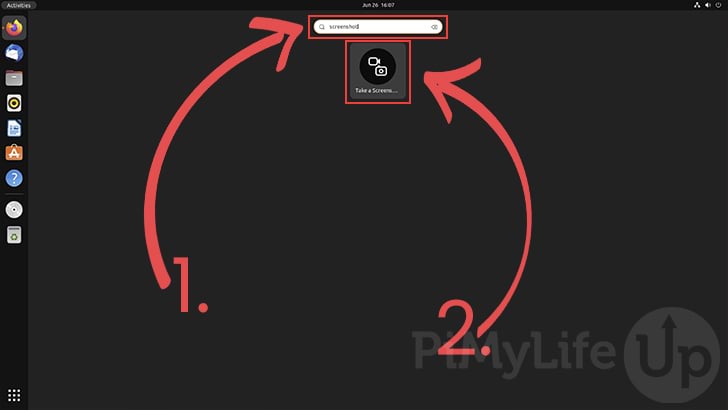
2. Within the activities screen, use the search bar at the top to search for “screenshot” (1.).
You should see an application called “Take a screenshot” or “Screenshot“. Once you see it, click the application to open it (2.).
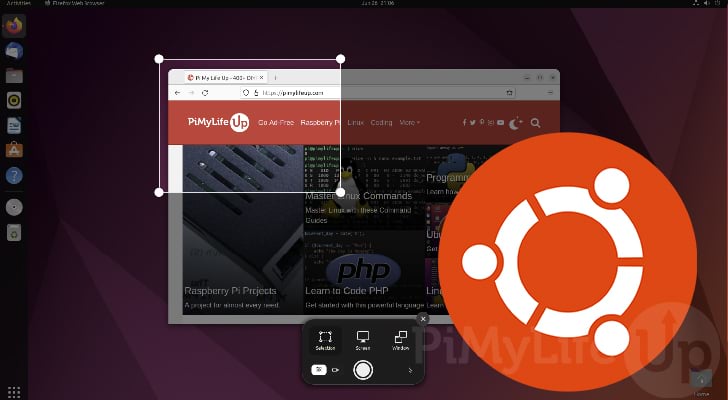
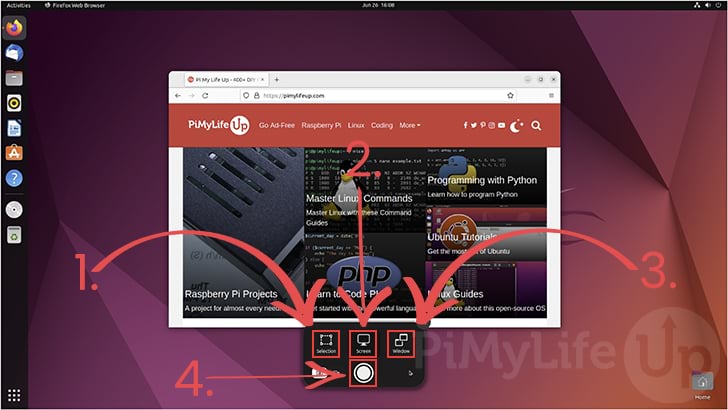
3. With the screenshot application now open on your Ubuntu device, let us run through the various options now available to you.
In Ubuntu 22.04, these options are displayed to you in an applet at the bottom of the screen. As you adjust these options, Ubuntu will adjust the screen to display what will be in the final screenshot.
- The “
Selection” option (1.) allows you to click and drag anywhere on the screen.
The selected area is what will be saved to your user’s pictures folder. - Using the “
Screen” option (2.), you can take a screenshot of the entire desktop.
This option is useful when you want to capture everything shown on your screen. - The final option available is the “
Window” option (3.).
Using this option Ubuntu can take a screenshot of the displayed window. This option will be grayed out if you don’t have any active windows.
When you want to take your screenshot you need to click the white circle at the bottom of the screen (4.).
4. After taking your screenshot, Ubuntu will save it to your current user’s “Pictures” directory if it exists, otherwise to the base of the user’s home directory.
Ubuntu will also copy it to the user’s clipboard, so you can copy and paste that screenshot if you want.
Conclusion
Throughout this guide, we have shown you a couple of different ways to take a screenshot within Ubuntu.
Thanks to built-in functionality, taking screenshots on Ubuntu is very straightforward. You can use the easy-to-use built-in app or handy keyboard shortcuts.
Please comment below if you have any questions about taking screenshots.
To learn more, please check out our many other Ubuntu guides. We also have other general Linux guides if you want to learn more general Linux tasks.