In this guide, we will be showing you how to set up a Proxy server on your Raspberry Pi using the Privoxy software.

Privoxy is a free and open-source non-caching web proxy that can filter and manipulate incoming data.
Using this software, we can set the Raspberry Pi up so that it can act as a proxy server for your web page data.
One of the bonuses of the Privoxy software is that you can filter and manipulate web page data before it reaches the web browser.
What this means is that you can even use Privoxy to act as an ad blocker for web browsers that don’t support software like uBlock.
Equipment List
Below you can find a list of equipment that we recommend for completing this tutorial on setting up your Raspberry Pi as a proxy server.
Recommended
Optional
For this tutorial, we were running the latest available version of Raspbian Buster running on a Raspberry Pi 4.
Installing Privoxy to the Raspberry Pi
In this section, we will be installing Privoxy to our Raspberry Pi. This software is what we will be using to turn our Raspberry Pi into a proxy server.
1. Before we install the Privoxy software to our Raspberry Pi, we need to update Raspbian’s existing packages.
We can do this by running the following two commands on the Pi’s terminal.
sudo apt update
sudo apt upgrade
2. Now we can install Privoxy by running the following command.
Installing Privoxy is simple as it is available from the Raspbian package repository.
sudo apt install privoxyAllow Other Local devices to Connect to the Proxy
Now that we have installed the Privoxy software, we can now go ahead and make some changes to its configuration to allow outside access to the proxy server.
By default, Privoxy is set up so only the local computer can access its proxy server.
1. To be able to configure the Privoxy software to allow outside connections we will have to modify its config file.
Begin modifying this file by running the following command.
sudo nano /etc/privoxy/config2. In this file, search for the following block of text.
This text is what defines what addresses Privoxy will listen on. At the moment its set to only listen on the loopback device.
By changing this to our replacement, we will be allowing any outside device to connect through the proxy.
Find
listen-address  127.0.0.1:8118
listen-address  [::1]:8118
Replace With
listen-address :8118Once done, save the file by pressing CTRL + X, followed by Y, then ENTER.
4. For our new changes to be loaded in, we need to restart the Privoxy service.
We can restart the service by running the following command.
sudo systemctl restart privoxyVerifying your Raspberry Pi Proxy Server is Working
Before beginning this section, we highly recommend that you make sure your Raspberry Pi has a static local IP address.
1. To be able to make use of Privoxy you will need to change your web browser to make use of your Raspberry Pi’s proxy server.
The method for this differs browser to browser, but below, we have some quick guides on where you can find the proxy settings for three different web browsers.
- In Chrome:
- Open the “
Settings” menu or go to “chrome://settingsin the address bar. - Scroll down to the bottom
- Click “Advanced” to open the advanced settings
- Scroll down until you see the “System” heading
- Click the “
Open your computer's proxy settings” button.
- Open the “
- In Firefox:
- Open up the
Optionsmenu or go to “about:preferences” in the address bar. - Scroll down to the bottom.
- Click the “
Settings...” button under the “Network Settings” heading.
- Open up the
- In Internet Explorer:
- Go to Settings.
- Click the “
Connections” tab. - Click the”
LAN settingsbutton. - Tick “
Use a proxy server for your LAN“.
2. Once you have found the proxy configuration page for the web browser that you are using, you will need to enter the following details.
The IP Address you set should be the IP for your Raspberry Pi. You would have retrieved this in the previous section.
For example, our IP address would be set 192.168.1.115.
The port should be set to 8118 as this is the port Privoxy will be listening on.
3. Once you have configured your proxy settings to point to your Raspberry Pi, go ahead and go to the following address.
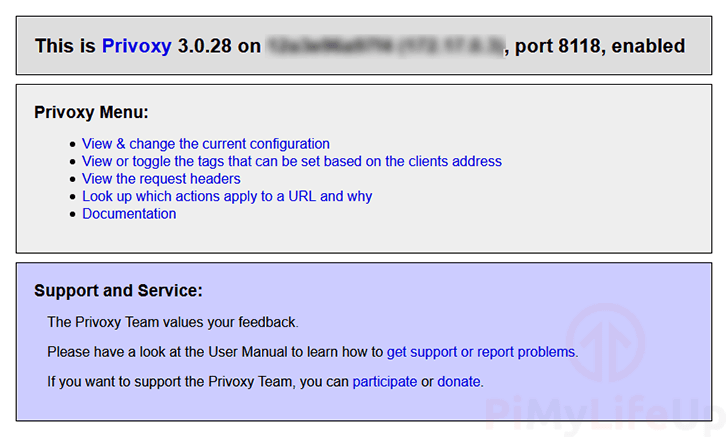
http://config.privoxy.org/4. If everything is working, you should be greeted by the screen below.
If you are greeted by a message saying “Privoxy is not being used“, you will need to double-check that your proxy settings are correct.
At this point, you should now have successfully set up your Raspberry Pi to act as a proxy server by using the Privoxy software.
If you have run into any issues with getting the software to work, you can drop a comment below.


Thanks Emmet – that fixed the problem! The only thing I did differently is set the http proxy on the host Raspberry Pi as well. I guess it could be done by changing IP Tables as well but iI just used ‘export http_proxy=”http://127.0.0.1:8118/”
On my Mac, I ticked both http and https boxes on the proxy settings and removed the FTP tick.
Finally the privoxy.org/config does not work so I ticked the debug option on the conf file to 1 and then checked the privoxy logfile on /var/logs/privoxy to see the requests.
Finally, I added a VPN to my raspberry pi (using openvpn) and now its set up as a vpn proxy server!
Thanks for the quick response!
Very well written tutorial – thanks. Unfortunately after I followed it to the letter, I was not able to get Privoxy to work. I am using a Raspberry Pi as the proxy server and a Mac to test the proxy using Chrome/Safari. Any pointers will be appreciated
Hi Manish,
I have made some corrections to the tutorial and it should now be working fine.
All you need to do is follow the steps under the “Allow Other Local devices to Connect to the Proxy” section again.
Cheers,
Emmet