In this tutorial, we will be showing you how to set up your very own Raspberry Pi Minecraft Bedrock server. This project is a cheap way of providing you with an always-on, Bedrock capable server.
This setup stops you from having to leave your phone or computer online if you want others to be always able to access your world. The Pi is also pretty good on power usage so you can save on your power bill too.
For this tutorial, we will be making use of the Nukkit software. We decided to utilize Nukkit since we found that it was one of the most stable Minecraft Bedrock servers currently available that will run on a Raspberry Pi. While still not feature complete, it is still fairly actively developed.
Please note there are some serious drawbacks when comparing this against the Vanilla bedrock server. However, it sadly isn’t currently possible to run the vanilla server on a Raspberry Pi.
If you’re after a server for the Java version of Minecraft, then you should check out our previous tutorial that shows you how to set up a spigot Minecraft server.
If you would like to know more about the server software, then you can find out more about it on the Nukkit website.


Equipment List
The following pieces of equipment are what I recommend for completing this Raspberry Pi Minecraft Bedrock server.
Recommended
- Raspberry Pi Amazon 3 or newer
- Micro SD Card Amazon
- Ethernet Cable Amazon or Wi-Fi Amazon
- Power Supply Amazon
Optional
- Raspberry Pi Case Amazon
We last tested this tutorial on a Raspberry Pi 5 that was running the latest version of Raspberry Pi OS Bookworm.
Setting up your Raspberry Pi Minecraft Bedrock Server
In this tutorial, we will work entirely within the terminal. In fact, it is best to change the boot mode of the Raspberry Pi, so it boots directly into the terminal for the Minecraft Bedrock server.
You can also install Raspberry Pi OS Lite, so you don’t install any of the additional packages that come with the full version of Raspberry Pi OS; make sure you install Java, as we will need that.
Minecraft servers are hugely demanding on the Raspberry Pi’s hardware, so every extra bit of resources made available to it, the more it can handle. It’s important to keep this in mind before installing any additional software packages that may drag the performance down.
Preparing your Raspberry Pi
1. Before setting up the Minecraft Bedrock server on our Raspberry Pi, there are a few things we need to prepare. Let’s start by updating our Raspberry Pi’s existing packages to their latest versions using the following two commands.
The first command updates the package list cache, and the second uses this updated cache to upgrade any out-of-date packages.
sudo apt update
sudo apt upgrade -yCopy
2. With your Raspberry Pi updated, we only need to ensure that the two packages are installed for us to be able to install and run the server.
Use the command below to install the wget tool as well as the default JDK package. The JDK package is the most important of the two as it is what will install the Java runtime on to our Raspberry Pi.
The Nukkit server, which we rely on to set up a Minecraft Bedrock Server on our Raspberry Pi, is written in Java and requires this runtime to function properly.
sudo apt install wget default-jdkCopyInstalling the Minecraft Bedrock Server on the Raspberry Pi using Nukkit
3. Now that we have all the packages, we need to set up the Minecraft Bedrock Server, let us move on to creating a place to store it on our Raspberry Pi.
Create a directory within your current user’s home called “nukkit” by using the mkdir command.
mkdir ~/nukkitCopy4. Once the directory has been created, change to it by using the cd command.
cd ~/nukkit5. At this point, we can now download the latest version of Nukkit to our Raspberry Pi by using the following command in the terminal.
PetteriM1 develops the build of Nukkit we are using. This includes some additional improvements not available in the main Nukkit branch, and also features an easy-to-obtain build that we can rely on.
wget -O nukkit.jar https://github.com/PetteriM1/NukkitPetteriM1Edition/releases/latest/download/Launcher.jarCopyInitial Run of Nukkit
6. With Nukkit now downloaded to our Raspberry Pi, we can run it, which will generate all the necessary files to further configure the server.
Running Nukkit is incredibly easy, we can run it with the following simple command.
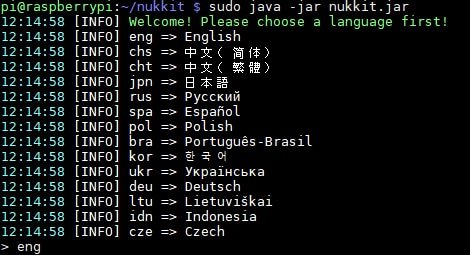
java -jar nukkit.jarCopy7. Upon running the server for the first time, you will be asked to choose a language, for this tutorial we will be using English. Therefore, we typed eng into the console and pressed enter.
8. The server should immediately begin booting up, and when it is ready to be connected, it should display the following text.
[INFO] Preparing level "world"
[INFO] Starting GS4 status listener
[INFO] Setting query port to 19132
[INFO] Query is running on 0.0.0.0:19132
[INFO] Default game type: Survival Mode
[INFO] Done (3.109s)! For help, type "help" or "?"
9. While you can now begin to play on your server, you might want first to configure it, so it is set up more to your liking. To do this, first, stop the process by pressing CTRL + C.
Configuring your Minecraft Bedrock Server on the Raspberry Pi.
10. The Minecraft Bedrock Server we are using on our Raspberry Pi actually generates two different configuration files.
a. The first configuration file controls how the Nukkit software operates. With this, you can control aspects such as the seed used for generating a world, the number of chunks to be sent, and similar settings.
Most users will probably not need to edit Nukkit’s configuration file, but if you want to take a look, you can begin editing by running the following command in the terminal.
nano ~/nukkit/nukkit.ymlCopyb. The other configuration file that Nukkit generates when it first starts is the one that controls the Minecraft Bedrock server game settings. With this you can control various options such as whether PVP should be enabled, what game mode to use and more.
You can edit the Minecraft server properties by using the command below in the terminal.
nano server.propertiesCopy11. Once you have finished making your changes to the configuration files, make sure you save them by pressing CTRL + X then pressing Y and then ENTER.
12. Afterwards, you can immediately proceed to start up Nukkit again by typing in the following command:
However, if you plan on running a Minecraft Bedrock Server on your Raspberry Pi for the long run, we recommend skipping down to our section on getting the server to start at boot.
java -jar nukkit.jarCopyStart the Bedrock Server at Boot
13. To enable our Bedrock server to start at startup, we will need to create a service for it.
Let’s begin writing this service by running the command below.
sudo nano /lib/systemd/system/minecraftbedrockserver.serviceCopy14. Within this file, add the following text. This text defines the service and tells the service manager what file to run.
Ensure that you replace “<USERNAME>” with your username. For example, if your username is “pi” you would replace the text with that.
[Unit]
Description=Minecraft Bedrock Server

[Service]
User=<USERNAME>
Group=<USERNAME>
Restart=on-abort
WorkingDirectory=/home/<USERNAME>/nukkit
ExecStart=/usr/bin/java -jar /home/<USERNAME>/nukkit/nukkit.jar

[Install]
WantedBy=multi-user.targetCopy
Once you have entered in all the data, you can save the file by pressing CTRL + X then Y followed by ENTER.
15. Now that we have created our new service, we need to enable it by running the following command.
sudo systemctl enable minecraftbedrockserver.serviceCopy16. Let’s go ahead and start up our Pi’s Minecraft Bedrock server with the command below.
This command instructs the service manager to start our newly created service.
sudo systemctl start minecraftbedrockserver.serviceCopy17. To check the status of the Bedrock server service, use the command below.
sudo systemctl status minecraftbedrockserver.serviceCopy18. If you ever have the need to stop your Bedrock server, all you need to do is run the following command.
sudo systemctl stop minecraftbedrockserver.serviceCopy19. Finally, to stop the server from being automatically started when your Raspberry Pi turns on, you will want to disable the service.
sudo systemctl disable minecraftbedrockserver.serviceCopyConnecting to your Minecraft Bedrock Server
If you’re on a local network, connecting to the Raspberry Pi Minecraft Bedrock server will be easy. To test out our recently set-up server, we will need to do the following.
20. If you don’t already know the IP address of your Raspberry Pi, one of the easiest ways to get it is by using the “hostname” command within the terminal.
The first IP address returned by this command will be the local IP assigned to your Pi.
hostname -ICopy21. Now load up Minecraft on a Mobile Phone, a Windows PC, or console that is located on the same local network as the Raspberry Pi.
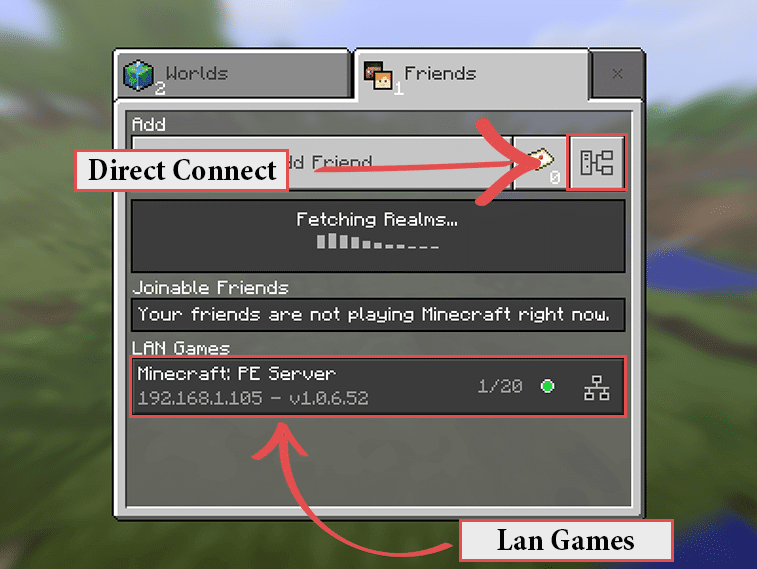
22. Go to the friend’s tab and then your server should pop up at the bottom under LAN Games. If it doesn’t simply go to direct connect and enter the IP we got earlier on the Pi using the hostname command “hostname -I“.
We have highlighted the direct connect button in our screenshot below.
23. If you want to allow access to the Minecraft Bedrock server via the internet, then you will need to set up port forwarding or use a service like Tailscale or Pangolin.
You will need to port forward the port 19132 (Unless you change it in the server properties) to the local IP address of your Raspberry Pi. Keep in mind that opening ports always increases the security risk from outside sources.
For more information, check out our port forwarding guide for the Raspberry Pi.
Updating your Minecraft Bedrock Server
1. The Nukkit server we rely on is updated relatively often to maintain support for the latest versions of Minecraft Bedrock. Luckily, the update process is relatively straightforward.
You can verify whether a new release is available by checking the Nukkit GitHub releases page.
To update your Raspberry Pi powered Minecraft Bedrock Server, you will first have to make sure you are in the correct directory by running the following change directory command.
cd ~/nukkitCopy2. Now, before we can update the server, we must temporarily stop it. If you have used the service that we wrote earlier in the guide, you will be able to stop the server by running the following command in the terminal.
sudo systemctl stop minecraftbedrockserver.serviceCopy3. Within this directory, we simply need to redownload the latest available Nukkit binary from their GitHub.
Run the following command to download the latest build of Nukkit to your Raspberry Pi.
wget -O nukkit.jar https://github.com/PetteriM1/NukkitPetteriM1Edition/releases/latest/download/Launcher.jarCopy4. Once the download is finished, you should now have the latest available version of the Nukkit server.
You can then start your server again by running the following command.
sudo systemctl start minecraftbedrockserver.serviceCopyConclusion
Hopefully, by now, you should have a fully operational Raspberry Pi Minecraft Bedrock Server.
While we aren’t able to use the official release of the server on our Pi, the Nukkit software at least gives us a decent solution.
If you come across any issues or have some feedback related to this tutorial, then please don’t hesitate to leave a comment below.
If you liked this tutorial, be sure to check out our many other Raspberry Pi projects.


how do i get back to command line after making the startup service? I cant seem to figure it out.. thanks
Hi Zane,
As mentioned within the tutorial, you can save and quit out of the service file you created using Nano by pressing CTRL + X, Y, and then ENTER.
This should return you to your existing terminal session.
Kind regards,
Emmet
thank you for the tutorial. It has been working great.
I have set up the server, and for it to run on boot. Which has been great! But after it is run on boot, how do i get to its command line like in step 7. I am able to get to it if I stop the service and run the jar file. But if I run the jar file while the service is running it doesnt work.
Hi Zane,
Hmm that is something I didn’t really cover to well with this implementation. You would need to adjust the service so that it runs the BEdrock server within a “screen”.
I have noted it down for me to take a look into re-writing the tutorial to include it but that might be a little while off. If you want to tackle this yourself, you can always look at how we achieve it on generic Linux with the normal Minecraft server (https://pimylifeup.com/minecraft-server-linux/)
Kind regards,
Emmet
How can I update this? or find out when an update is available? Looks like it isn’t working with the latest clients at 1.21.93
Hi Joe,
Please follow the section titled “Updating your Minecraft Bedrock Server”. This will walk you through the process of updating your Minecraft bedrock server to the latest release of Nukkit.
Additionally, I have actually changed the releases we use to a different one that is more actively maintained. Additionally it has key features such as mob spawning built-in, something that was critically missing from the main branch of Nukkit.
You can check whether a new release is available by checking PetteriM1’s GitHub page.
Kind regards,
Emmet
How do you stop the server once you’ve set up ‘mcbedrock.service”? Trying to make changes to optimize server to run decently on a zero 2 w but can’t seem to properly open ‘server.properties’
Hi Cohen,
Whoops that is definitely something I sohuld have included in the tutorial and I have updated the end stop to mention the stop command. In particular you would use “
sudo systemctl stop minecraftbedrockserver“.When it comes to editing the “server.properties” file, I’m not exactly sure what could be going wrong here. Is there any errors or anything that is occuring? The software we are relying onto get the Minecraft Bedrock server running on the Raspberry Pi can be a bit finicky.
Kind regards,
Emmet
Is the update link still up-to-date?? it doesn’t appear to be so
Hi Eduard,
It looks like the Nukkit team made some key changes to where new releases are served from. I have made some changes on our end so it should now pull the latest available version that they offer.
Kind regards,
Emmet
I got this working on my Pi to replace a windows server on an old PC. Configuration of the Nukkit server is a little more complex than the official bedrock server with the requirement to download plug-ins to make it equivalent. Unfortunately it seems there is a limitation with Nukkit currently that might be an issue for some people. If you join from a console additional split screen players arnt supported by Nukkit. If a 2nd player on the same console tries to join their screen hangs on the spawning world and the player doesn’t appear in the server window. This is a shame as it would have been nice to put this on the Pi but its not usable for me currently without it unfortunately.
This looks like a great tutorial. Before I jump in on my Pi5 and build this, can you tell me if the server saves its configuration, or does every “restart” create a blank world. My nieces will kill me if I build them a server that wipes all their work after a power failure 🙂 Cheers Mark !
Hi Mark,
From memory the server automatically saves every so often, I can’t remember how often it occurs though. You can always verify this by hopping in a world, deleting a few obvious blocks and then simulating a power failure.
You could always use something like the PiPower UPS if you wanted to help prevent data loss due to a power failure.
Kind regards,
Emmet
Start the Bedrock Server at Boot, step 2: It’s important to include here that the user, group and paths need to be relevant to the user. It may not necessarily be “pi”. I found this out the hard way. (n00b to linux)
Hi Julian,
Apologies for that and thank you for letting me know. I have updated the tutorial to reference the need to put in your own username.
Kind regards,
Emmet
What is the best way to uninstall this server from my pi4? I would like to start over and have a clean install.
Hi Ryan,
Uninstalling the Minecraft Bedrock server from your Raspberry Pi should be as simple as using the following commands.
First you will want to disable the bedrock server service.
Next, ensure that the server is stopped by using the following command.
We can now remove the service file to return your Pi back to when the service wasn’t created.
Finally, all you need to do is delete the Nukkit directory by using the command below.
Let me know if this works for you.
Cheers,
Emmet
Hi
I can not update my server using the link
Can the update link changed?
Thanks!
Hi Iain,
Thank you for bringing up this issue.
I have updated the link so that it will now point to latest version of Nukkit.
Cheers,
Emmet
hello I did everything exactly as in the instructions but when I enter
https://ci.opencollab.dev/job/NukkitX/job/Nukkit/job/master/lastSuccessfulBuild/artifact/target/nukkit-1.0-SNAPSHOT.jaralways comes error 404 not foundHi Sebastian,
It looks like the NukkitX team has changed where the latest snapshots are stored. I’ve updated the download link so it should work again.
Cheers,
Emmet
Can I put the existing world to server? Thanks
Hi VojazCZ,
Sadly not. From what I understand, the server software we are using uses its own saving format for the world.
Cheers,
Emmet
tried loads of different server tutorials and none worked except this one but realised it was a nukkit server and wouldn’t have any mobs i have found a mob plugin but how do i install plugins?
Hi it’s running well on an RPi4 8GB, except I spawned in a deep cavern and had to dig a stair with my hands in the dark!
One oddity, I can’t seem to crsft a torch with charcoal, the mini craft and the crafting table want coal. Is this so, or just me?
Hi,
When will the Nukkit server be updates to 1.16.201?
The kids are nagging me to get it done.
Thanks
Hi Keri,
You can try the following experimental build instead which is meant to have support for 1.16.200 however it is apparently buggy and users may run in to random disconnects.
Cheers,
Emmet
Hi, i am from india and i have succesfully made a mcpe server on an orange pi pc using this guide…….. I am thankful also, but i had a small problem here……..when the electricity is suspended several times, the “level.dat” file in the world folder gets automatically converted into an empty text document……
Here are my specs :-
1.orange pi pc 1 gb ddr3 ram , 1.6ghz quad-core allwinner H-3 processor.
2.terabyte usb wifi adapter (the cheap ₹300 one…..)
Pls do reply soon, and thanks for this guide works in 2020 as well!!
Keep up,
BLUE TANUJ YT
Hi Blue,
Sadly there is not a lot you can do about this, the sudden power off will likely be causing the data to be corrupted.
The only solution would be to purchase a UPS and have your Raspberry Pi be connected to that. However that is not a cheap option.
Cheers,
Emmet
I want to expand on Emmet’s comment
A UPS for a Raspberry Pi can be very inexpensive as you can just use a battery powerbank, but it needs to have the feature that it can charge and supply power at the same time. Usually one that has this feature, will have it on the box.
Another option is to use something like the PiJuice, which has a battery in it, and has other features like letting your raspberry pi know that it’s battery will run out so the raspberry pi can shut down safely. This is a more elegant solution, but it wil probably cost a little more.
Thanks for the tutorial – that’s worked brilliantly. We’ve noticed a few quirks when playing on the server. Some items can’t be placed – you can have them in your inventory but when you try and place them, they just pop straight back into your hand. So far we’ve found it to be a problem with wooden signs, barrels and looms, but there are probably others. Could that be related to plugins? I’ve only added the MobPlugin so far, so we’d have mobs and animals. Might it need something else added? Also we seem to have stopped having nights in the game – it’s permanently daytime. We got nights to start with but they’ve stopped. I’ve tried rebooting, and restarting the Nukkit server, but made no difference. Last oddity is that I’m never getting hungry! Other players do need to eat, but my food is permanently full. Any ideas on any of those? Thanks!
Hi Graham.
Sadly this may be a problem with Nukkit itself.
I am considering rewriting this tutorial to use an alternative solution that seems to be more actively developed. I just need to test how the performance is on a Raspberry Pi.
Cheers,
Emmet
Hi there Graham,
Seems like its due to the wrong gamerules……
Here is what u can try:-
1. Firstly, get yourself the operator permission by either from the terminal on your picture or get the “op password” plugin from nukkitx…
2.type and change the following to true:-
1. /gamerule dodaylightcycle true
2. For Hunger I don’t know what is the command called but type “/gamerule” and you will get a lot many commands just check which one works out for you….
Hopefully this should help you
CIA,
BLUE TANUJ YT
When I type java -jar nukkit.jar into the console, it says the jarfile nukkit.jar can’t be accessed. What should I do?
Hi Scott,
That seems odd. I just tested the guide then and everything seems to be wokring as intended.
Are you sure you have downloaded the file using step 11 of the tutorial? That error message is typically shown when the file doesn’t exist or tyhe user doesn’t have permission to access it.
Using the following command you should be able to see if the file exists within the
nukkitdirectory we create during the guide.do “cd nukket” first