In this guide, we will be showing you how to install and run Minecraft on your Raspberry Pi.
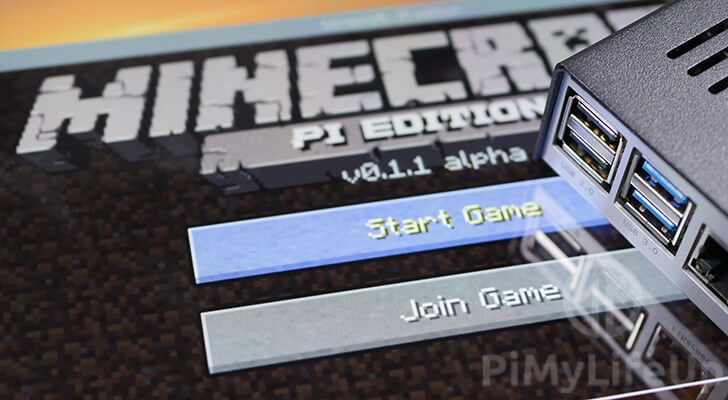
You will be installing a special version of Minecraft that has been built just for the Raspberry Pi. This version of Minecraft is called “Minecraft Pi Edition“.
This version is much older than the current release of Minecraft. However, it has one advantage, and that is that it’s completely free. Also, this version of Minecraft also comes with a Python library that allows you to interact with the game world.
There are a few things you should know about this version of Minecraft that was built just for the Raspberry Pi.
- It uses the old game world format, meaning the world has a maximum size of 256 x 256 x 128 blocks.
- The game mode is creative only, so there is no crafting in this version of Minecraft
- There are no mobs in this version
Despite these drawbacks, this is still an interesting version of Minecraft to try out on your Raspberry Pi. It is also a great way to explore programming by interacting with the game world using Python.
If you want to run a server for your retail version of Minecraft, then be sure to check out our Minecraft server guide.
Equipment List
Here is a list of the equipment we recommend for this tutorial on installing Minecraft on your Raspberry Pi.
Recommended
- Raspberry Pi Amazon 1, 2, 3 or 4
- Micro SD Card Amazon
- Power Supply Amazon
- Ethernet Cable Amazon or Wi-Fi Amazon
- HDMI Cable Amazon
- USB Keyboard Amazon
- USB Mouse Amazon
- Monitor Amazon
Optional
- Raspberry Pi Case Amazon
Installing Minecraft for your Raspberry Pi
In this section, we will show you how to install the Minecraft Pi Edition to your Raspberry Pi.
1. Luckily for us, Minecraft Pi Edition has been made available in the Raspbian package repository.
The first thing we need to do is update and upgrade all existing packages by running the command below.
sudo apt update
sudo apt upgrade
2. Once the packages have been updated, we can now proceed with this guide.
Run the following command to install Minecraft Pi Edition to your Raspberry Pi.
sudo apt install minecraft-piThis command will install both Minecraft and the Python libraries needed to interact with it.
Running Minecraft on your Raspberry Pi
Running Minecraft Pi Edition on your Raspberry Pi is a simple process.
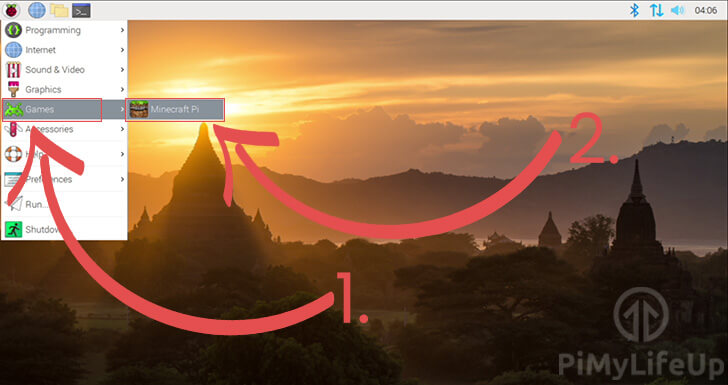
1. To launch Minecraft, you need to click the Raspberry Pi icon in the top left-hand corner.
2. Next, you need to hover over the “Games” sub-menu, then click “Minecraft Pi“.
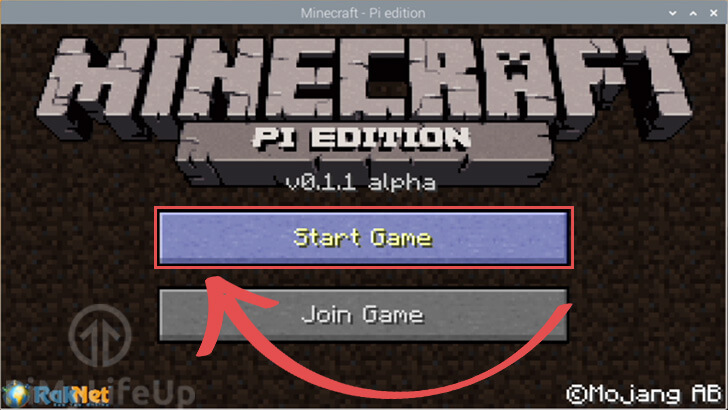
3. You should now have Minecraft Pi Edition loaded up on your Raspberry Pi.
To start a game, all you need to do is click the “Start Game” button.
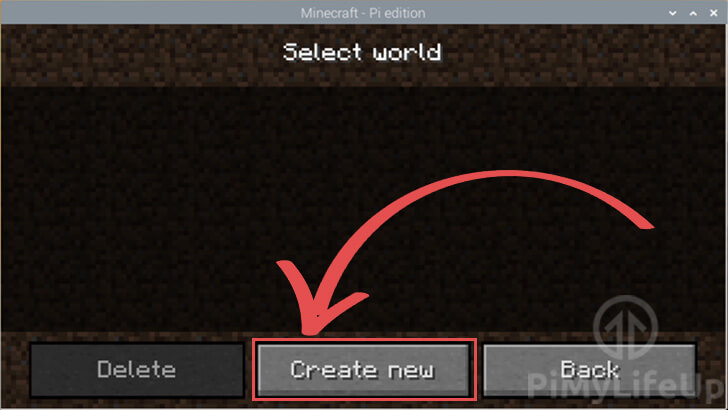
4. Within the next menu, you need to create your first world by clicking the “Create new” button.
5. Once the world has finished generating, you spawn immediately into it.
In the next section, we will show how you can use Python to manipulate the game world.
Interacting with Minecraft through Python
One of the coolest features of Minecraft Pi Edition is the API that it has built-in.
In this section, we will be showing you how you can use Python to interact with Minecraft Pi Edition.
If you would like to get a better understanding of Python before continuing, then be sure to check out our Getting Started with Python guide.
1. Let’s start by creating a pretty simple Python script.
Within this script, we are going to send a message to the running Minecraft client.
Using the terminal, we can begin writing our Python script by running the following command.
nano minecraft.pyFor this guide we will be using the nano text editor to write our code. However, feel free to use a dedicated code editor such as Visual Studio Code.
2. To start this script, we must first import the Minecraft Python library.
This library is what we will be using to interact with the game client.
Add the following line to import the minecraft module from the mcpi library.
from mcpi import minecraft3. With the module imported, we need to create a connection to the game client.
We do this by using the minecraft libraries Minecraft.create() function and storing the result in a variable called “mc“.
mc = minecraft.Minecraft.create()4. Using the object we stored in our mc variable, we can make calls to the game client.
The function that we are going to use for our example is the .postToChat("TEXT HERE") function.
What this function allows us to do is post text into the chat.
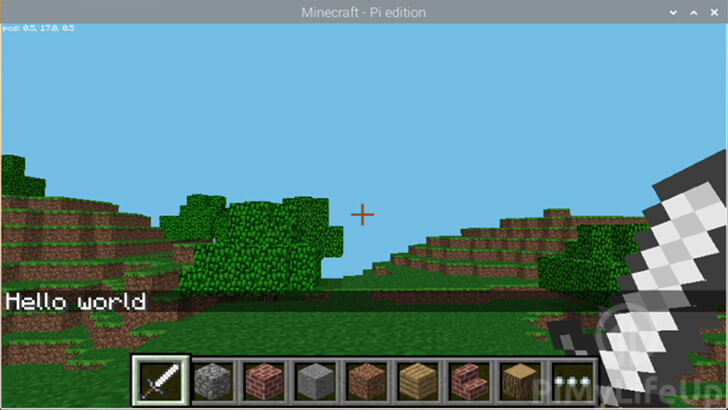
mc.postToChat("Hello World")This bit of code is one of the simplest ways of interacting with Minecraft on your Raspberry Pi.
5. The final version of your code should end up looking just like what we have below.
from mcpi import minecraft

mc = minecraft.Minecraft.create()

mc.postToChat("Hello World")
Once the code has been entered, save the file by pressing CTRL + X, then Y, followed by ENTER.
5. Let’s go ahead and now run our little Python script.
python3 minecraft.pyAfter you have run the script, you should see the text “Hello World” appear within the game.
Various Functions of the Minecraft Python API
In this section, we will explore some of the other functions that you can use to interact with Minecraft from your Raspberry Pi.
Find the Position of the Player
Using the Minecraft Python API, we can retrieve the x, y, and z position of the player.
To find the location, we can use the following line in Python.
pos = mc.player.getPos()The pos variable will now store the player’s position. You can access the three positions by using pos.x, pos.y, and pos.z.
If you would prefer to store the positions as three separate variables, then it is also possible to do that by doing the following.
z, y, z = mc.player.getPos()This method makes use of Pythons unpacking functionality to pull out the values to our x, y, and z variables.
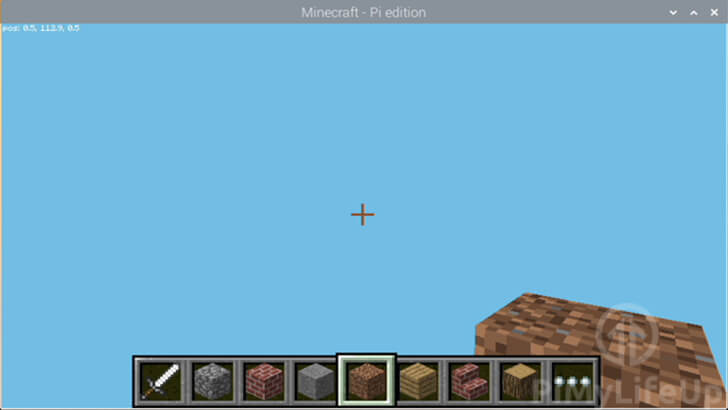
Teleporting the Player
You are also able to teleport players by making use of the API.
To do this, we will be making use of the player.setPos(x, y, z) function.
Below you can see how we use both the .setPos(x, y, z) and .getPos() functions to teleport the player vertically in the game world by 50 blocks.
x, y, z = mc.player.getPos()
mc.player.setPos(x, y+50, z)
After running a script with these two functions, you should see the player appear in the air then fall back down to the ground.
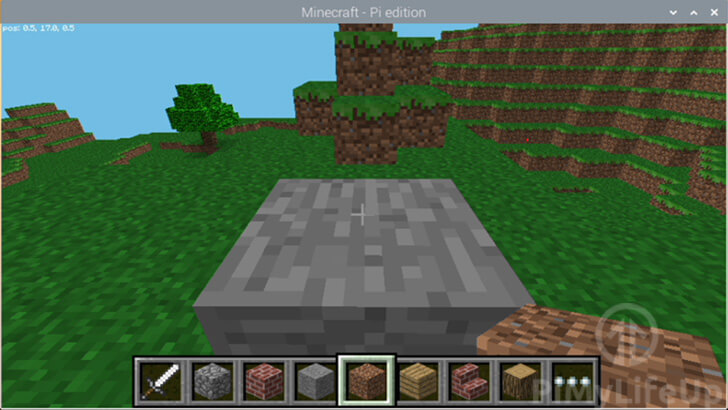
Setting a Block
The API also has the functionality to manipulate blocks in the game world.
To do this, you will need to make use of the mc.setBlock(x, y, z, blockID) function.
This function allows you to change a block at the specified position to the one you specify.
Using this example, we can use the following code to place a stone block one x position away from the player’s current position.
x, y, z = mc.player.getPos()
mc.setBlock(x+1, y, z, 1)
After you run this code, you should see a stone block appear. You may have to spin the camera around to see it.
If you are interested in the different block IDs that you can use, then scroll down further as we have listed all the blocks supported in Minecraft Pi edition.
Setting Multiple Blocks
It is also possible to set multiple blocks at once by making use of the mc.setBlocks(x0, y0, z0, x1, y1, z1, blockID) function.
This function takes in six different arguments for the positions.
The first set of positions (x0, y0, and z0) define the starting point of the area. The second set of positions (x1, y1, z1) defines the endpoint of the area.
Using this function, you can set an area to a specific block type, for example, to create a giant stone cube.
In the example below, we are going to show you how to create a 5x5x5 stone cube by using the mc.setBlocks() function.
x, y, z = mc.player.getPos()
mc.setBlocks(x+1, y+1, z+1, x+6, y+6, z+6, 1)
After running these two lines of code, you should see a giant stone cube appear near the player.
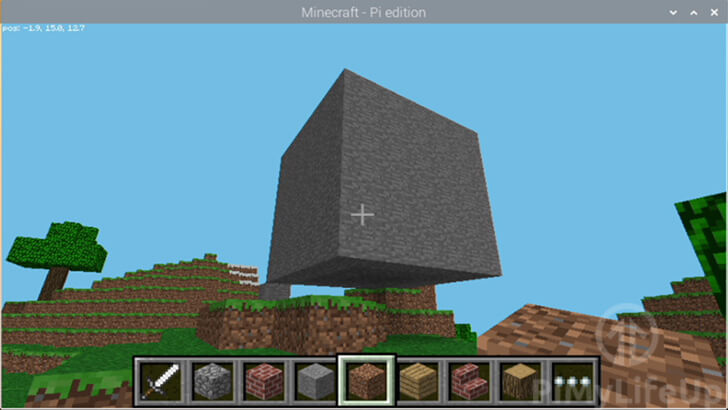
This API function is great if you want to make large objects quickly.
Retrieving the ID of a Block
Just like you can set a block, you can also retrieve the ID of a block in a specific position.
To do this, you can make use of the .getBlock(x, y, z) function. This function will retrieve the ID of the block at the specified position.
For example, you can use this function to check what block the player is currently standing on.
x, y, z = mc.player.getPos()
blockID = mc.getBlock(x, y-1, z)
print(blockID)
This function can be quite useful as you can program behaviors based on the block the player is standing on.
Minecraft Pi Edition Block IDs
Below you can see a list of the IDs of the available blocks in Minecraft Pi Edition.
| Constant Name | Block ID |
|---|---|
| AIR | 0 |
| STONE | 1 |
| GRASS | 2 |
| DIRT | 3 |
| COBBLESTONE | 4 |
| WOOD_PLANKS | 5 |
| SAPLING | 6 |
| BEDROCK | 7 |
| WATER_FLOWING | 8 |
| WATER | 8 |
| WATER_STATIONARY | 9 |
| LAVA_FLOWING | 10 |
| LAVA | 10 |
| LAVA_STATIONARY | 11 |
| SAND | 12 |
| GRAVEL | 13 |
| GOLD_ORE | 14 |
| IRON_ORE | 15 |
| COAL_ORE | 16 |
| WOOD | 17 |
| LEAVES | 18 |
| GLASS | 20 |
| LAPIS_LAZULI_ORE | 21 |
| LAPIS_LAZULI_BLOCK | 22 |
| SANDSTONE | 24 |
| BED | 26 |
| COBWEB | 30 |
| GRASS_TALL | 31 |
| WOOL | 35 |
| FLOWER_YELLOW | 37 |
| FLOWER_CYAN | 38 |
| MUSHROOM_BROWN | 39 |
| MUSHROOM_RED | 40 |
| GOLD_BLOCK | 41 |
| IRON_BLOCK | 42 |
| STONE_SLAB_DOUBLE | 43 |
| STONE_SLAB | 44 |
| BRICK_BLOCK | 45 |
| TNT | 46 |
| BOOKSHELF | 47 |
| MOSS_STONE | 48 |
| OBSIDIAN | 49 |
| TORCH | 50 |
| FIRE | 51 |
| STAIRS_WOOD | 53 |
| CHEST | 54 |
| DIAMOND_ORE | 56 |
| DIAMOND_BLOCK | 57 |
| CRAFTING_TABLE | 58 |
| FARMLAND | 60 |
| FARMLAND_INACTIVE | 61 |
| FARMLAND_INACTIVE | 61 |
| FURNACE_ACTIVE | 62 |
| DOOR_WOOD | 64 |
| LADDER | 65 |
| STAIRS_COBBLESTONE | 67 |
| DOOR_IRON | 71 |
| REDSTONE_ORE | 73 |
| SNOW | 78 |
| ICE | 79 |
| SNOW_BLOCK | 80 |
| CACTUS | 81 |
| CLAY | 82 |
| SUGAR_CANE | 83 |
| FENCE | 85 |
| GLOWSTONE_BLOCK | 89 |
| BEDROCK_INVISIBLE | 95 |
| STONE_BRICK | 98 |
| GLASS_PANE | 102 |
| MELON | 103 |
| FENCE_GATE | 107 |
| GLOWING_OBSIDIAN | 246 |
| NETHER_REACTOR_CORE | 247 |
If you would like to learn more about the Minecraft Pi Edition Python API, then you can check out our Minecraft API reference guide. This guide shows you all the functionality exposed by the API and explains how they work.
Hopefully, at this point in the tutorial, you will now have Minecraft successfully installed to your Raspberry Pi
You should also now have an understanding of how you can make use of the Python API available for Minecraft Pi Edition.
If you have run into any issues with this tutorial or have any feedback, then feel free to drop a comment below.


the first code line syntax is wrong, it should be
from mcpi import minecraft
Hi Adriaan,
Thank you for pointing out this mistake. I have gone ahead and corrected that and gave the guide a quick cleanup.
Cheers,
Emmet
When I did sudo apt install Minecraft it said it was unable to locate package Minecraft. I also updated and upgraded it before doing so.
Hi Ayden,
Make sure that you are running Raspbian, and make sure that you are typing in
minecraft-piand not justminecraft.Cheers,
Emmet