In this project, we will be showing you how to install and run the Joplin server on a Raspberry Pi.

Joplin is one of the most popular choices for those who are looking for a great free and open-source note-taking application. It is packed with a multitude of features while also retaining support for nearly any device you can think of.
One drawback of using a free and open-source solution like Joplin is that it doesn’t come with synchronization capabilities right out of the box. Luckily, with a bit of self-hosting, we can completely rectify this. This is thanks to the Joplin team making their synchronisation server free and open-source.
The Joplin server is incredibly easy to get up and running on your Raspberry Pi, thanks to it being provided as a Docker image. With just a few short commands and a single configuration file, you can have your Joplin notes synchronized in no time.
Being able to self-host the Joplin server gives this software a huge advantage for those who like to retain full control over their data and maximize their privacy. You don’t have to worry about any corporation snooping on what you are doing or having to pay a continual fee just to keep your data in sync.
Please note that to run the Joplin server software, you must be using a 64-bit operating system. This means you can only use a Raspberry Pi 3 or newer for this server.


Equipment
Below is a list of some of the equipment we used when setting up the Joplin server on a Raspberry Pi.
Recommended
Optional
This tutorial was tested on a Raspberry Pi 5 running the latest version of Raspberry Pi OS Bookworm (64-bit).
Installing and Running Joplin on a Raspberry Pi
In the following sections, we will guide you through the entire process of installing and running the Joplin server on the Raspberry Pi.
This server is incredibly easy to get running, and even easier to connect to your Joplin apps.
Preparing your Raspberry Pi
1. Before installing the Joplin server on the Raspberry Pi, we will need to prepare the device. The first step in this process is to ensure our Pi is up to date.
You can update the package list cache and upgrade any out-of-date packages by using the following two commands in the terminal.
sudo apt update
sudo apt upgrade -yCopy
2. With everything now up to date, the next step is to set a static IP address for your Raspberry Pi. A static IP is important as it ensures your Pi will always be handed the same IP address.
If you haven’t set one before, we recommend following our static IP guide.
https://pimylifeup.com/raspberry-pi-static-ip-address/3. Next, you will need to install Docker on your Raspberry Pi. This is one of the most crucial parts of the tutorial, as we will be relying on Docker to get the Joplin software running.
The primary method Joplin uses to provide its builds is through Docker containers, which include ARM64 builds for the Raspberry Pi.
We recommend following our guide on installing Docker, as it will ensure that Docker is set up in the way we expect.
https://pimylifeup.com/raspberry-pi-docker/4. Once Docker is installed on your system, we will create a directory to store the Compose file for Joplin.
A Compose file is like a set of instructions Docker will use to install and run Joplin and any other containers we may require.
You can create a directory at “/opt/stacks/joplin” by using the mkdir command in the terminal. We use the “/opt/stacks/” directory as a base, as it provides a clean place to set up the Compose files, and it works seamlessly with software like Dockge out of the box.
sudo mkdir -p /opt/stacks/joplinCopy5. After creating the directory, you can change into it with the cd command. We need to be in this folder for the rest of the guide.
cd /opt/stacks/joplinCopyWriting a Docker Compose file for Joplin
6. We can now proceed with writing the Docker Compose file that will set up the Joplin server on your Raspberry Pi. In addition to setting up Joplin, this same compose file will also set up the database where Joplin will store its data.
You can use Nano to begin writing the “compose.yaml” file by running the following in the terminal.
sudo nano compose.yamlCopy7. Within this file, you will want to type out the following lines. These lines declare the two containers that we require:
db– This container is the database where the Joplin server will store its data. In particular, we will be using the PostgresDB Docker container.app– The “app” container is the Joplin server itself. Here we specify details such as the app URL and the database connection details.
Now, while you fill out this file, you must replace some placeholders:
<DBPASSWORD>– Replace this with a random secure password. This password is used for the connection between Postgres and Joplin.
There are two occurrences of this password within the template that you must replace.<APPURL>– This placeholder must be swapped out with the URL that will be used to access your Joplin server. There are a couple of ways you can define a URL here, so let’s quickly go over them:- If you plan to use Joplin locally, use the syntax: “
http://<IPADDRESS>:22300“.
Just replace “<IPADDRESS>” with the local IP of your Raspberry Pi. For example, we would use “http://192.168.0.201:22300“. - Alternatively, if you are using a domain name and want HTTPS access, use “
https://<DOMAINNAME>“. For example, you might use something like “https://joplin.pimylifeup.com“.
However, this will require some additional work. You will need to set up a reverse proxy using Nginx, or alternatively use something like Pangolin or Cloudflare Tunnels.
Either choice you go with, ensure you replace “<DOMAINNAME>” with the domain name you are utilizing.
- If you plan to use Joplin locally, use the syntax: “
services:
    db:
        image: postgres:16
        restart: unless-stopped
        volumes:
            - ./db:/var/lib/postgresql/data
        environment:
            - POSTGRES_PASSWORD=<DBPASSWORD>
            - POSTGRES_USER=joplin
            - POSTGRES_DB=joplin
    app:
        image: joplin/server:latest
        environment:
            - APP_BASE_URL=<APPURL>
            - APP_PORT=22300
            - POSTGRES_PASSWORD=<DBPASSWORD>
            - POSTGRES_DATABASE=joplin
            - POSTGRES_USER=joplin
            - POSTGRES_PORT=5432
            - POSTGRES_HOST=db
            - DB_CLIENT=pg
        restart: unless-stopped
        ports:
            - "22300:22300"
        depends_on:
            - dbCopy
8. After you have finished filling out the Compose file, you can save and quit by pressing CTRL + X, Y, and then ENTER.
Starting up the Joplin Server Docker Container
9. With the Compose file now written, all we need to do to start up the Joplin server on our Raspberry Pi is to run the command below.
With this command, we use the “-d” option to get Docker to detach from the current terminal session. This is what enables your Joplin installation to run in the background. If you ever run into any issues, remove this option then run the command again, it should enable you to easily see any errors that might be occuring during start up.
During the start up process, Docker will download the images for both Postgres and Joplin and start them up on your machine.
docker compose up -dCopyAccessing the Joplin Web Interface
10. With the Joplin server up and running, you will now want to connect to its web interface and complete the setup process.
Now, if you have configured this for just your local network, you will want to know the IP address of your Raspberry Pi. The easiest way to get the IP assigned to your Pi is with the hostname command as shown below.
hostname -ICopy11. Now, in your favorite web browser, go to the following address. Ensure you replace “<IPORHOSTNAME>” with either the IP address or hostname assigned to your Raspberry Pi.
If you have set up a reverse proxy, or Pangolin, this URL will differ, and you will likely go to your domain name instead.
http://<IPORHOSTNAME>:22300For example, we would go to the following address.
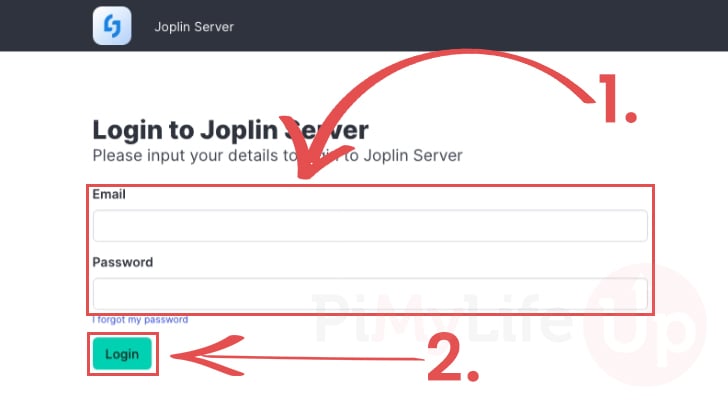
http://192.168.0.22:2230012. Upon accessing the Joplin server’s web interface, you will be prompted to log in to an account. During the start-up of Joplin on your Raspberry Pi, it automatically created a default user.
To log in to Joplin, use the username: “admin@localhost“, and the password: “admin” (1.).
Once you have filled out your details, click the “Log In” button to sign in (2.).
Updating the Default Joplin Users Password
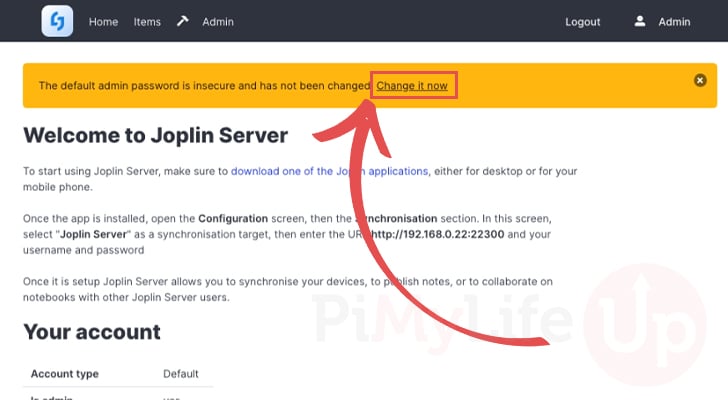
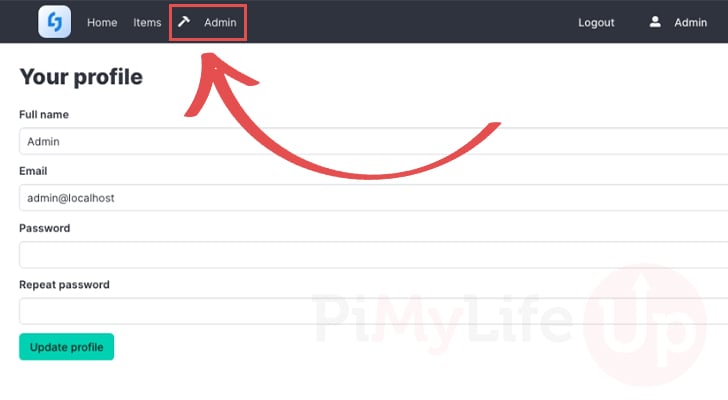
13. You now have access to your Joplin server, but before you do anything, you should change the password used by the admin user.
To begin changing these details, click the “Change it now” link.
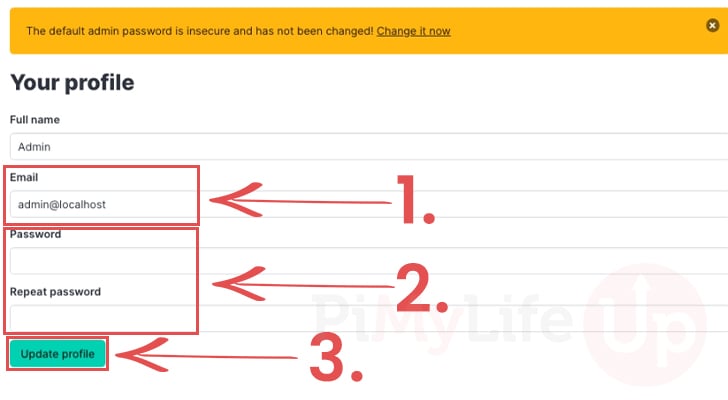
14. On this next screen, you will see several text boxes; using these, you can update the name, email, and password of your account.
The first thing you will want to do is update the email (1.), this will attempt to send you an email to confirm the change but we can work around this.
Next, you will want to set the new password that you want to use for your Joplin account (2.) on your Raspberry Pi.
Once you are happy with the new password you have set, click the “Update profile” button (3.).
Confirming an Email Change
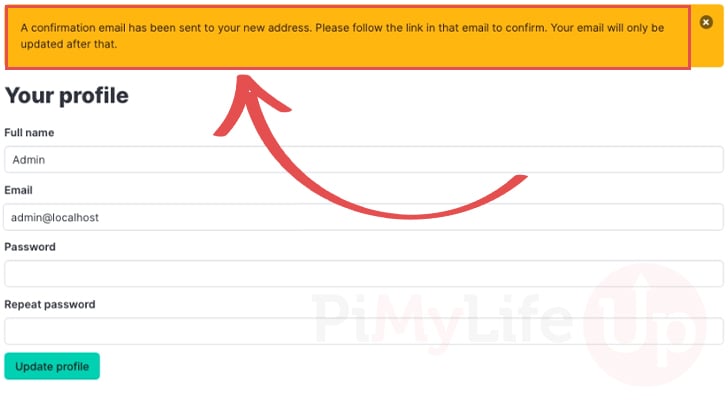
15. If you choose to update the email used for your admin account, you will now see a warning that you must click a link to confirm the change.
The only problem with this is that there is a big chance this email will never be sent or accepted by your email provider. Luckily, there is an easy workaround for this.
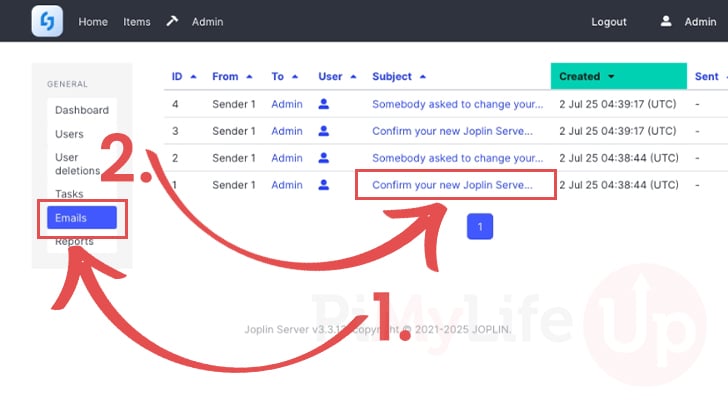
16. First, you will want to click the “Admin” option in the top menu bar.
17. Within the admin screen, you will want to use the sidebar to change to the “Emails” screen (1.).
Once you are on this screen, you should see an email with the title “Confirm your new Joplin Serve...“. Click this email to continue.
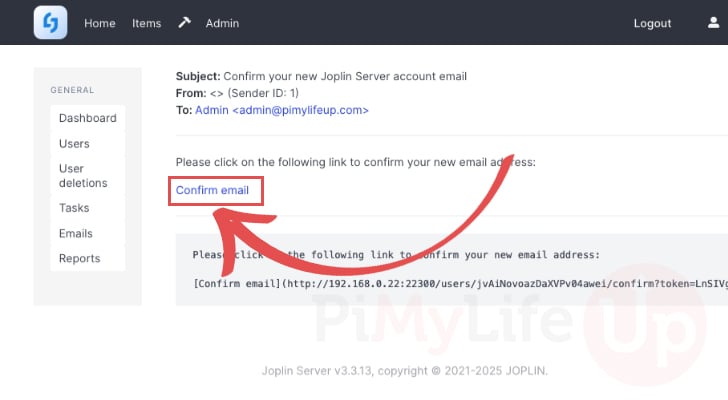
18. Finally, you will see the email that should of been sent off to the email address you were trying to change to.
All you need to do to confirm the email change is to click the “Confirm email” link.
Looking for the Connection Details
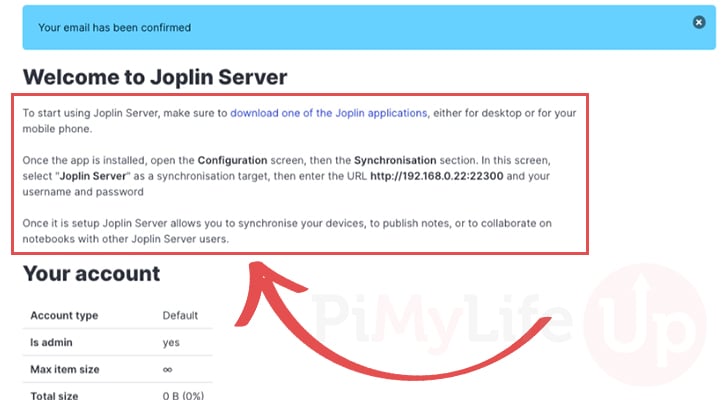
19. You should now be taken back to the Joplin server homepage. This will give you the steps you need to follow to connect the Joplin app to your Joplin server.
We will quickly show what these steps look like in the next section.
Connecting Joplin to your Raspberry Pi Jopen Server
20. The first thing you will want to do with Joplin open on your machine is to open up the settings.
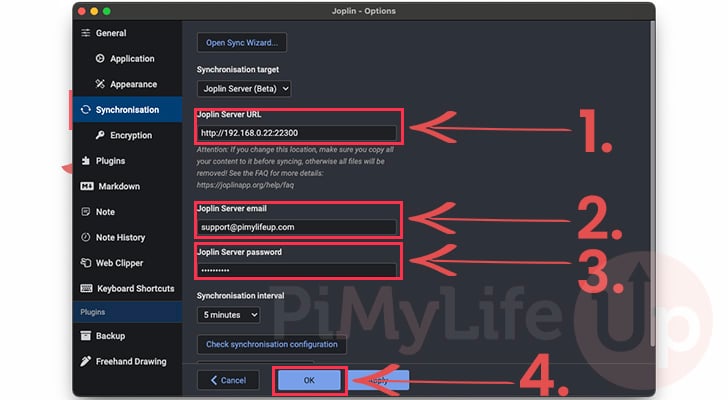
With the settings screen open, use the sidebar to swap to the “Synchronisation” screen (1.).
Next, you should see a select box located under the “Synchronisation target” heading (2.), click this box to reveal the options you can utilize.
Finally, select the option labeled “Joplin Server” (3.). Clicking this will reveal the options we need to set to connect the Joiplin app to our Raspberry Pi.
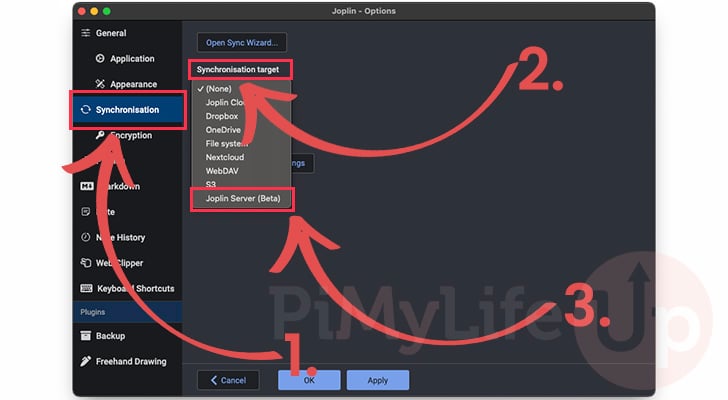
21. You will now see a bunch of different options that you must fill out:
- The first option is the Joplin server URL. This URL should match the one you set as the app URL in the Docker Compose file earlier. It will also be the same URL you use to access your Joplin server running on your Raspberry Pi.
In our example, we will be using the URL “http://192.168.0.22:22300“. - Next, you need to set the email for an account that already exists on your Joplin server. In our example, we are just using the email we set for our admin account, which is “
support@pimylifeup.com“.
The Joplin server does support more than just the admin user, but you must create them through its web interface. - Finally, set the password for your user.
With all three of these options, you are now ready to begin synchronising your notes with your Raspberry Pi Joplin Server. To finish up, simply click the “OK” button (4.).
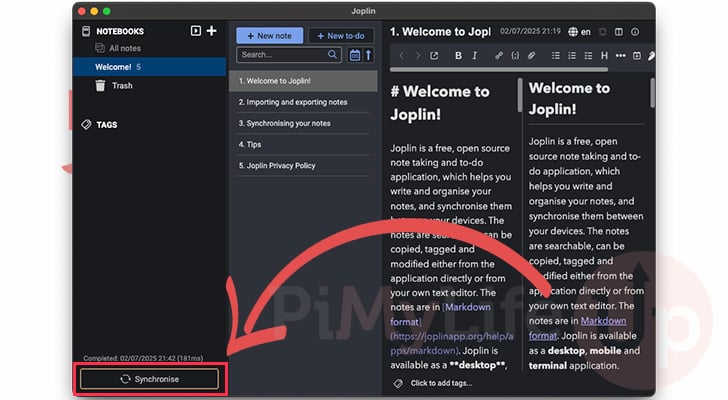
22. Now, if everything is working properly, you should be able to click the “Synchronise” button and all your notes will be saved safely onto the server.
You should see the message “Completed” alongside a date and the time it took to complete appear above the button.
Updating to the Latest Release of the Joplin Server on the Raspberry Pi
In this section, we will be walking you through the very simple and very quick steps to updating your Joplin server to the latest release on your Raspberry Pi.
Thanks to our use of Docker, the entire update process is remarkably straightforward and can be completed in just three steps.
1. The first thing we must do is change to the same directory where we wrote the Compose file for Joplin on our Raspberry Pi.
If you followed our steps exactly, you should be able to access this folder using the command below.
cd /opt/stacks/joplinCopy2. Once you are in the correct folder, we will now instruct Docker to pull the latest image for all the containers specified in the Compose file.
To achieve this, we simply need to use the command below. Please note that this will only download the new image, it won’t update the already running containers.
docker compose pullCopy3. Now that you have a new version of Joplin downloaded to your Pi, all you must do to get Docker to move over to the new release is to use the command below.
Docker will detect that the already running container has a new version and shut it down; it will then start it back up again using the new image.
docker compose up -dCopyConclusion
If you have reached this point in the Raspberry Pi project, you should have successfully set up the Joplin server.
Joplin is one of the best open-source note-taking applications, packed with useful features; the only downside is that it requires additional work to synchronize across devices. Luckily, with the ability to now use the Joplin server, synchronizing your notes has become significantly easier.
If you want to take things further with this tutorial, the next step would be to set up something like Pangolin to provide you with access to your notes outside of your home network.
Please feel free to leave a comment below if you have encountered any issues with setting up the Joplin server on a Pi. Most issues tend to come from those attempting to run the server on a 32-bit operating system.
If you liked this project, we highly recommend taking some time to explore some of our many other projects and guides for the Raspberry Pi.


Hi
Just installed Joplin server on my Raspberry pi 5 and had a lot of grief until I discovered that the POSTGRES database image in your compose.yaml file was incompatible with the Joplin app. I’d suggest changing ‘image: postgres:latest’ to image: ‘postgres:15’ to avoid failure to start.
Hi Steven,
Thank you very much for alerting me to this! I have updated our guide to also pin the verison to 16 (Should be be a good stable release) to help prevent this issue for others.
Much aprreciated.
Kind regards,
Emmet