In this project, we will be showing you how to install and run Half-Life 2 on a Raspberry Pi.

Despite being over 20 years old, Half-Life 2 still holds its place as one of the greatest games ever made. It is a perfect combination of FPS, intense combat, puzzles, and storytelling.
To this day, it remains one of the most fun FPS games you can play, and one you can now play on a Raspberry Pi.
Getting Half-Life 2 to run on a Raspberry Pi isn’t the simplest process, and we have to rely on some leaked source code to get it to run. While Half-Life 2 was never built with a device like the Pi in mind, having access to the code has allowed various developers to get it to compile and run on this small computer.
For the best experience with running this game, you will want to be running a Raspberry Pi 5 with at least 4GB of RAM. The extra speed given by the newer Pi allows the game to get over the line of being actually playable.
The weakest Raspberry Pi you could get away with is the Raspberry Pi 4, however, it will definitely be a low framerate experience, especially when compared with the Pi 5.


Equipment
Below is a list of some of the equipment we used when we got Half-Life 2 running on our Raspberry Pi.
Recommended
- Raspberry Pi Amazon
- Micro SD Card Amazon
- USB Keyboard Amazon
- USB Mouse Amazon
- HDMI Cable Amazon
- Monitor Amazon
Optional
- Retro USB Controllers or Joysticks Amazon
- Xbox Controller Amazon
- PlayStation Controller Amazon
- Ethernet Cable Amazon or Wi-Fi Amazon
We last tested this tutorial on a Raspberry Pi 5 running Ubuntu 24.04 and Raspberry Pi OS Bookworm.
How to Install and Run Half-Life 2 on Your Raspberry Pi
Over the following sections, we will walk you through installing and running Half-Life 2 on your Raspberry Pi.
Before you continue, you will probably want to know a couple of things. First, you must own a copy of Half-Life 2 on your Steam account. If you don’t own it already, you can get it super cheap during the many Steam sales.
Secondly, to run Half-Life 2 on our Pi, we will use a leaked version of the Source Engine that we must compile ourselves. This compilation process does take a little bit of time but only needs to be done once.
Lastly, you must run a desktop variant of either Raspberry Pi OS or Ubuntu. We will be using Raspberry Pi OS for our run-through, but we have heard of some users having a better experience with Half-Life 2 using Ubuntu.
We have included a video below that will walk you through the whole process. You can always follow along with our text tutorial as well if you would like.
Preparing your Raspberry Pi
1. Before installing and running Half-Life 2 on our Raspberry Pi, we should ensure our operating system is up to date.
You can update the package list and upgrade any out-of-date packages using the following two commands.
sudo apt update
sudo apt upgrade -yCopy
2. Once your Raspberry Pi’s operating system is up-to-date, you must install all the packages needed to grab and run Half-Life 2.
You will only need to run the command below to install all the packages we require.
sudo apt install wget unzip git build-essential ccache libsdl2-dev libfontconfig1-dev libopenal-dev libjpeg-dev libpng-dev libcurl4-gnutls-dev libbz2-dev libedit-dev python3CopySetting up Depotdownloader
3. The next step in this process is downloading an open-source tool called DepotDownloader. This tool is an open-source alternative to the Steam CLI and is crucial to getting Half-Life 2 running on your Raspberry Pi.
This is because we need a particular version of the Half-Life 2 content. The newer releases have had core changes that break compatibility with the version of the engine we will be using.
To set up this tool, let us create a directory to store it using the mkdir command.
sudo mkdir -p /opt/depotdownloaderCopy4. With the new folder created, change to it by using the cd command. We will want to be in this folder to make downloading this tool into the right spot a little easier.
cd /opt/depotdownloaderCopy5. You can now download the Steam DepotDownloader to your Raspberry Pi by running the following command.
With this line, we use the wget command to download version 3.0.0 of the tool. This is the latest release at the time of publishing.
sudo wget https://github.com/SteamRE/DepotDownloader/releases/download/DepotDownloader_3.0.0/DepotDownloader-linux-arm64.zipCopy6. Once the archive has been downloaded to your Pi, we must extract it using the unzip command.
With this command, we are using the “-j” option to flatten the files we are extracting. Basically, we are throwing out any directories but keeping the files themselves. This will help ensure that files end up where we expect them to be.
sudo unzip -j DepotDownloader-linux-arm64.zipCopy7. Your next step is ensuring this new tool has execute privileges. This allows a user like us to run the software.
Adding the execute privilege to a file is as simple as using the chmod command with the “+x” option like we have done below.
sudo chmod +x DepotDownloaderCopy8. Once done, we can clean up after ourselves by deleting the DepotDownload archive by using the rm command.
sudo rm DepotDownloader-linux-arm64.zipCopyDownloading and Compiling the Half-Life 2 Engine on the Raspberry Pi
9. We are finally at the point where we can move onto downloading and compiling the Half-Life 2 Engine on to our Raspberry Pi.
The first part of this process is to create a directory where we will clone the source code. To create a folder called “/opt/hlt2-source/“, run the following command.
sudo mkdir -p /opt/hl2-source/Copy10. After creating the directory, we will want to change into it by typing the following into the terminal.
cd /opt/hl2-source/Copy11. We can now use the git tool we installed earlier on our Raspberry Pi to clone the Half-Life 2 source engine.
We will need to compile this code to run the game on an ARM system without requiring any extra layers of emulation.
Both the “--recursive” option, and the ending dot (.) are highly important with this command. Recursive ensures that Git clones any Git repositories referenced within this one. The final dot, makes Git clone the source engine to your Raspberry Pi to your current directory.
sudo git clone https://github.com/nillerusr/source-engine.git --recursive .Copy12. Once the code has been cloned to your Pi, we must configure it to build and run on our Raspberry Pi using the command below.
sudo python3 ./waf configure -T release --prefix=hl2 --build-games=hl2 --disable-warnsCopy13. Finally, you can begin compiling Half-Life 2 on your Raspberry Pi by typing in the following command.
Compiling this game engine on your Rapsberry Pi can take a little bit. For us, the process with our Raspberry Pi 5 took about 20 minutes to complete. Older Raspberry Pis may take considerably longer to compile Half-Life 2.
sudo python3 ./waf build -p -v Copy14. Once the compilation process has completed, “install” Half-Life 2 onto your Pi by running the following command.
In reality, this command is just copying all of the files needed to run the game to a folder called “/hl2“.
sudo python3 ./waf installCopy15. Now so you don’t have to go to the source folder every time you want to run HL2, let us copy the engine files that we just built out of here and into the main “/opt/” directory.
sudo mv hl2/ /opt/CopyDownloading Half-Life 2 to your Raspberry Pi
16. With the source engine for Half-Life 2 now compiled on our Raspberry Pi, you will need to actually download the game files for Half-Life 2 itself.
Currently, we only have the executable that can be used to run the game, not the actual game data. This is where the DepotDownloader tool we installed earlier comes into play.
Now, in the terminal, you will want to run the following command. This will use DepotDownloader to download a specific version of Half-Life 2 since the latest release will no longer work with this method. While typing this command, replace “” with your Steam username.
sudo /opt/depotdownloader/DepotDownloader -app 220 -depot 221 -manifest 3666218991449795038 -dir /opt/hl2/ -username <USERNAME> CopyBefore this tool can download Half-Life 2, you will be required to enter the password for your account, and if you have Steam Guard setup, you will need to authenticate using that.
The reason this tool needs all of this access is that Steam will block the request if you don’t own the game.
17. To ensure that Half-Life 2 can generate any cache files it needs on your Raspberry Pi, we will now want to take ownership of this new directory for your current user.
To give ownership of these files to your user, you will want to make use of the chown command.
sudo chown -R $USER: /opt/hl2/CopyLaunching HL2
17. After the download has finished, you can now change to the directory where both the compiled Half-Life 2 engine and the game files now sit on your Pi.
To change to this folder, use the following command within the terminal.
cd /opt/hl2/Copy18. Finally, at this point. all you need to do is run the command below to start Half-Life 2 on your Raspberry Pi.
Please note that the game will launch to whatever resolution the screen is set to. If you are using a 4k monitor, we highly recommend reducing this to at least 720p, or you can just make this change in game.
./hl2_launcherCopyChanging Half-Life 2 Config for the Raspberry Pi
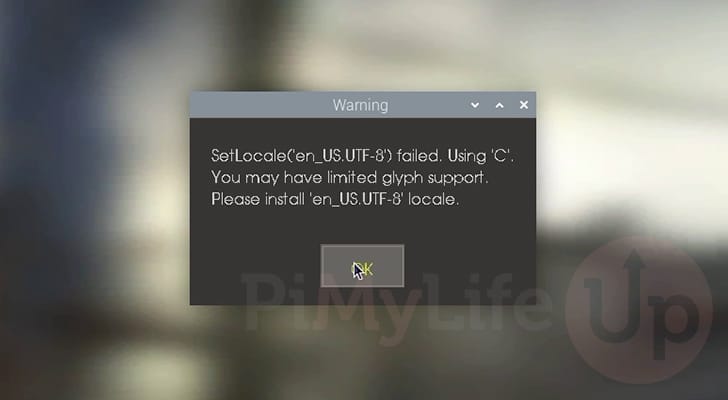
19. Whenever you launch Half-Life 2 on your Raspberry Pi, you might run into a brief error about a missing component.
All you need to do is click the “OK” button to continue.
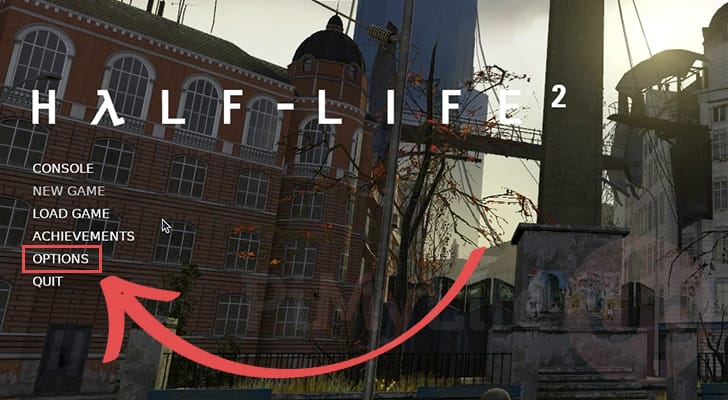
20. Before you dive into running HL2, you will want to re-adjust the video options to be playable. At the moment, the game will feel super unresponsive as the game defaults every setting to high.
To change these settings, select the “OPTIONS” option.
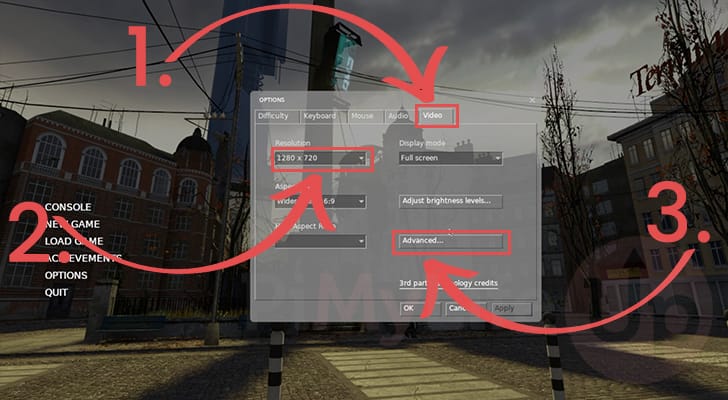
21. With the options menu open, change to the “Video” tab (1.).
Next, you will want to use the resolution select box to select at the highest, 1280 x 720 (2.). The lower you set the resolution the better experience you will have with Half-Life 2 on your Raspberry Pi.
After changing the resolution, you will want to change to the “Advanced” (3.) screen so that we can lower so more settings.
22. On this screen, you will want to basically set the vast majority of the options to their lowest options. This will give you a good base to work off of. If you are running at super low resolutions, you may be able to adjust some of these settings to be a bit higher.
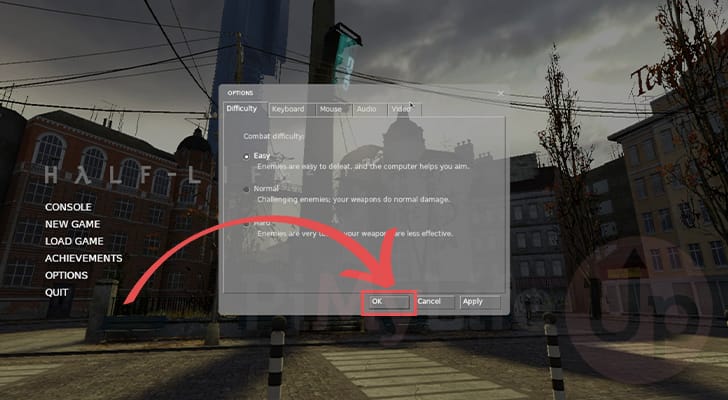
Once you are happy with all the settings (1.), you will then want to click the “OK” button (2.).

23. You can confirm all your settings changes by clicking the “OK” button again. The game may freeze for a second or two while it reloads the lower-resolution assets.
24. At this point, you should have successfully managed to get Half-Life 2 up and running on your Raspberry Pi.
Your experience is definitely going to vary, and you aren’t going to get crazy high frame rates, but this game is most definitely playable.

Conclusion
Hopefully, if you have managed to get to this part of the tutorial, you will now be successfully playing Half-Life 2 on your Raspberry Pi
With the Raspberry Pi 5, this game has become somewhat playable, especially if you are fine with the occasional frame hitch and the reduced graphics quality. Your mileage will vary with older Pis, such as the Pi 4. The extra performance introduced with newer Pi’s helps with running games like Half-Life 2.
Please feel free to drop a comment below if you have had any issues with getting this game to run on your Raspberry Pi.
If you liked this guide, be sure to take some time to explore some of our many other Raspberry Pi projects.