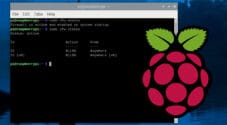
In this Linux guide, we will show you how to configure your firewall rules when using UFW.
UFW stands for uncomplicated firewall and comes pre-installed with all of the latest releases of Ubuntu and Ubuntu Server.
It is one of the easiest ways to set up a firewall on your device or server quickly.
Firewalls are an integral part of maintaining strong network security and are crucial for servers.
In this guide, we will show you how you can use UFW to allow, deny, or rate-limit the ports on your device.
It should be noted that by default UFW will block all incoming connections. UFW will not block outgoing connections by default.
Table of Contents
- Using UFW to Allow Access Through a Port
- Allowing Access for a Specific IP Address
- Denying Access Through Ports using UFW
- Deny Access to a Specific IP Address
- Rate Limiting Connections on a Port
- Deleting Existing Firewall Rules
- Getting the Status of UFW
- Listing UFW Rules While Disabled
- How to Enable or Disable UFW
Using UFW to Allow Access Through a Port
One of the very first things you should learn to deal with is how to allow access through an individual port.
By allowing a port within UFW, connections will be able to be made through it. This allows other devices to connect to yours through your network.
Using UFW, allowing a port is a straightforward process that requires one command.
At its very basics, all you need to do is type in “ufw allow” followed by the port number you want to access your device through.
Optionally you can also specify the protocol that the port should be allowed on, whether that be TCP, UDP, or another protocol.
If you don’t specify a protocol, the port will be accessible through all available protocols.
Allowing Access Through a Port using UFW
At its most straightforward usage, all you need to do it specify the port number you want traffic to be allowed through.
sudo ufw allow PORTCopyAs an example, let us allow access through the default OpenSSH port (Port 22).
sudo ufw allow 22CopySpecifying the Protocol for the Port to be Allowed On
Using this simplified syntax, you can specify the protocol that you want the port to access.
By specifying the protocol, you will not be able to access it using any other protocol.
sudo ufw allow PORT[/PROTOCOL]CopyFor reference, two of the most used protocols on the internet are TCP and UDP.
For example, suppose we only wanted our SSH port to be accessible through the TCP protocol. In that case, we can use the following command.
sudo ufw allow 22/tcpCopyAllowing Access by Specifying a Service Name
Using UFW, it is also possible to specify a service to allow by making use of its service name.
sudo ufw allow SERVICENAMECopyPlease note that this feature only works for services and ports that have been specified within the /etc/services file.
For example, if we wanted to allow access to SSH using UFW, we can run the following command.
sudo ufw allow sshCopyAllowing Access for a Specific IP Address
It is also possible to use UFW to allow access for a specific IP address to access your device.
You can either allow the IP address to have full access to your device or only to a specific IP address.
This method uses a different syntax to allowing global access through a port.
Allowing Complete Access for a Certain IP Address
The easiest way of specifying access for an IP address is to give it complete access to your device.
This isn’t the best practice for security, as they would have a way of completely bypassing your firewall.
The syntax for allowing access from an IP address is “sudo ufw allow from” followed by the IP address you want to whitelist.
sudo ufw allow from <strong>IPADDRESS</strong>CopyFor example, if we wanted to whitelist the IP address 192.168.0.1, we would use the following command.
sudo ufw allow from 192.168.0.1CopyAllowing Access to a Port for a Certain IP Address
Using this more advanced syntax, you can still use it only to access a specific port.
You can also optionally use this to specifying the protocol you want it to have access to.
sudo ufw allow from TARGET to DESTINATION port PORTNUMBER [proto PROTOCOL]CopyWith this syntax, TARGET is the IP address that you are expecting to access your device.
DESTINATION is the point you want this IP address to access. You can just use any if this doesn’t matter to you.
For example, if we wanted to access our devices SSH port (Port 22) from the IP address 192.168.0.1, we can use the following command.
sudo ufw allow from 192.168.0.1 to any port 22 proto tcpCopyDenying Access Through Ports using UFW
In this section, we will show you how to block or deny access to a port on your device using UFW.
Denying connections through a port using UFW is a very straightforward process.
To block a port using UFW, you need to use “ufw deny” followed by the port number, then optionally the protocol.
Like allowing a port, you can block a port on from being accessible through a specific protocol. If no protocol is specified, UFW will automatically assume it should block all protocols.
Denying Access Through a Port
Denying access to a port is as simple as allowing access. The only real difference is that the word “deny” is used instead of “allow“.
sudo ufw deny PORTCopyAs an example of how this works, we can use UFW to block outside access to our MySQL server operating on port 3306.
sudo ufw deny 3306CopyDenying Access Through a Port with a Specific Protocol
You can also optionally specify the specific protocol that you want to deny access through using UFW.
The protocol is specified directly after the port number and is separated by the forward-slash symbol (/)
sudo ufw deny PORT[/PROTOCOL]CopyFor example, if we wanted to stop users from accessing our MySQL port when using the UDP protocol
sudo ufw deny 3306/udpCopyDenying Access by using a Service Name
You can also use UFW to deny access to a port or ports by making use of its service name.
These services and the ports they are associated with are referenced with the /etc/services file.
sudo ufw deny SERVICENAMECopyFor example, if we wanted to block access to FTP on our device, we can use the following command.
sudo ufw deny ftpCopyDeny Access to a Specific IP Address
If you want, you can use UFW to block a specific IP address from accessing your device.
UFW provides you with two separate methods to achieve this. The first allows you to block the IP address from accessing your device on any port. The other method will enable you to only block access on a specific port.
You will find that blocking an IP address requires a different syntax then blocking a port.
Deny Complete Access to a Specific IP Address
To block access from an IP address, you will need to use a slightly different syntax.
All you need to do is use “ufw deny from” followed by the IP address that you want to block.
sudo ufw deny from IPADDRESSCopyFor example, we can block the IP address 192.168.0.2 by using the following command.
sudo ufw deny from 192.168.0.2CopyDeny Access through a Port to a Specific IP Address
Even with this method, it is still possible to block an IP address from accessing a specific port rather than the entire device.
The protocol for this is slightly more complicated as the way you need to specify the protocol and port numbers is different.
sudo ufw deny from IPADDRESS to PROTOCOL port PORTNUMBERCopyReplace IPADDRESS with the IP address that you want to be blocked on the specified port.
PROTOCOL is the protocol that you want to be blocked. If you want to block the IP address on all protocols use the “any” keyword.
Lastly, replace PORTNUMBER with the port that you want to block the IP address on.
For example, if we wanted to block the IP address 192.168.0.2 from our SSH port (Port 22) on any protocol, we can use the following command.
sudo ufw deny from 192.168.0.2 to any port 22CopyRate Limiting Connections on a Port
One of the most useful features of UFW is its ability to easily rate limit the connections being made to a specific port.
You can use this functionality to limit the number of connections that are made to critical ports.
For example, you can reduce the chance of users brute-forcing your SSH login by limiting connections made through your SSH connection
When you limit a connection, UFW will not allow any more than six connections within the last 30 seconds. The firewall will block any additional connections.
Limiting a port is a relatively simple process. Syntax wise it works like the allow command, but instead, you use the limit keyword.
All you need to do to limit a connection is to use “ufw limit” followed by the port number and then optionally the connection protocol.
sudo ufw limit PORT[/PROTOCOL]CopyFor example, we can use the firewall to limit connections to our Raspberry Pi’s SSH port by running the following command.
sudo ufw limit 22CopyAs SSH only works over TCP by default, you can limit connections using the TCP protocol.
sudo ufw limit 22/tcpCopyDeleting Existing Firewall Rules
Deleting existing firewall rules using UFW is a reasonably straightforward process.
There are two different methods that you can use to delete existing firewall rules.
To delete a firewall rule, you will need to know either the rule itself or the number assigned to it.
Deleting Using a known Firewall Rule
For this first method, we are going to show you how to delete a firewall rule when you know the exact existing rule.
This method is useful for deleting a rule within UFW while it is not active.
To delete a rule using this method, you will need to use “sudo ufw delete” followed by the rule.
sudo ufw delete RULECopy1. For example, let us say that we had the following rule applying a limit to our SSH port.
ufw limit 22/tcpCopy2. We can delete this rule by using the following command, referencing the rule we want to delete.
sudo ufw delete limit 22/tcpCopyDeleting Using the Rule Number
The alternative method is to delete the firewall rule by referencing its index number. This number is assigned to the rule by UFW.
Please note that this method will currently only work if you have UFW enabled.
To delete a rule using this way, you will need to use ufw delete followed by the rules number.
sudo ufw delete RULENUMBERCopyBelow we have included an example on how to retrieve the number of a rule, and delete it.
1. First, retrieve the list of rules with their numbering by using the following command.
sudo ufw status numberedCopy2. That command will give you a list that should look something like we have below.
Status: active

     To                         Action      From
     --                         ------      ----
[ 1] 22                         LIMIT IN    Anywhere
[ 2] 80                         ALLOW IN    Anywhere
[ 3] 443                        ALLOW IN    Anywhere
[ 4] 22 (v6)                    LIMIT IN    Anywhere (v6)
[ 5] 80 (v6)                    ALLOW IN    Anywhere (v6)
[ 6] 443 (v6)                   ALLOW IN    Anywhere (v6)Copy
The first column is the number that has been assigned to that rule.
3. For example, if we wanted to delete our rule allowing traffic in through the HTTP port (80), we can use the following command.
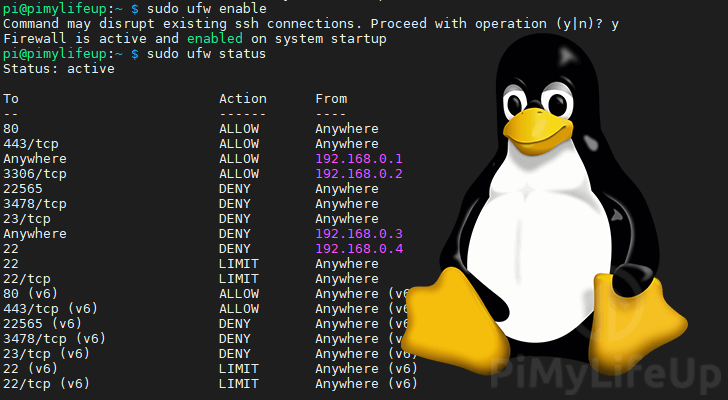
sudo ufw delete 2CopyGetting the Status of UFW
Checking the status of your firewall is made relatively simple when using UFW.
All you need to do to check the status is to use the following command
sudo ufw statusCopyFrom this command, you will get one of possibly two results.
If UFW has been disabled, you will see the following result notifying you that the firewall is currently inactive.
Status: inactiveCopyAlternatively, if you have UFW enabled, you will see something similar to what we have below. This command should list all your firewall rules while UFW is enabled.
Status: active

To                         Action      From
--                         ------      ----
22                         LIMIT       Anywhere
80                         ALLOW       Anywhere
443                        ALLOW       Anywhere
22 (v6)                    LIMIT       Anywhere (v6)
80 (v6)                    ALLOW       Anywhere (v6)
443 (v6)                   ALLOW       Anywhere (v6)Copy
Listing UFW Rules While Disabled
One issue you may run into when using UFW is that the “ufw status” command does not return your firewall rules while it is disabled.
To get around this, we can make use of the following command.
sudo ufw show addedCopyThis command will return all of the rules that have been added to UFW.
As UFW isn’t running, you won’t be able to get the numbers assigned to these rules.
Added user rules (see 'ufw status' for running firewall):
ufw limit 22
ufw allow 80
ufw allow 443Copy
How to Enable or Disable UFW
The last thing we will be touching on is how to disable or enable UFW on your device.
Before enabling your firewall, you should always make sure that you have all of your wanted rules added.
For example, if yourely on an SSH connection, you should ensure that the port has an active “allow” rule defined.
Failure to configure your rules correctly could potentially get you locked out from remotely accessing your device.
Enabling UFW
Enabling UFW is a straightforward process and can be completed by using a single command.
sudo ufw enableCopyBy turning UFW on with this command, it will immediately be enabled. Additionally, it will now start at boot.
Disabling UFW
Disabling UFW is just as easy as enabling it. To disable UFW, you can make use of the following command.
sudo ufw disableCopyWhen UFW is disabled, it automatically disables itself from starting at boot.
Hopefully, this guide has given you a good insight into how to use UFW on your Linux based system.
If you have any feedback on this guide, feel free to leave a comment below.


Excellent stuff, in fact excellent site all round.
Many thanks for all your efforts they are appreciated.
Have you have any dealings with any of the Ecoflow products?
All the best,
sage
Hi Sage,
I’m glad to hear that you like our work, hearing feedback like that is always highly appreciated.
Unfortunately, I’ve never had the chance to use any of the EcoFlow products. Always been intrigued by their offerings but never quite had a good enough reason to purchase any of their products. Whys that?
Kind regards,
Emmet
Thank you very much works 10/10 much helful