In this Raspberry Pi ExpressVPN tutorial, I will be taking you through the steps of installing ExpressVPN.

It’s a pretty straightforward process that will result in your network traffic being securely anonymized.
ExpressVPN is yet another large VPN provider that is widely praised. There are no activity logs, connection logs and they’re based in the British Virgin Islands where there are currently no data retention laws.
There are 148 VPN locations in 94 countries, so you are spoiled with the choice of where to connect. You can see the full list of server locations over at their website. Keep in mind that this list is likely to continue to grow.
There is a 30-day money back guarantee on the service so if you find it’s not up to par you can request a refund.
This tutorial has been tested with the latest version of Raspbian. If you want to minimize the number of issues that you run into then I highly recommend that you update your operating system.
Other VPN services such as NordVPN or VyprVPN might take your fancy instead. If they do, I have tutorials that will take you through the process of setting up those.
The full tutorial on installing ExpressVPN to the Raspberry Pi is right below. Please let us know if you run into any issues.
Equipment List
Recommended
- Raspberry Pi Amazon
- Micro SD Card Amazon
- Ethernet Cable Amazon or Wi-Fi Amazon
- Power Supply Amazon
- ExpressVPN Subscription ExpressVPN
Optional
Downloading the Raspberry Pi ExpressVPN Installer
Firstly, you will need an ExpressVPN account, so make sure you sign up for one here. Pick the plan that best suits your needs, the yearly plan is the best value.
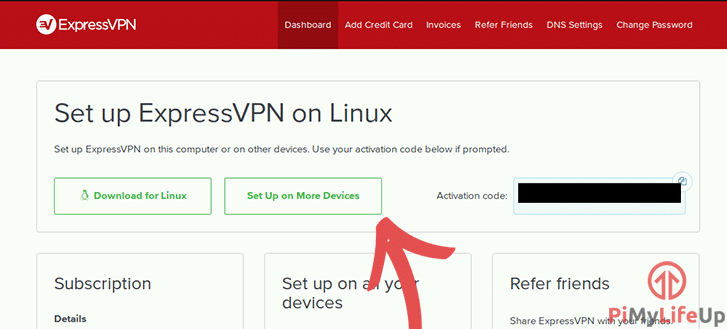
1. Log in to your account on ExpressVPN and click on Set up on More Devices within the set up box at the top of the page.
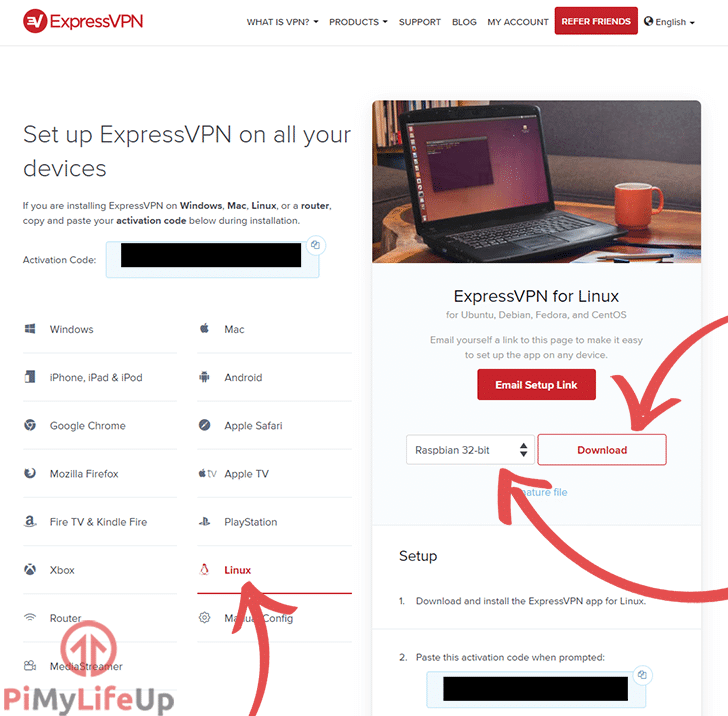
2. On the left side of the screen click on Linux. Select Raspbian 32-bit from the drop-down box and click on download. You will also need the activation code, so copy that as well.
3. Alternatively, you can download the install file directly by using the following command.
wget https://download.expressvpn.xyz/clients/linux/expressvpn_1.5.1_armhf.deb4. These next few steps are optional but recommended if you like to verify your download came unaltered. So, let’s check our download’s PGP (Pretty Good Privacy) signature is correct.
5. Start by installing PGP key for ExpressVPN.
wget https://www.expressvpn.com/expressvpn_release_public_key_0xAFF2A1415F6A3A38.asc
gpg --import expressvpn_release_public_key_0xAFF2A1415F6A3A38.asc
6. Now let’s verify the fingerprint of the PGP is correct.
gpg --fingerprint release@expressvpn.comThe key fingerprint should look something like this; 1D0B 09AD 6C93 FEE9 3FDD BD9D AFF2 A141 5F6A 3A38
7. Now go back to the admin area of ExpressVPN and download the signature file.
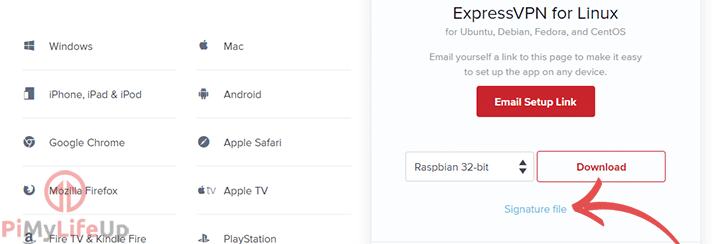
8. Alternatively, you can use wget to download the file. Ensure the version matches the file we downloaded earlier.
wget https://download.expressvpn.xyz/clients/linux/expressvpn_1.5.1_armhf.deb.asc9. Finally, let’s run the verification, the fingerprint should match the one we saw earlier in step 6.
gpg --verify expressvpn_1.5.1_armhf.deb.ascIf the fingerprints are the same, then you can proceed to install ExpressVPN on the Raspberry Pi. Otherwise, I highly suggest that you re-download and rerun the check.
Installing ExpressVPN
The process of installing ExpressVPN is straightforward and won’t take too long to set up.
1. Navigate to the location of the installer file. For us, it’s in the downloads folder as we made use of the browser to download the file.
cd ~/Downloads/2. In here, use the following command. You may need to update the version number if it has changed.
sudo dpkg -i expressvpn_1.5.1_armhf.deb3. Once it has installed, run the following command.
expressvpn activate4. Next, insert the activation code that we copied in the first section of this tutorial.
5. It will now ask if you want to share anonymous information, enter n to decline, or Y to accept.
6. If you accidentally entered the wrong option, then use the following line. Change false to true if you want to share anonymous information.
expressvpn preferences set send_diagnostics falseUsing ExpressVPN on the Raspberry Pi
Now the application is installed, using ExpressVPN is super easy.
1. To quickly start the VPN, you can enter the following command.
expressvpn connectThis simple line of code will connect you to a recommended location if you haven’t previously connected. Alternatively, it will connect you to the server that you were previously connected to.
2. To disconnect, simply run the following command.
expressvpn disconnect3. You can get a list of locations by using the following command.
expressvpn list4. Next, you can connect to that specific location by either using the location names or the alias names.
For Alias:
expressvpn connect aumeFor Location:
expressvpn connect "Australia - Melbourne"5. There are more settings that you’re able to configure, simply use the following line to bring up the manual for the ExpressVPN software.
man expressvpnAuto start on Boot up
Having the Raspberry Pi ExpressVPN auto-connect at startup is surprisingly easy. Having it auto connect is important if you wish the Pi to be behind a VPN at all times. It will help stop your location from being revealed if your Raspberry Pi reboots without your knowledge.
expressvpn autoconnect truePreventing DNS Leaks
By default, ExpressVPN takes measures to prevent your DNS from leaking. You can switch these settings off if you don’t wish to use them, I highly recommend that you keep them on.
To turn off the network lock and allow traffic to still flow if your VPN drops out then enter the following command. Switching to default will restore the original functionality. Another option is strict, and this will block all traffic if ExpressVPN drops out.
expressvpn preferences set network_lock offIf you don’t wish to use the VPN DNS you can switch it off. You might get DNS leak without it unless you setup a DNS of your choosing.
expressvpn perfeences set force_vpn_dns falseCheck out the ExpressVPN manual for more information on what you can do.
If you find that your DNS continues to leak then we can try changing the default DNS to Cloudflare’s DNS rather than your internet service providers.
1. To begin, load into the dhcpcd configuration file and update the following line.
Open
sudo nano /etc/dhcpcd.confFind
#static domain_name_servers=192.168.0.1Replace with
static domain_name_servers=1.1.1.12. Save & exit the file.
3. Now reboot your Pi by entering the following command.
sudo reboot4. Go to ipleak.net and check that your DNS is no longer leaking.
Troubleshooting
If you need to uninstall the ExpressVPN software from your Raspberry Pi, then this can be done by running the following line.
sudo dpkg -r expressvpnFor further help regarding connectivity issues to ExpressVPN, you might want to visit their support center. Also, remember to use the man command to bring up the manual for the ExpressVPN application.
There are plenty of other VPNs available for the Raspberry Pi. You can even turn your Pi into a VPN server, be sure to check out our tutorial on it.
I hope that by end of this Raspberry Pi Express VPN tutorial that you have everything running smoothly. If you run into any issues then please let me know.
Affiliate link disclaimer: All the products I mention on this website I have personally purchased and used at least once. Some of the links on this website are affiliate links that earn me a small commission whenever a sale is made.


I was wondering if you have a tutorial like this for surfshark? Do you think these steps could help setting up another vpn?
If Surfshark provides you with ovpn files, then the Vyprvpn tutorial will have steps that should help guide you in the direction. I will look at doing a tutorial on Surfshark at some point in the future.
I just want to say thanks for making such great tutorials!