In this quick guide, we will be showing you how you can program an Arduino from a Raspberry Pi using the Arduino IDE.
While the Raspberry Pi is an excellent device for many different things, it is a jack-of-all-trades and master-of-none. There are still many situations where you need a more dedicated device, such as the Arduino.
When comparing the two, the Arduino, in our case, the Arduino Uno, is just much easier to use when handling input and output. This is helped a lot because the Arduino has an inbuilt analog-to-digital converter. Dealing with analogs on the Raspberry Pi often requires an additional analog-to-digital converter, which can make circuits messier than needed.
Of course, one great thing about a Raspberry Pi is that its ARM chip allows us to run numerous different bits of fully fledged software. One of those is the Arduino IDE. This software lets you easily program an Arduino directly from your Raspberry Pi.
You could even in theory deploy these two devices together so you can easily deploy new code to your Arduino, and thanks to the Raspberry Pi being low powered you won’t be doing serious damage to your power budget.
These next few steps will show you how to install the Arduino IDE to your Raspberry Pi and then how to use those to program an Arduino.
As the IDE is a graphical application, you will need to be running the desktop variant of Raspberry Pi OS.

Equipment
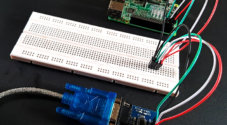
Below is a list of equipment we used to program an Arduino from our Raspberry Pi.
Recommended
- Raspberry Pi Amazon
- Monitor Amazon
- Micro SD Card Amazon
- Power Supply Amazon
- Ethernet Cable Amazon or Wi-Fi Amazon
- Arduino Uno Amazon
Optional
This tutorial was tested on a Raspberry Pi 5 running the latest version of Raspberry Pi OS Bookworm, alongside an Arduino Uno.
Installing and using the Arduino IDE on the Raspberry Pi
Over the following sections, we will walk you through the very simple steps to install the Arduino IDE on your Raspberry Pi. We will then show you how to write a simple hello world script and see the results through the serial monitor.
For these steps, we will be using an Arduino Uno that we have connected to our Raspberry Pi using a USB cable. Please note that some boards require additional drivers to be installed using the Arduino IDE interface.
If you prefer to have a more visual guide on how to install this IDE and program your Arduino, be sure to check out the video we have embedded below
Installing the Arduino IDE to the Raspberry Pi
1. Before we can install the Arduino IDE to your Raspberry Pi, you will want to ensure that your current operating system is up to date.
You can update the package list cache and upgrade any out-of-date packages by running the following two commands within the terminal.
sudo apt update
sudo apt upgrade -yCopy
2. Once the update is complete, all you need to do to install the Arduino IDE is run the command below.
This will install the latest available version that is included within the Raspberry Pi OS package repository. At the time of posting this means we will be using version 1.8.19. The newer 2.0 versions are currently incompatible with ARM systems like the Pi.
sudo apt install arduinoCopy3. With the Arduino IDE now installed on our Raspberry Pi, we need to do some extra steps to get it all functioning correctly. If you were to try to program your Arduino right now, you would find that it won’t actually be able to communicate with it.
To get around this, we will need to add your current user to the “dialout” group using the usermod command. On Linux systems, the “dialout” group is the one that can interact with serial devices and connections.
sudo usermod -aG dialout $USERCopy4. Since we have changed your current user groups, we will need to restart your Raspberry Pi by running the command below.
sudo rebootCopyOpening up the Arduino IDE
5. Once your Raspberry Pi has finished rebooting, you can open up the Arduino IDE and begin programming your Arduino.
To open up this interface, click the Raspberry icon in the top-left corner to bring up the start menu.

6. With the start menu now open, hover over the “Programming” option (1.) and then click the “Arduino IDE” program (2.).
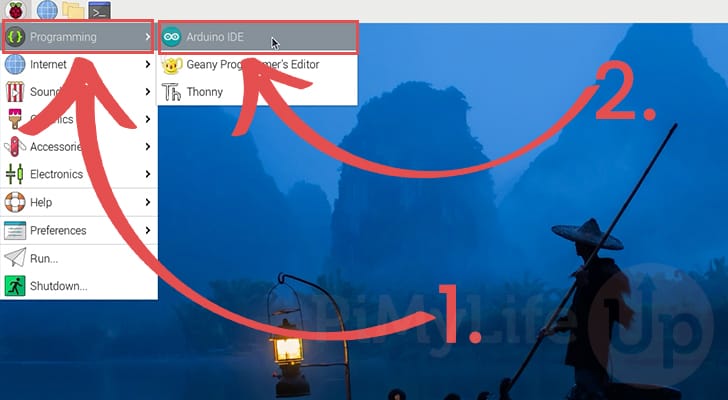
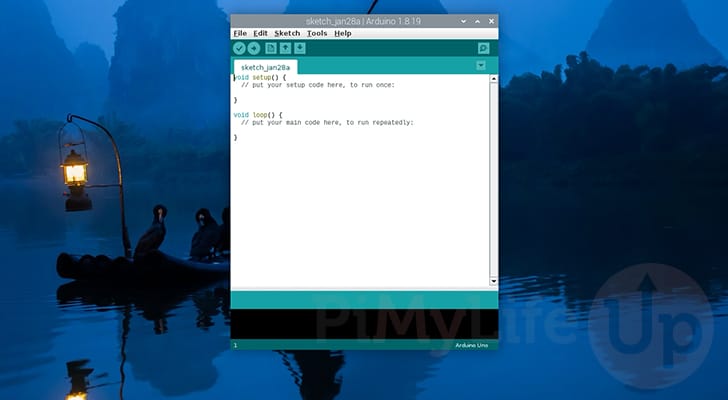
7. You have now successfully installed and opened the Arduino IDE on your Raspberry Pi.
Our next few steps will walk you through using this interface to program a very simple script to your Arduino.
Programming An Arduino from a Raspberry Pi
These next few steps will walk you through how you can use the IDE to program your Arduino from a Raspberry Pi.
Selecting your Arduino Board
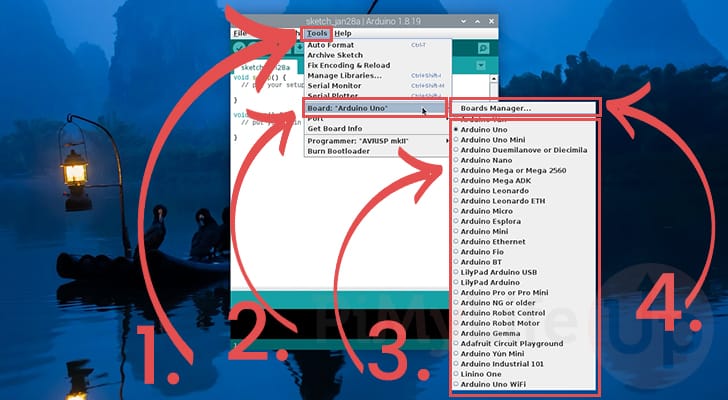
8. Before your Raspberry Pi can program your Arduino, you must ensure that the correct board has been selected.
First, bring up the tools menu by clicking “Tools” in the top menu bar (1.).
From here you should see an option starting with “Board:“, if the listed board is correct, you can skip straight to step 10. Otherwise, check the list of supported Arduino’s (3.) to see if yours is listed there
If your Arduino wasn’t automatically selected and is unavailable in the list, you will want to click the “Board Manager...” option (4.).
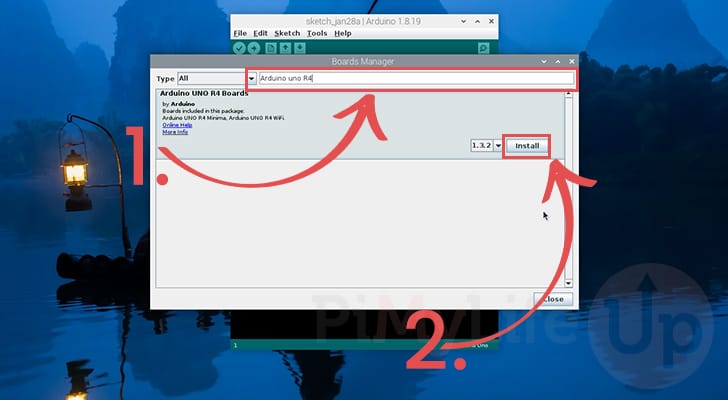
9. Some Arduino boards require you to install additional packages to program it from your Raspberry Pi.
With the boards manager open, use the top search bar and type in the name of your Arduino model (1.). For this example, we will be using “Arduino uno r4“.
If a board package is available to add support for your Arduino to your Pi, you should see a package listed here. Once you identify the right package, click the “Install” button (2.).
Ensuring the Correct Serial Port is Selected
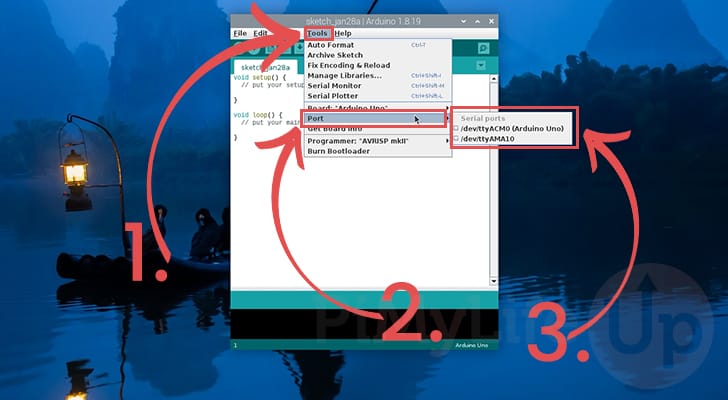
10. After selecting the Arduino Board you are using, we must ensure that the correct serial port has been selected.
To choose your serial port, click “Tools” in the top menu bar (1.).
Next, you will want to hover over the “Port” option (2.).
You will then see a list of serial ports available to your Raspberry Pi. The correct one should be the one with the name of your Arduino next to it. Otherwise, try using the port labeled “/dev/ttyACM0” (3.).
Writing a Basic Arduino Script
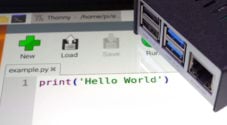
11. Now, to test that everything is working, let us use the Arduino IDE and our Raspberry Pi to program a simple Hello World script for our connected Arduino Uno.
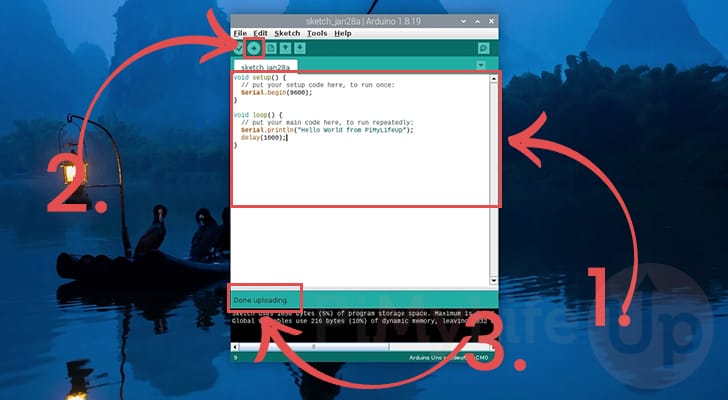
Within the code box (1.), enter the following short script. This script turns on serial mode and outputs the text “Hello World from PiMyLifeUp” to the serial output every second.
void setup() {
  Serial.begin(9600);
}

void loop() {
  Serial.println("Hello world from PiMyLifeUp");
  delay(1000);
}Copy
Once you have entered the code you want programmed to your Arduino, click the arrow icon in the menu bar (2.) to upload the code to your Arduino.
If everything has worked properly, you should see the text “Done uploading” appear on the interface (3.).
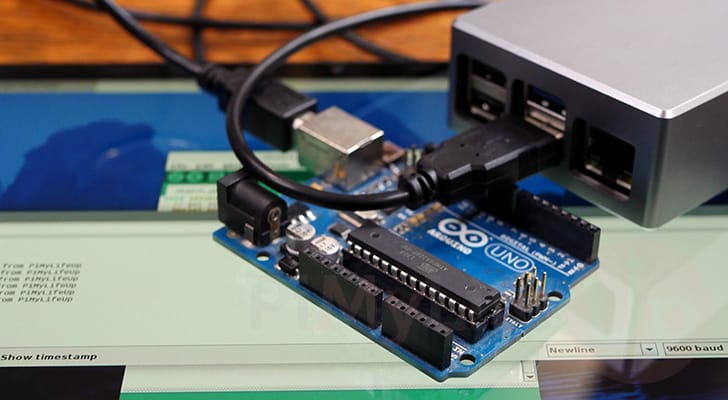
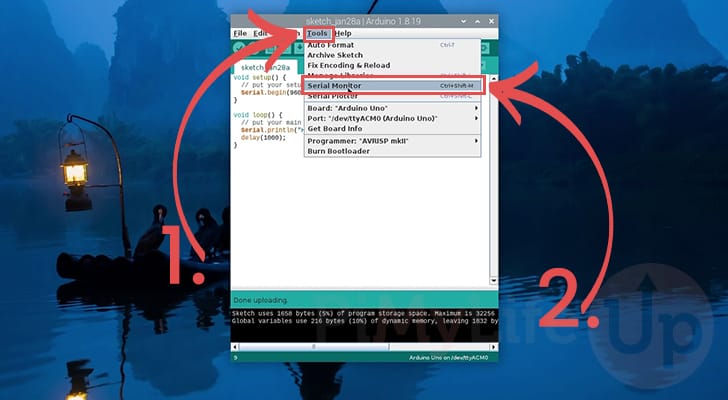
12. To verify that everything is working, let us open up a serial monitor to see the text being output by our Arduino.
To open the serial monitor, first click “Tools” in the top menu bar (1.), and then select the option labeled “Serial Monitor” (2.).
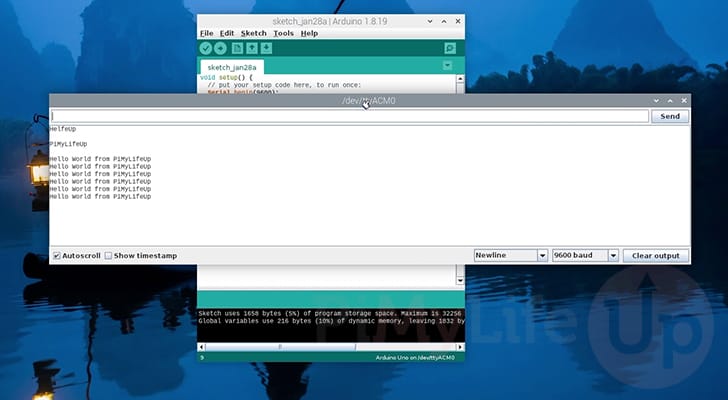
13. Below, you can see that everything is working with the text “Hello World from PiMyLifeUP” being output over the serial monitor.
Conclusion
By this point in the tutorial, you will know how to program an Arduino directly from a Raspberry Pi.
This whole process is pretty simple, as we can install the Arduino IDE directly onto Raspberry Pi OS.
Please comment below if you have had any issues installing the Arduino IDE or programming your Arduino from your Raspberry Pi. Most issues tend to come down to not having the correct board drivers installed, or poor connection to the board from a fault cable.
If you found this tutorial helpful, we highly recommend taking the time to explore some of our many other Raspberry Pi projects.