In this guide, we are going to show you how to enable SSH on Ubuntu operating systems.
SSH stands for Secure Shell and is the go-to network protocol for creating a secure tunnel between two devices.
This tunnel is regarded as secure and private thanks to SSH’s use of strong encryption and is used as one of the primary ways of managing servers remotely.
You can even use SSH to transfer files remotely, thanks to its implementation of the SSH file transfer protocol. It is a secure alternative to FTP.
Out of the box, Ubuntu does not have the SSH server installed. One of the main reasons for not enabling SSH by default is security.
If you have a weak password and an open network, attackers can use SSH to access your system. The one recommendation that we have before beginning this guide is to make sure you are using a secure password.
Ideally, for the best security, you will end up utilizing SSH keys on your Ubuntu system.
These steps showing you how to enable SSH should work for almost every version of Ubuntu (Including 18.04 and 20.04). OpenSSH has been the standard for providing SSH since 1999.
Enabling SSH on Ubuntu
In this section, we will show you the straightforward steps to enable SSH on your Ubuntu device.
Please note to complete this section, you will need to have access to a user with superuser privileges.
To make it easier to connect to your device over SSH, consider configuring your Ubuntu device to use a static IP address.
Be sure to check out our guide on setting a static IP address for Ubuntu 18.04.
1. Your first step is to open up the terminal.
If you are using the server edition of Ubuntu, you will already have access to this.
However, on the desktop version of Ubuntu, you can open up the command line by searching for the “terminal” application.
Alternatively, you can use the following key combination, CTRL + ALT + T, to quickly open the terminal.
2. Before we install the openssh-server package to Ubuntu, we should update the package list.
If it has been some time since you last updated the package list, it could cause connection issues when you go to install the package.
Don’t worry, though, as updating the package list is as simple as using the command below.
sudo apt update3. With the package list up to date, we can now install the openssh-server package to our Ubuntu machine.
To install this package, all you need to do is to run the following command.
sudo apt install openssh-serverThe openssh-server package is what will enable the SSH protocol on your Ubuntu device.
This package is the server that allows users to connect to your device over SSH.
It handles the hard work of creating the encrypted tunnel and authenticating and processing connections.
4. Upon installation, the package manager will automatically enable SSH on your Ubuntu machine. It will even set up a service so that it is available at startup.
You should now be ready to connect to the server.
Checking that SSH is Running on Ubuntu
Before continuing, you may want to verify that you have enabled SSH on your Ubuntu machine and that the server is up and running.
Luckily thanks to the system manager, checking the status of services is a straightforward process.
1. To verify that the SSH server is now running, we can utilize the systemctl tool.
Run the following command within the terminal to get the status of the SSH service.
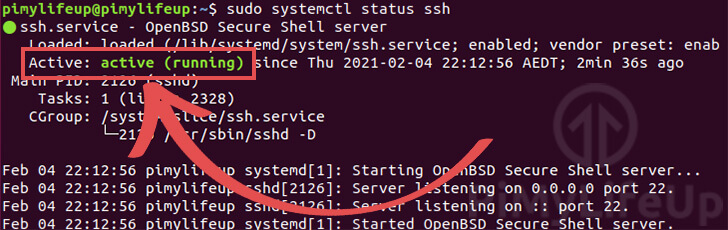
sudo systemctl status ssh2. From this command you should get a result like we have below.
● ssh.service - OpenBSD Secure Shell server
   Loaded: loaded (/lib/systemd/system/ssh.service; enabled; vendor preset: enab
   Active: active (running) since Thu 2021-02-04 22:12:56 AEDT; 2min 36s ago
 Main PID: 2126 (sshd)
    Tasks: 1 (limit: 2328)
   CGroup: /system.slice/ssh.service
           └─2126 /usr/sbin/sshd -D

Feb 04 22:12:56 pimylifeup systemd[1]: Starting OpenBSD Secure Shell server...
Feb 04 22:12:56 pimylifeup sshd[2126]: Server listening on 0.0.0.0 port 22.
Feb 04 22:12:56 pimylifeup sshd[2126]: Server listening on :: port 22.
Feb 04 22:12:56 pimylifeup systemd[1]: Started OpenBSD Secure Shell server.
If SSH is now enabled on your Ubuntu machine, you should see the message “Active: active (running)“, as we have shown below.
Allowing SSH through UFW
Ubuntu features a built-in firewall called UFW. UFW has been the standard firewall for Ubuntu systems since 8.04.
On a new installation, UFW won’t be enabled by default. However, it’s good to have the rule added in case you ever activate it.
Luckily for us, configuring UFW to let access through to SSH is a very straightforward process.
a. To allow SSH through UFW, all you need to do is run the following command.
sudo ufw allow sshThis command will allow connections through port 22 to the SSH server.
b. Alternatively, it is also possible to allow access through to SSH by specifying the exact port you are using.
This is useful if you have reconfigured the SSH server to utilize a different port.
sudo ufw allow 22If you are utilizing a different port, change “22” to that port number.
Disabling SSH on Ubuntu
There are two different ways that you can easily disable SSH on Ubuntu.
One method is to disable the SSH service. The other is to uninstall the software from Ubuntu.
Disabling the SSH Service
The first and least permanent change is to stop and disable the SSH server on Ubuntu.
As Ubuntu uses systmctl we can disable the SSH service by using a couple of simple commands.
1. Our first task will be to stop the SSH server that is currently running.
To shutdown, a currently running service, all you need to do is utilize the following command.
sudo systemctl stop ssh2. Next, we can disable the SSH service itself by running the following command.
Disabling the service will stop it from starting back up when your Ubuntu machine restarts.
sudo systemctl disable sshUninstalling the SSH Server
Alternatively, if you feel like you are no longer going to utilize SSH, it is possible to uninstall it.
1. All you need to do is utilize the apt package managers remove function.
Run the following command on your Ubuntu device to uninstall the SSH server from your Ubuntu server.
sudo apt remove openssh-server2. SSH should now be removed from your Ubuntu machine.
You can verify this by simply trying to make an SSH connection to your Ubuntu device.
Conclusion
At this stage, you will know how you can enable SSH on your Ubuntu device.
SSH is a secure and robust standard for remotely connecting to devices.
If you have had any issues with installing the OpenSSH server, please leave a comment below.
Also, be sure to check out our other Ubuntu and Linux guides.


Yep this website is a really good guide for many must have tools for a new Linux user!
Thanks to you for not leaving out the configuring of the firewall code I was able to login via SFTP on the first try from a windows 10 PC on my home LAN. This worked flawlessly on a new Zorin linux install.
Thank you. Your guides to setting things up (for my Pi 4) are excellent. Completely straightforward, they work, they’re great.