In this tutorial, we will show you how to enable SSH on your Mac.
SSH stands for Secure Shell Protocol and is a highly secure method for connecting two computers over a network.
It is often used to control a device such as a Mac over the network as it allows you to send commands remotely.
This is especially useful if you happen to be using your Mac as a web server with it running Apache or NGINX. Alternatively, you could just want to manage your Mac remotely.
macOS calls the functionality of enabling the SSH server on a Mac “remote login”. While it uses a different name, it is just SSH.
By the end of this tutorial, you will see how easy it is to enable SSH on your Mac with MacOS 13 and newer.
Enabling SSH on a Mac
Within this section, we will be covering exactly how to enable SSH on a Mac.
We will be showing you two different methods. The first is how to use the desktop interface. The other is how to use the terminal.
It is useful to know how to use the terminal to enable or disable SSH, as it is one thing that rarely changes. In contrast, the macOS interface gets updated and changed relatively often.
Using the Desktop Interface on macOS to Enable SSH
The steps below were written for macOS 14 Sonoma, but they should be the same for older releases. The position of some of these options might differ slightly.
1. To enable SSH on your Mac, you will need to get to the settings screen.
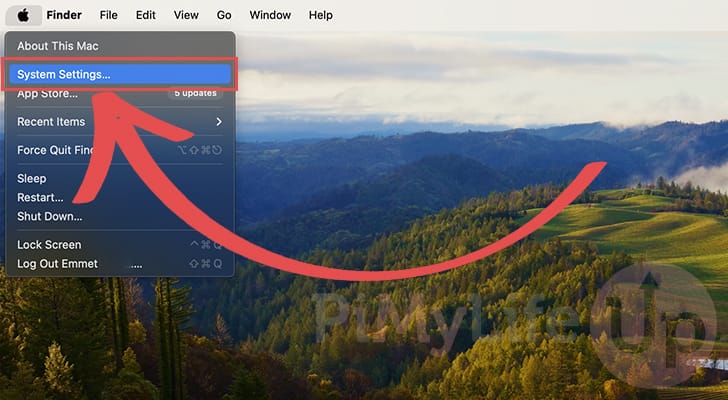
Start by opening the Apple menu by clicking the Apple icon in the top-right corner.

2. In the menu that pops up, find and click the “System Settings...” option
On older versions of macOS, this is sometimes labeled “System Preferences“.
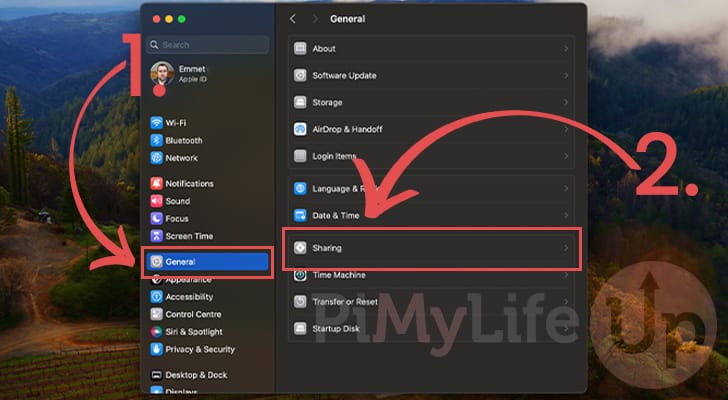
3. Now that you have the settings menu open, change to “General” settings by clicking “General” in the sidebar (1.).
Next, find and click the “Sharing” option (2.). Within this menu is where you will find the ability to enable the remote login functionality.
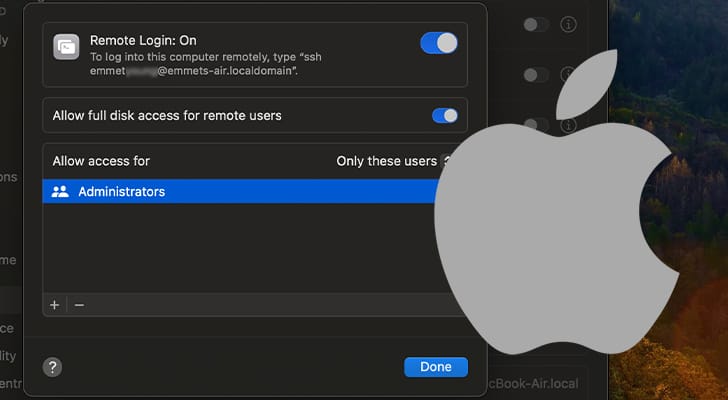
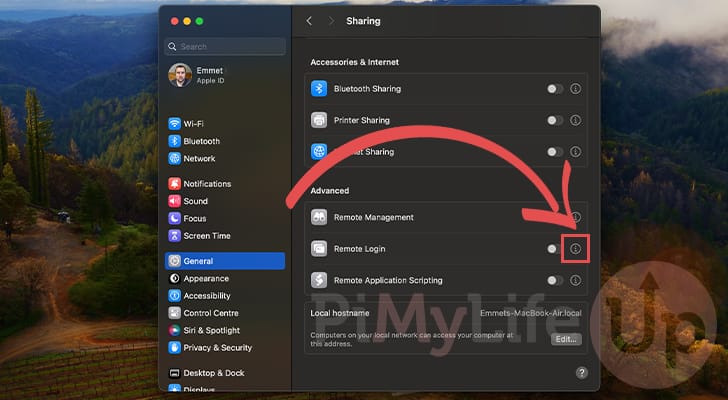
4. You are finally at the point where we can enable remote login on our Mac. Remote login is the name macOS gives SSH on your system.
Since we want to do more than just enable SSH on our Mac, click the little “(i)” icon next to the “Remote Login” option.
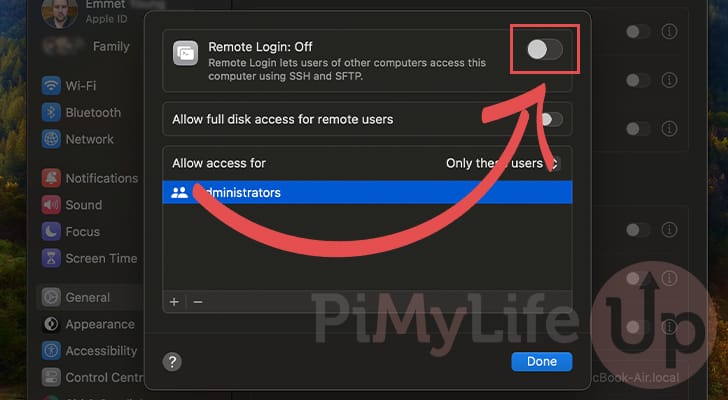
5. The first thing you want to do on this screen is toggle “Remote Login” to on.
All you need to do is click the toggle next to “Remote Login:“. This will make your Mac enable the SSH server.
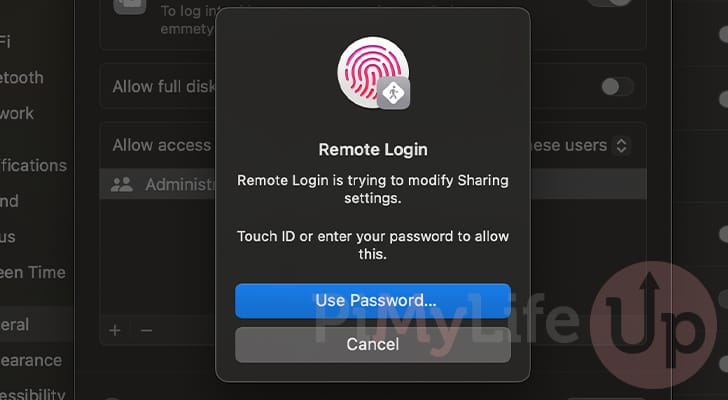
6. Before you can enable SSH, you will get a warning that the system is attempting to modify settings.
To enable SSH you must now either type in your password or use Touch ID.
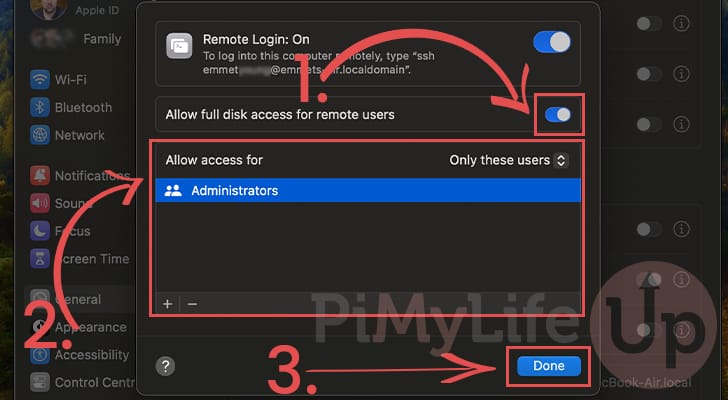
7. Now, you can decide whether you want your SSH users to have full access to the disk (1.). We recommend enabling this option as it makes it easier to manage your Mac over SSH.
Next, you can choose what users can use your Mac’s SSH server. By default, this is locked to “Administrators” (2.). Leaving this to the default setting is recommended.
Finally, once you have configured everything, click the “Done” button (3.).
8. You have now successfully enabled SSH on your Mac, or as macOS names it, remote login.
How to Enable or Disable SSH Using the Terminal on a Mac
In this section, we will show you how to enable and disable SSH through the terminal on macOS.
These steps are straightforward, especially if you are comfortable using the terminal. The advantage of using the terminal is that these commands have continued to work since super old versions of macOS.
Before continuing with this section, you must start by opening the terminal on your Mac.
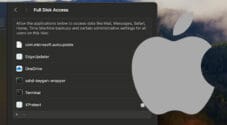
Additionally, you must have given the terminal full disk access to run these commands on your Mac. If you haven’t done so, follow our guide on granting the terminal full disk access on macOS.
Checking the Status of SSH Remote Login using the Terminal on macOS
1. Let us start by showing you how to check the current status of the SSH server on a Mac.
This is useful if you are unsure whether you have already enabled SSH on your system.
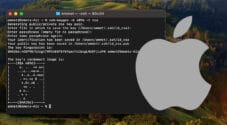
To get the status of SSH, use the following command within the terminal.
sudo systemsetup -getremoteloginCopyBy using “sudo“, we are running this command as an administrator. You will be prompted to authenticate yourself before this command will run.
2. fter running the above command, you will get two possible results.
- “
Remote Login: On“: The SSH server is currently enabled. You can log in remotely using your account. - “
Remote Login: Off“: Remote login functionality is disabled. You cannot connect to your Mac remotely using SSH.
Enabling the macOS SSH Server using the Terminal
3. Enabling SSH on your Mac while using the terminal is incredibly simple.
All you must do to enable this is to use the following command. This command sets the “remotelogin” option to “on“, which switches on the SSH server built into macOS.
sudo systemsetup -setremotelogin onCopy4. You have successfully set up SSH on your Mac and can now connect to it remotely using an SSH connection.
How to Disable the SSH Server
5. Disabling the SSH server on a Mac is as simple as enabling it when using the terminal.
All you need to do is use the following command within the terminal to set the “remotelogin” option to “off“.
sudo systemsetup -setremotelogin offCopy6. When switching off SSH, you will get a warning that any SSH connections to macOS will be terminated when it turns off the server.
To proceed with disabling SSH, type in “yes” and then press the ENTER key.
Do you really want to turn remote login off? If you do, you will lose this connection and only turn it back on locally at the server (yes/no)?7. You will now have hopefully turned off SSH on your Mac.
If you are trying to disable SSH over an SSH connection, this will only work if you give those users full disk access.
Conclusion
Hopefully, at this stage in the tutorial, you will have successfully learned how you can enable SSH on your Mac.
You will have also learned that SSH is called “Remote Login” within the macOS interface.
Please feel free to leave a comment below if you have any issues enabling the SSH server.
If you found this tutorial to be helpful, please check out our many other macOS tutorials.