In this tutorial, we will be showing you how to install DOSBox on the Ubuntu operating system.
DOSBox is an open-source emulator for the DOS operating system. It even emulates various features of hardware of the time, such as Tandy/Hercules/CGA/EGA/VGA/VESA graphics, as well as SoundBlaster/Gravis Ultra sound cards.
Emulating these various features has made it possible to even run MS-DOS applications on a Linux system such as Ubuntu.
The only drawback of DOSBox is that it is primarily driven through its command-line interface. But, don’t worry, as it is relatively straightforward to use.
Over the following few sections, we will show you how easy it is to install DOSBox to Ubuntu. Additionally, we will also show you how to use it to run an MS-DOS application.
Installing DOSBox on Ubuntu
The process of installing DOSBox on Ubuntu is relatively straightforward. This is because DOSBox is available through the official package repository.
Before you continue with this section, you will need to open the terminal on Ubuntu. The easiest way to open the terminal on desktop is to press CTRL + ALT + T.
1. Before proceeding, you will need to enable the Ubuntu universe repository by following our guide.
These steps are straightforward and will have the universe repository enabled quickly.
2. Once you have the Ubuntu universe repository enabled, we can now run a package list update.
Updating the package list is crucial to ensure we are installing the latest version of DOSBox on Ubuntu.
sudo apt updateCopy3. Once the package list has been updated, we can finally install DOSBox.
To install DOSBox on Ubuntu, you only need to run the following command within the terminal.
sudo apt install dosboxCopyYou will be prompted to confirm the installation of DOSBox. Press Y, then ENTER when this prompt appears.
4. For our next step, let us create a directory where we will store our various MS-DOS software.
Using the following mkdir command, we will make a directory called “dosbox” in your user’s home directory.
mkdir ~/dosbox/CopyConfiguring DOSBox on Ubuntu
Before using DOSBox, you will want to configure it to best suit your needs. This section will show you how to find the configuration file. Additionally, we will also show you how to open the key mapper.
Using the mapper, you can configure the controls to suit your needs. For example, you can map an Xbox controller to specific keys.
1. We need to start DOSBox on our Ubuntu system so that it will generate all the configuration files you need.
To start DOSBox, run the following command on your system.
dosboxCopy2. DOSBox will now open on your system. Once open, you can exit it immediately by typing “exit” and then pressing ENTER.
exitCopy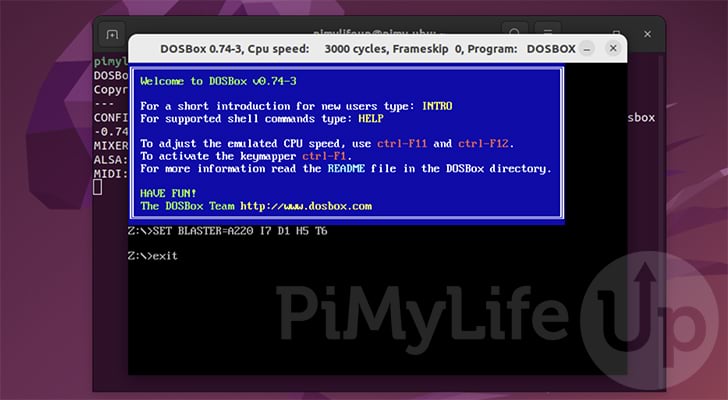
3. You can now edit the DOSBox configuration file using the following command.
To edit this file, we will use the nano text editor as it is very straightforward.
nano ~/.dosbox/dosbox-0.74-3.confCopyThe configuration file name might change depending on the version of DOSBox that was installed on Ubuntu. You can use the ls command to check for files within this directory.
ls ~/.dosbox/Copy4. Within this configuration file, you will find a ton of options that you can adjust.
We won’t cover this within this guide, but you can check the official DOSBox documentation for the best information.
Once you have made any changes, you can save and quit by pressing CTRL + X, then Y, followed by the ENTER key.
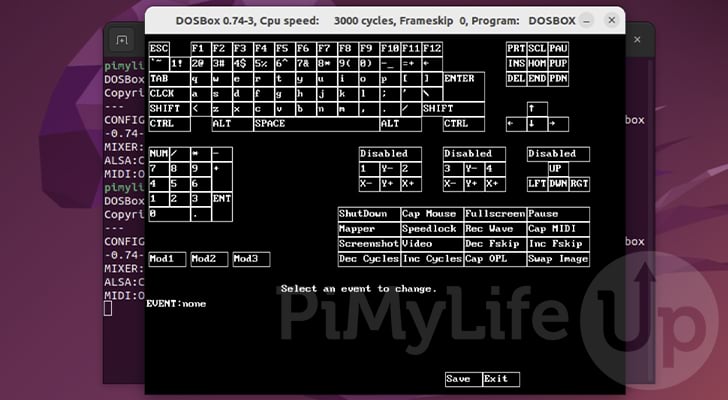
5. There are a couple of ways that you can DOSBox’s mapper. This mapper is what allows you to assign keys to particular buttons. This includes mapping keys to a controller.
If you already have DOSBox opened on Ubuntu, you can press CTRL + F1 to open the mapper.
However, you can open the mapper directly from the terminal using the following command.
dosbox -startmapperCopy6. Below, you can see what the DOSBox mapper looks like after opening it on Ubuntu. You can click the keys to modify the key mapping.
If you are using a known controller, you might find some keys are automatically mapped. However, the default mapping may not be great, depending on the game you are running.
Installing your First DOS Game
In this section, we will show you how to set up a game so you can run it using the DOSBox emulator on Ubuntu.
These basic steps are here to show you where we expect the files to be extracted for this guide.
While these particular steps focus on using the terminal, you can easily do this within the desktop GUI. Basically, you just need to extract your games to the “dosbox” directory we created earlier in your home directory.
It would be best if you kept each game in its own directory. For example, the game Outrun would be in “~/dosbox/outrun/“.
An excellent place to find old MS-DOS games is Archive.org’s MS-DOS Games library. If a game can be downloaded, you need to click the ZIP option under “Download Options“.
1. For this example, we have the DOS game “Outrun” saved to our “~/dosbox/” directory. However, it is currently stored as a “.zip” archive.
However, it only exists as a zip file so we will need to extract it.
2. You can extract this archive by using the unzip command on Ubuntu.
For our game, we ran the following command to extract its contents to a subdirectory called “outrun“. If your archive already contains the game as a subdirectory, zyou can skip using the “-d” option.
unzip outrun.zip -d ./outrun/Copy3. Once you have the DOS game you want to play on Ubuntu extracted to its own directory, we can move on to playing it.
Running a Game with DOSBox on Ubuntu
Within this section you will learn how you can use DOSBox on Ubuntu to run your games. Using this emulator is fairly straightforward process even though it is command line driven.
1. To launch the game, you must open up the DOSBox application.
The fastest way to do this is to open the terminal and run the following command.
dosboxCopy2. With DOSBox now running on Ubuntu, we can use it to launch a game. Our first task is to “mount” the directory where we stored the game to the “c” drive letter.
We can do that by using the following command within DOSBox.
First, you write the “mount” command, followed by a drive letter (E.G., c), then finally, the directory you want to mount. In our case, this is where we extracted Outrun on our device.
mount c ~/dosbox/outrun/Copy3. After mounting a new directory to a specific drive letter, you need to change to it.
You can change to our newly mounted path using a drive letter (c), followed by a colon (:).
c:4. You can now run your game by typing in the name of its executable.
In our example, this means we would type in “outrun” to launch the game.
outrunCopyIf you are unsure what the executable file is called within your directory, you can use the following command to find it.
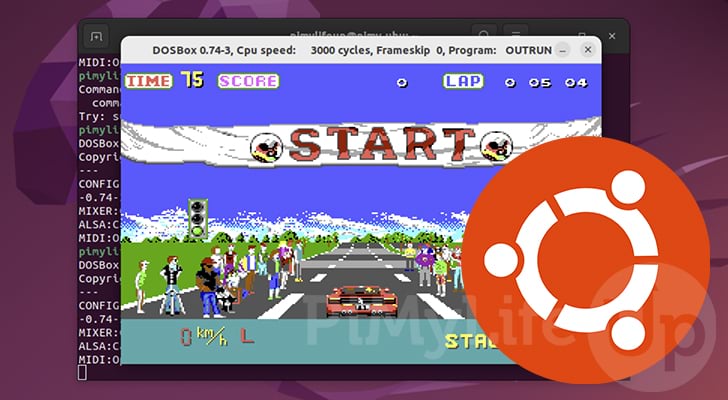
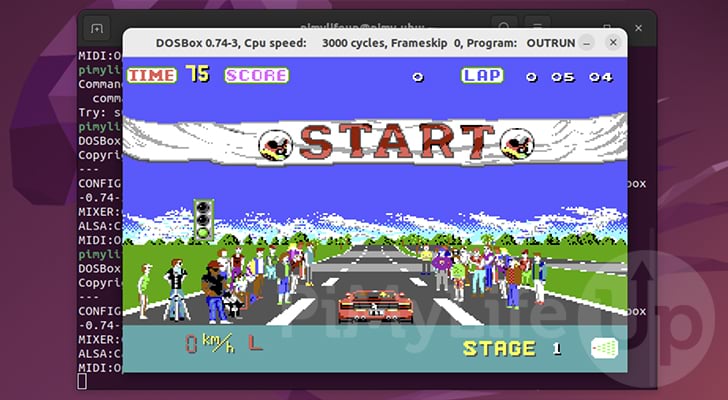
dir .exeCopy5. Below, you can see how we now have Outrun running on our Ubuntu device thanks to DOSBox.
You can control how fast or slow the game is running by controlling its cycles. To decrease the speed, press CTRL + F11. To increase the speed, press CTRL + F12.
Conclusion
Hopefully, at this point, you will have successfully installed DOSBox on Ubuntu and run your first game.
DOSBox is one of the best ways to run any program that was designed to run on the old DOS systems.
Please comment below if you have questions about installing and running DOSBox on Ubuntu.
Be sure to check out our many other Ubuntu tutorials. We also have many other general Linux tutorials.