In this guide, we will be showing you how to run Raspberry Pi Desktop using VirtualBox.
VirtualBox is a nifty piece of software that allows you to run an operating system on top of another operating system.
For example, by following this guide, you can run Raspberry Pi Desktop on Windows, Mac OS, or Linux.
For those who do not know, Raspberry Pi desktop is an x86 version of the OS that you run on the little SBC. It comes with most of the recommended software that ships with Raspberry Pi OS.
Being built on top of the desktop interface used for the Pi, this Debian-based operating system is very lightweight and is fantastic for low-end machines.
You can use this virtual machine as a great way of learning how to navigate the Raspberry Pi Desktop interface.
It is also possible to prototype projects you plan to do on your Raspberry Pi, as long as it isn’t only available on x86.
Downloading the Raspberry Pi Desktop Operating System
Finding the correct version of Raspberry Pi Desktop to download is a straightforward process.
You can’t just use Raspberry Pi OS’s regular builds as VirtualBox does not support virtualizing the ARM architecture.
The Raspberry Pi Foundation provides a page that has this particular version of the operating system separated.
Go to the official page for Raspberry Pi Desktop and click the button labeled “Download“.
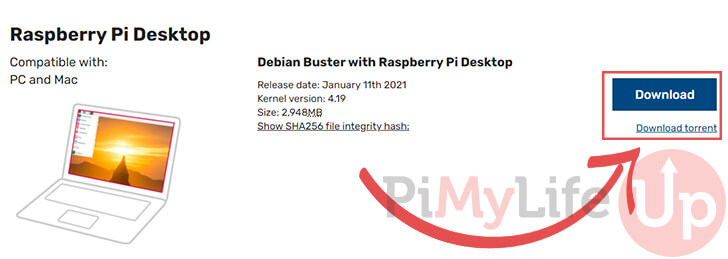
This button should appear next to the “Debian Buster with Raspberry Pi Desktop” text.
Installing VirtualBox to your PC
As noted earlier in this guide, we will be using VirtualBox to run Raspberry Pi Desktop on our Windows PC.
The steps showcased within this guide work for the Mac and Linux versions of the VirtualBox software.
You can download the VirtualBox virtualization software for your operating system from their website.
Please note that VirtualBox relies on hardware-based virtualization to work.
You need to ensure that you have Intel’s VT-x or AMD’s AMD-V enabled. These allow VirtualBox to virtualize operating systems like Raspberry Pi Desktop to get the most of your hardware’s capabilities.
Creating a Virtual Machine for Raspberry Pi Desktop
Once you have VirtualBox installed on your PC, we can now go ahead and create a new virtual machine (VM).
This virtual machine is what we will be installing the Raspberry Pi Desktop operating system to.
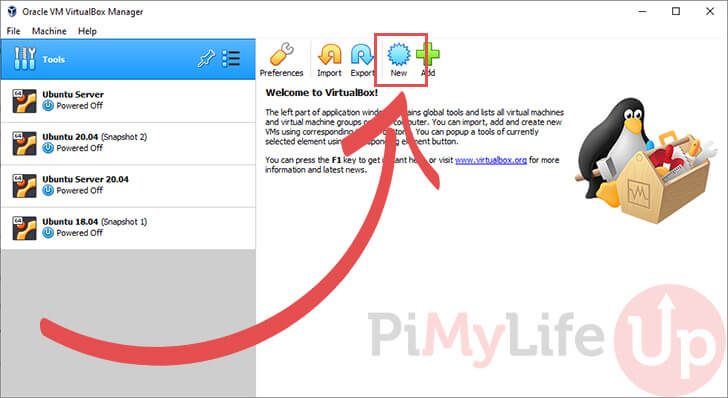
1. Within VirtualBox, we need to create a new virtual machine for Raspberry Pi Desktop.
You can start this process by either clicking the “New” button or pressing CTRL + N.
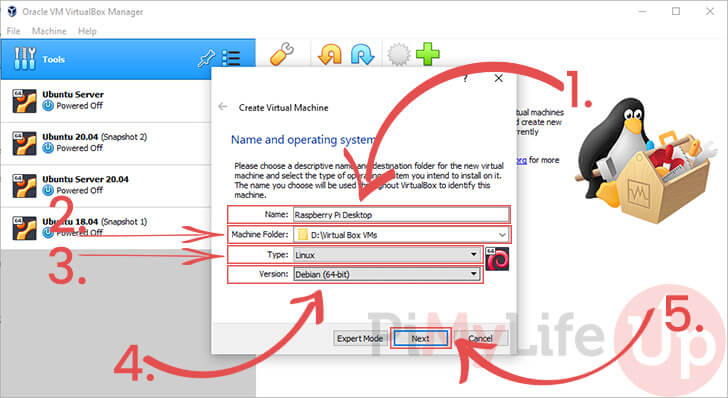
2. For the first step of creating a new VM, we need to give it a name (1.). For our guide, we will name this VM “Raspberry Pi Desktop“.
Next, you need to specify where you want that virtual machine to be stored (2.).
We then need to specify the type of operating system we want VirtualBox to virtualize, use the type option to set this to “Linux” (3.).
Now we need to specify the type of Linux operating system we are using. As Raspberry Pi Desktop is built off of Debian, we need to set this to “Debian (64-bit)” (4.).
Once you have all four options set correctly, click the “Next” button to continue (5.).
3. We are now required to specify how much memory our virtual machine will have access to.
For our guide, we will be sticking to 2048mb of memory (1.). However, you can get away with as little as 1024mb of RAM as Raspberry Pi Desktop is relatively well optimized for low-end systems.
With your memory allocation set, click the “Next” button to confirm it (2.).

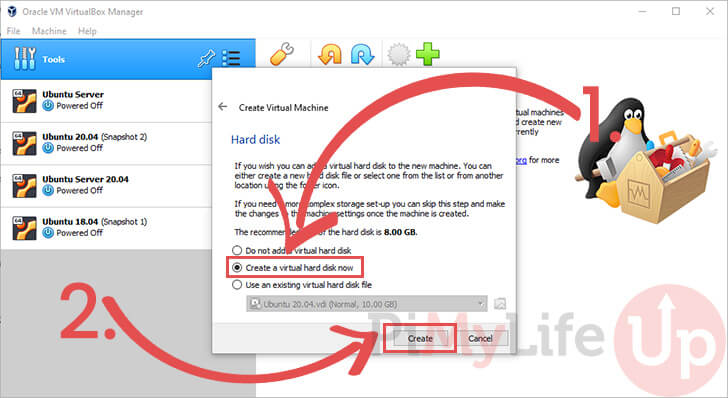
4. A virtual machine stores its operating system and all of its files within what is called a “virtual hard disk”.
This virtual disk allows the operating system to interact with it as if it was a real mountable drive without affecting the drives in your actual computer.
As we want to create a virtual hard disk, select the “Create a virtual hard disk now” option (1.).
With an option selected, click the “Create” button (2.).
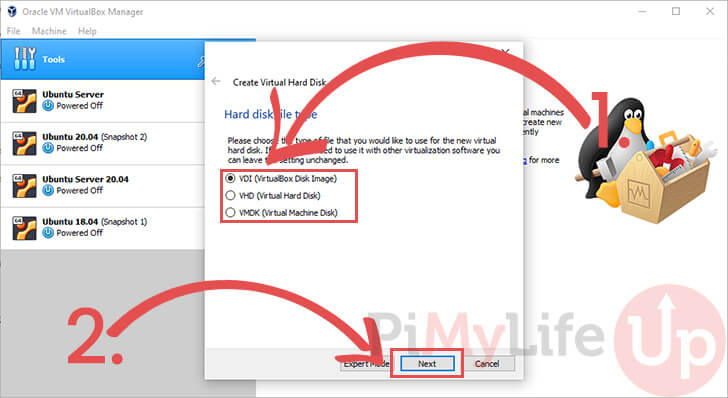
5. Our next step is to select the type of virtual disk we want.
If you only intend on using VirtualBox to run Raspberry Pi desktop, you can stick with the VDI option (1.).
Continue with the virtual machine setup by clicking the “Next” button (2.).
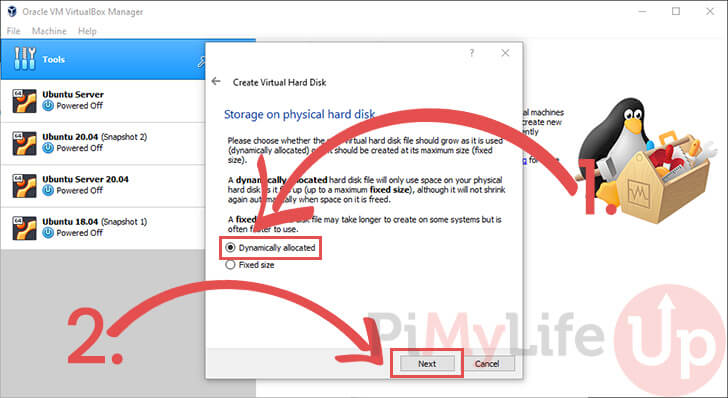
6. We can now choose whether we want the disk to be created all at once or whether it should be dynamically allocated.
For this guide, we will stick with “Dynamically allocated” as it is faster to get started with (1.).
To proceed with the VM creation, click the “Next” button (2.).
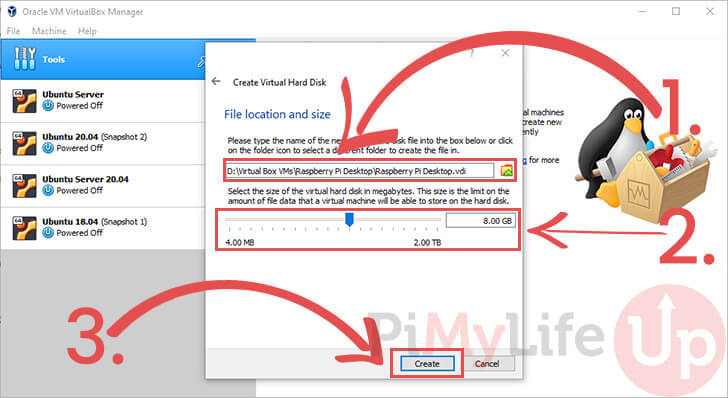
7. Our final step is to select the location VirtualBox will store our virtual disk and its size.
First, set the file location of the virtual disk. Make sure this is somewhere where you have a decent amount of storage (1.).
Next, you will need to set the size of your virtual disk. 8 GB of storage should be more than enough for most use cases, but you can increase this up to 2 TB (2.).
To finalize the creation of your Raspberry Pi Desktop’s virtual machine, click the “Create” button (3.).
Starting up Your New Raspberry Pi VirtualBox Machine
At this stage, you should now have a virtual machine created within VirtualBox that we can run the Raspberry Pi Desktop OS within.
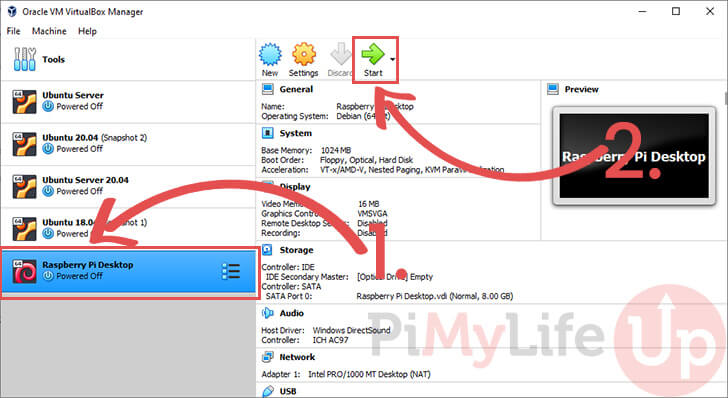
1. Within the VirtualBox interface, locate the virtual machine you just created and click it (1.).
Once you have the virtual machine selected, boot it up by clicking the “Start” button (2.)
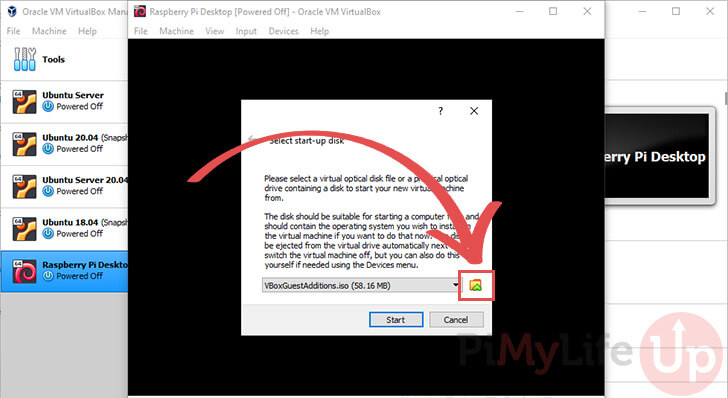
2. When you first start up a virtual machine, you should see a prompt, as we have shown below.
This prompt asks you to select the image you want to use as the virtual machine’s startup disk.
To add the Raspberry Pi Desktop as an option, we need to open the optical disk image selector. You can open this by clicking the little folder icon next to the select box.
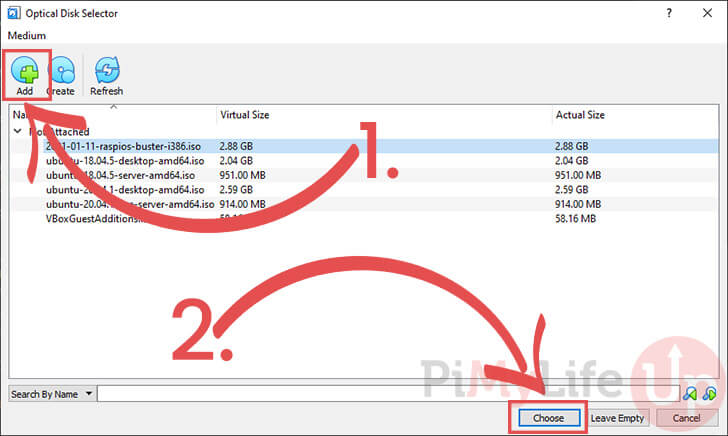
3. Within the topical disk selector dialog, you will need to click the “Add” button (1.).
This button will bring up a file browser for your system. Use this dialog to find and select the Raspberry Pi Desktop image that you should have downloaded earlier.
This image will be called something along the lines of “2021-01-11-raspios-buster-i386.iso“.
Once you have the Raspberry Pi Desktop image selected, you can click the “Choose” button (2.) at the bottom of the dialog.
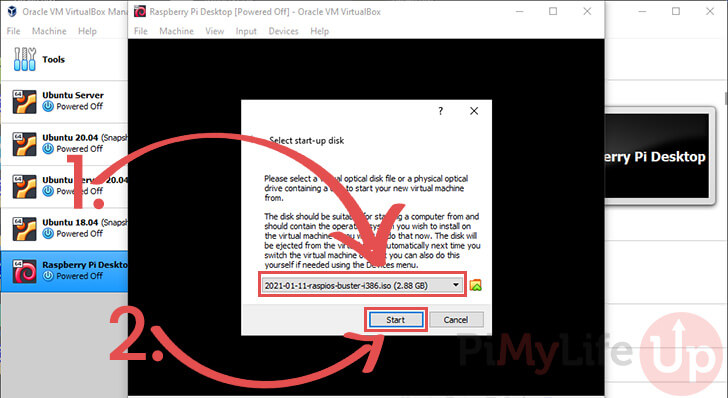
4. With the Raspberry Pi OS image now available to VirtualBox, you need to make sure it is currently selected in the select box (1.).
Once you are sure it has been selected, click the “Start” button (2.) to boot up the virtual machine.
Running Raspberry Pi Desktop within VirtualBox
After starting up the virtual machine, it will immediately begin to run off of the Raspberry Pi image we selected.
1. During Raspberry Pi Desktop’s startup, you will be given a chance to select how you want to run it.
To navigate this menu, you use the UP and DOWN arrow keys. You can select a choice by pressing the ENTER key.
The two options you will most likely choose are “Run with persistence” (1.) or “Install” (2.).
- The first option will allow you to boot into the Raspberry Pi Desktop immediately without installing the OS to the virtual disk.
However the OS will still have persistence, meaning the packages you install, and settings you make should remain after restarting the virtual machine.
By selecting the first option, you will always need to have the Raspberry Pi Desktop image available as the OS does not existing within the virtual disk itself. - The install option (2.) is how you would traditionally install an OS to a hard disk.
VirtualBox will install the Raspberry Pi Desktop OS to the virtual disk, meaning you will no longer need to have the disk installed.
If you only want to check out the Raspberry Pi OS desktop interface quickly, you are more than safe enough to choose the “Run with persistence” option.
However, if you wanted to use this more regularly, you should select the “Install” option.
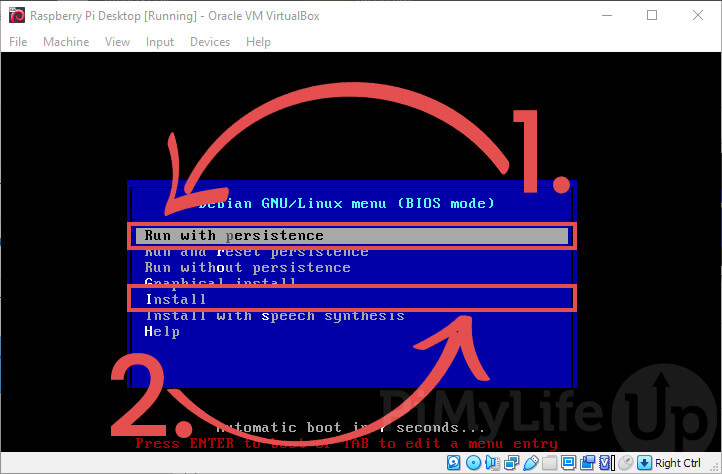
Please note that if you don’t press any key, the VM will automatically boot using the “Run with persistence” option.
Installing Raspberry Pi Desktop to VirtualBox
If you decide to go down the install route for Raspberry Pi Desktop, there are a few extra steps that you will need to follow.
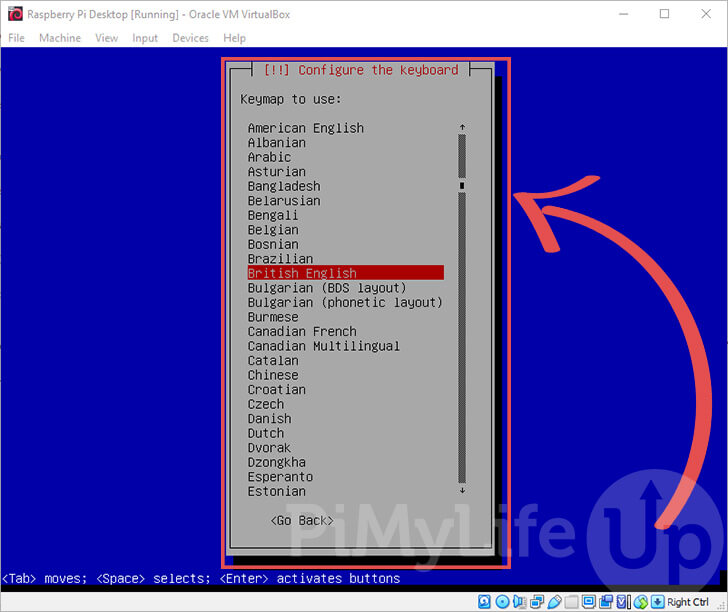
When using these menus, you need to use the ARROW keys to navigate the menus. Use the SPACE key to select an option and the ENTER key to confirm the selection.
1. The first option you will need to set is the language for the keyboard you are using.
This automatically defaults to “British English“, but you must configure this correctly. In our case, we selected “American English“.
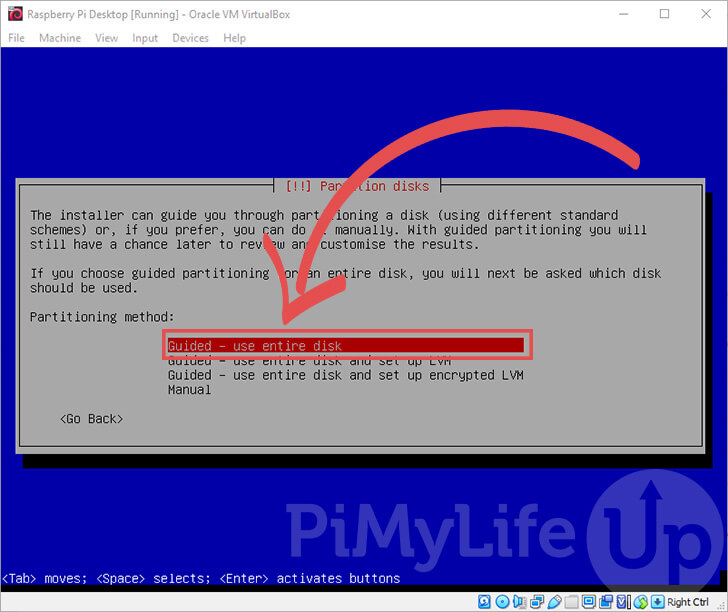
2. Before Raspberry Pi Desktop can be installed to our VirtualBox VM, we need to let it partition the disk.
We can start this process by selecting the “Guided - use entire disk” option.
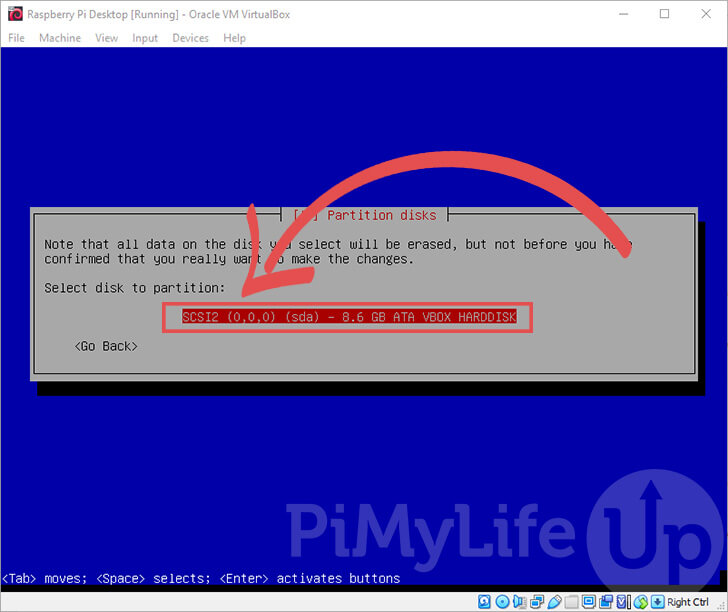
3. Our next step is to select the disk that we want to partition.
In our case, we only have one disk available to configure. This disk is the virtual one you created earlier on in this guide.
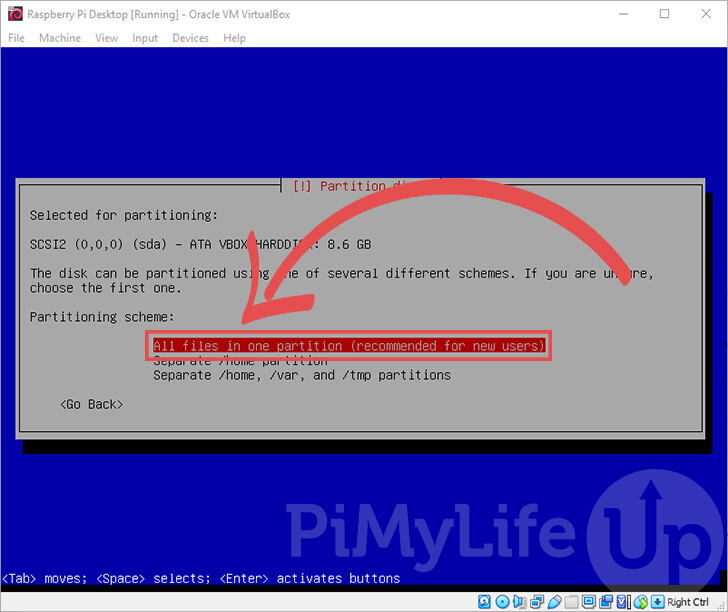
4. You will now be prompted to select how you want the disk to be partitioned.
The Raspberry Pi Desktop installer lets you create individual partitions for various directories.
We want everything to be stored within the partition, so we selected the first option.
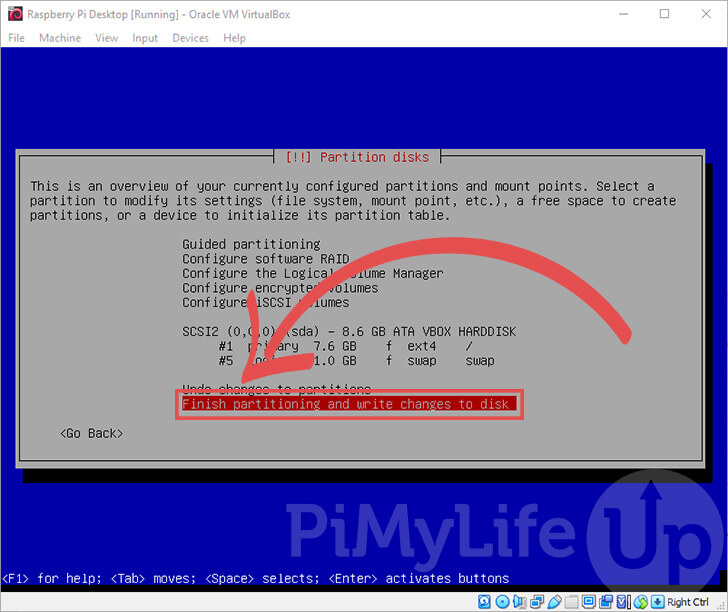
5. The screen will now show you all the changes that it wants to perform to your disks.
You can use this screen to understand what partitions the OS installer will create on your virtual disk.
If you are happy with what it shows, select the “Finish partitioning and write changes to disk” option.
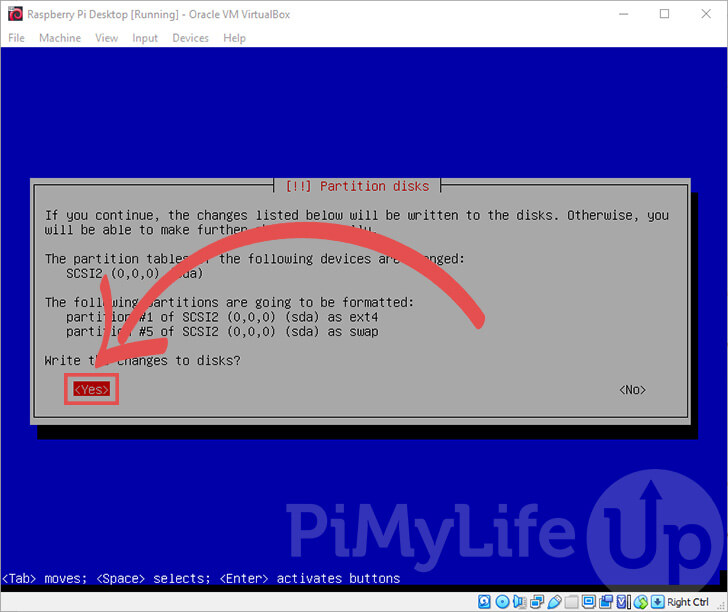
6. Finally, the OS installer will want to write the changes to the disk.
You can confirm this by selecting the “<Yes>” option.
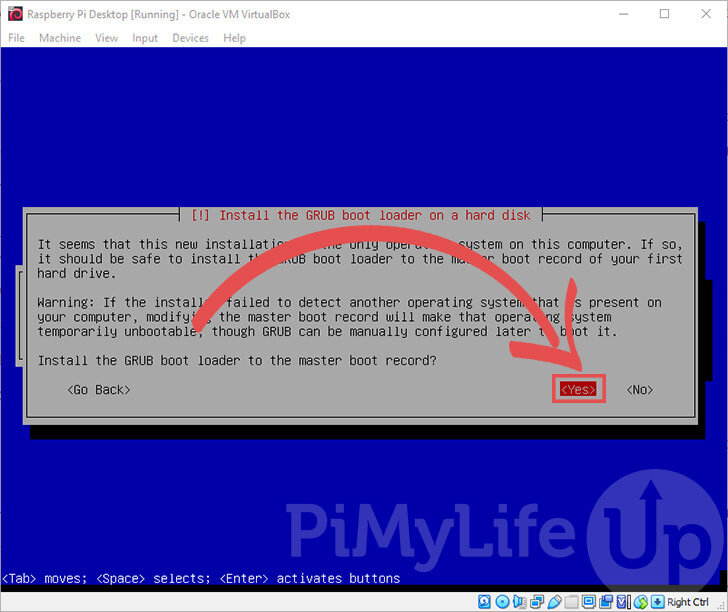
7. Next, the installer will want to install the GRUB boot loader.
The boot loader is what handles booting into the Raspberry Pi OS desktop within your virtual machine.
As we want the boot loader, select the “<Yes>” option
8. We now need to choose the drive that we want to write this bootloader to.
In this guide’s case, you should only have the one virtual disk that you created earlier.
Select the available disk to finish your setup of the operating system.

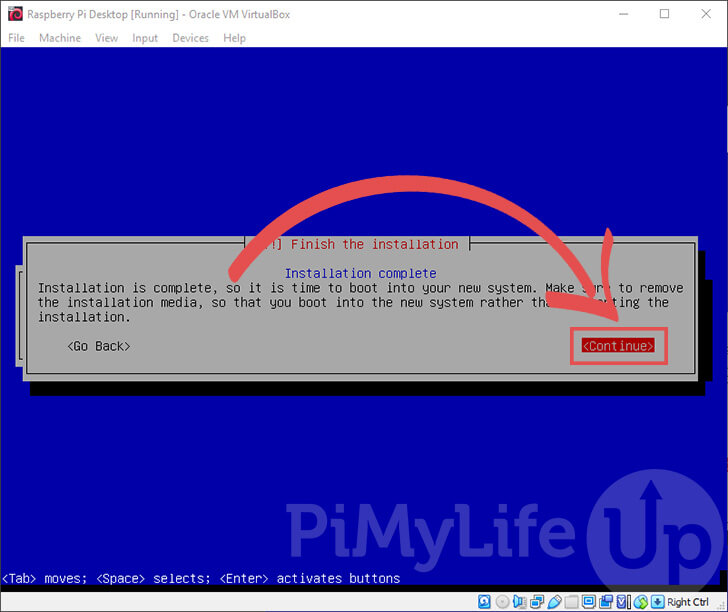
9. The installation process has now been completed.
You can select the “<Continue>” option to restart your device into the operating system.
You are not required to remove the boot image yourself, as VirtualBox will handle this process for you.
10. Your virtual machine should now restart into the Raspberry Pi Desktop.
You can now start exploring the operating system and installing packages that you may want to run.
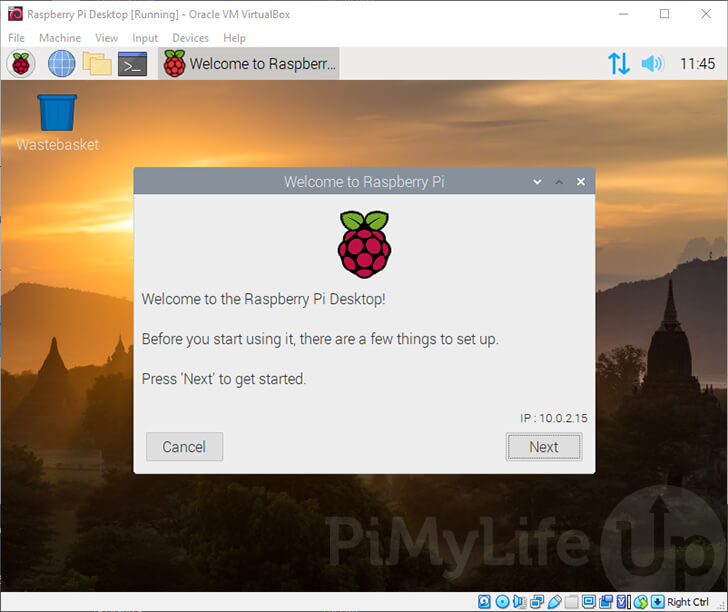
If you want to make risky changes to the OS, be sure to explore using VirtualBox’s snapshot functionality.
Running the OS With Persistence
If you choose to boot directly into the operating system without installing it, then there is nothing extra you need to do.
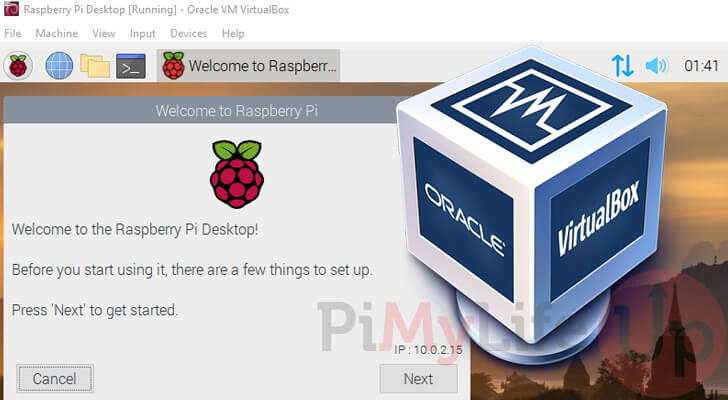
After a short boot-up sequence, you will be greeted by the desktop interface of Raspberry Pi OS.
Use this virtual machine to explore the operating system and get familiar with the general interface.
Conclusion
This guide should have shown you how to install the Raspberry Pi Desktop OS to a VirtualBox virtual machine.
It is a fairly straightforward process that anyone can get up and running on their Windows, Mac, or Linux PC.
Using a virtual machine allows you to quickly check out the desktop interface and familiarize yourself with it.
As it uses the same interface as Raspberry Pi OS, you can use this to get used to interacting with the SBC.
If you have experienced any issues with running Raspberry Pi Desktop on VirtualBox, please leave a comment below.
You can also follow our guide on how you can run Ubuntu within a virtual machine as well.
Also, be sure to explore our numerous Raspberry Pi tutorials and Linux guides.


yes, excellent primer indeed
thanks
Excellent Tutorial, thank you.