In this tutorial, we will be showing you how you can control a TV by using HDMI-CEC and a Raspberry Pi.
HDMI-CEC is a special protocol designed for TVs to communicate with another device over an HDMI cable. This protocol allows the TV to control another device while also allowing that device to control the TV.
Most modern TVs have implemented support for this protocol, but it often has to be enabled within the TV’s settings. Searching for the model of your TV should help you find what this setting is called.
Using the HDMI-CEC protocol, you can use your Raspberry Pi to control a TV in a variety of different ways, such as turning it off and on or changing the volume.
Equipment List
Below is the equipment that you will likely need to complete this tutorial on using HDMI-CEC from your Raspberry Pi.
Recommended
- Raspberry Pi Amazon
- Micro SD Card Amazon
- Power Supply Amazon
- Ethernet Cable Amazon or Wi-Fi Amazon
- HDMI Cable Amazon
Optional
For this tutorial on using HDMI-CEC, we were running the latest available version of Raspbian Buster running on a Raspberry Pi 4.
This tutorial should function with older Raspberry Pi’s and older versions of the Raspbian operating system.
Installing cec-client to Your Raspberry Pi
In this section, we will be showing you the simple steps to installing the cec-client software on your Raspberry Pi.
cec-client is the software package that we will be utilizing on the Raspberry Pi to control a device over the HDMI-CEC protocol.
1. Our first task is to update the package list on our Raspberry Pi as well as upgrade the currently installed packages.
We can achieve this task by running the following two commands.
sudo apt update
sudo apt upgrade
The first command will update the package list. The second command will upgrade the installed packages.
2. Our next step is to install the cec-utils package. This package contains the cec-client software that we will be utilizing later in this tutorial.
We can install this package to our Raspberry Pi by running the following command.
sudo apt install cec-utilsUsing the tools provided by this package, we will be able to send commands using CEC over the HDMI cable that’s connected to our Raspberry Pi.
Interacting with a TV over HDMI-CEC Using the Raspberry Pi
In this section, we will be showing you the various ways of using the cec-client software to interact with other devices.
Throughout this section, you will notice there is a couple of things we will be doing for each step.
The first is using echo and the pipe (|). We are using these two things to pass the command directly through to the cec-client software without having to launch it.
Additionally, we are using both the -s and -d options with the cec-client software.
The -s option tells the software that we are going to be issuing a single command. The software will start up, issue the command then immediately exit.
The -d 1 option sets the debug level for the software. By setting it to 1, the cec-client software will only display errors.
This setting significantly reduces the amount of text that will flood the console.
Scanning for HDMI-CEC Devices from your Raspberry Pi
1. The first thing you will need to do is scan for available devices that are advertising that they have CEC capability.
Scan for HDMI-CEC capable devices by running the following command on your Raspberry Pi.
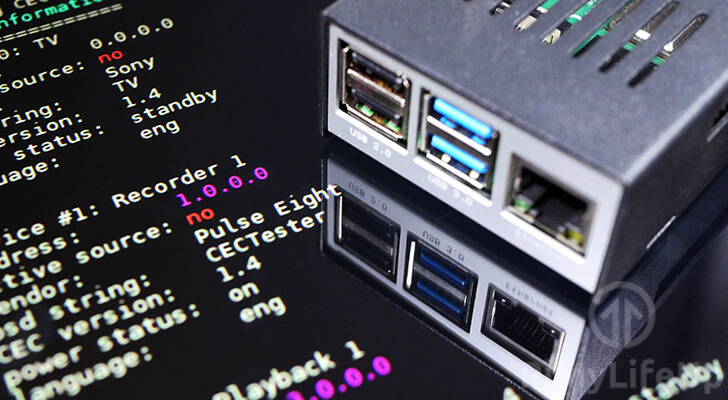
echo 'scan' | cec-client -s -d 12. From this command, you should see a list of devices that your Raspberry Pi now has access to.
You need to identify the device that you want to interact with. Typically the “os string:” and” vendor:” fields will help you identify the device you want to interact with.
Once you have identified the correct device, make a note of the “address:” or the device number.
opening a connection to the CEC adapter...
requesting CEC bus information ...
CEC bus information
===================
device #0: TV
address:       0.0.0.0
active source: no
vendor:        Sony
osd string:    TV
CEC version:   1.4
power status:  standby
language:      eng


device #1: Recorder 1
address:       1.0.0.0
active source: no
vendor:        Pulse Eight
osd string:    CECTester
CEC version:   1.4
power status:  on
language:      eng


device #4: Playback 1
address:       3.0.0.0
active source: no
vendor:        Sony
osd string:    PlayStation 4
CEC version:   1.3a
power status:  standby
language:      ???
Please note that “device #1: Recorder 1” in this example is the Raspberry Pi’s own CEC connection so we can safely ignore it.
3. For example, if we wanted to control our “Sony TV“, we can see that the device number would be “0“, and the address for the device would be “0.0.0.0“.
Once you have either the device number or device address, you can begin to send commands to it.
Sending the “on” Command over HDMI-CEC
Using the cec-client to turn on your device is a relatively easy process.
echo 'on <DEVICEADDRESS>' | cec-client -s -d 1As you can see from above, all we need to do is send the command on followed by the device address or device number.
Example of Turning a Device ON Over HDMI-CEC
For example, if we wanted to turn on our Sony TV that has the address of “0.0.0.0“, we would make use of the command like below.
echo 'on 0.0.0.0' | cec-client -s -d 1Sending the “standby” Command over HDMI-CEC
If you would like to turn your TV off (Put it into standby) using your Raspberry Pi, you can also do this easily using HDMI-CEC.
echo 'standby <DEVICEADDRESS>' | cec-client -s -d 1To put the TV into standby, all you need to do is send the “standby” command, followed by the device’s address or number.
Example of Turning a Device OFF Over HDMI-CEC
Using this command is relatively straightforward.
To put our Sony TV into standby, all we need to do is send “standby” followed by our devices address of “0.0.0.0“.
echo 'standby 0.0.0.0 | cec-client -s -d 1Getting the Power Status over HDMI-CEC
You can even make use of HDMI-CEC on your Raspberry Pi to retrieve the power status of the device.
echo 'pow <DEVICEADDRESS>' | cec-client -s -d 1Using the pow command, you can find out whether the device you are connecting to is currently powered on or is in standby mode.
This command can be helpful for deciding whether you need to power the TV on or off, especially if managing a device remotely.
Example of Getting the Power Status over HDMI-CEC
Like most HDMI-CEC commands, it is relatively easy to make use of this. All you need to do is reference pow followed by the device address.
echo 'pow 0.0.0.0' | cec-client -s -d 1If your device is in standby you will see something like what we have below appear in your terminal.
opening a connection to the CEC adapter...
power status: standby
Retrieving Additional CEC-Client Commands
If you would like to check what other commands you can issue to your TV from your Raspberry Pi using HDMI-CEC, you can use the following command.
echo 'h' | cec-client -s -d 1What this command does is retrieve the available commands that the cec-client software knows how to handle.
From this command, you should get a list of commands, as we have below.
================================================================================
Available commands:

[tx] {bytes}              transfer bytes over the CEC line.
[txn] {bytes}             transfer bytes but don't wait for transmission ACK.
[on] {address}            power on the device with the given logical address.
[standby] {address}       put the device with the given address in standby mode.
[la] {logical address}    change the logical address of the CEC adapter.
[p] {device} {port}       change the HDMI port number of the CEC adapter.
[pa] {physical address}   change the physical address of the CEC adapter.
[as]                      make the CEC adapter the active source.
[is]                      mark the CEC adapter as inactive source.
[osd] {addr} {string}     set OSD message on the specified device.
[ver] {addr}              get the CEC version of the specified device.
[ven] {addr}              get the vendor ID of the specified device.
[lang] {addr}             get the menu language of the specified device.
[pow] {addr}              get the power status of the specified device.
[name] {addr}             get the OSD name of the specified device.
[poll] {addr}             poll the specified device.
[lad]                     lists active devices on the bus
[ad] {addr}               checks whether the specified device is active.
[at] {type}               checks whether the specified device type is active.
[sp] {addr}               makes the specified physical address active.
[spl] {addr}              makes the specified logical address active.
[volup]                   send a volume up command to the amp if present
[voldown]                 send a volume down command to the amp if present
[mute]                    send a mute/unmute command to the amp if present
[self]                    show the list of addresses controlled by libCEC
[scan]                    scan the CEC bus and display device info
[mon] {1|0}               enable or disable CEC bus monitoring.
[log] {1 - 31}            change the log level. see cectypes.h for values.
[ping]                    send a ping command to the CEC adapter.
[bl]                      to let the adapter enter the bootloader, to upgrade
                          the flash rom.
[r]                       reconnect to the CEC adapter.
[h] or [help]             show this help.
[q] or [quit]             to quit the CEC test client and switch off all
                          connected CEC devices.
================================================================================
At this point, you should now have learned how to use cec-client on your Raspberry Pi to control devices that support the HDMI-CEC protocol.
If you have any issues with HDMI-CEC on your Raspberry Pi, feel free to drop a comment below.


Really helpful! Thanks!
I got around to trying this out last night. I can turn on and off the TV. I was not successful at turning on my receiver but I can see it in the device scan. I’m not able to change the volume maybe I need to set the active source to the Pulse Eight?
This works with the raspberry pi zero w also.
Be aware that on the Raspberry Pi 4 only the HDMI plug next to the USB-C will work with cec commands.
I think both might work. The PI 4 has /dev/cec0 and /dev/cec1. By default cec-utils seem to use /dev/cec0. E.g.: echo ‘scan’ | cec-client -s -d 1 /dev/cec0 gives me lots of errors echo ‘scan’ | cec-client -s -d 1 /dev/cec1 works (on a PI 400 which is just a PI 4 in a nice case with keyboard and passive cooling).
@author: Awesome post, helped a lot. However, now I still need to find out how to listen to and act upon commands from the TV remote :O