Learn how to set the screen resolution of your Raspberry Pi using the terminal and desktop interface.
Even though the Raspberry Pi tries to automatically work out the best resolution to use for a screen, this isn’t always a perfect science.
Displays can sometimes provide weird information back to the device that makes it difficult to work out the correct resolution.
With this guide, we will be showing you how you can manually set the resolution of your Raspberry Pi.
Setting the resolution can be done through both the desktop interface and the terminal.
Using the terminal, you will be shown how you can use simple command line tools to control your screen resolution. We will also be showing you how to edit the boot configuration to set your screen resolution at startup.
Equipment List
Here is a list of the equipment we recommend for this guide on setting the screen resolution of your Raspberry Pi.
Recommended
Optional
- Raspberry Pi Case Amazon
We tested this guide on the Raspberry Pi 3 and the Raspberry Pi 4 using the latest version of Raspberry Pi OS Bookworm.
Changing the Screen Resolution using the Desktop
In this section we are going to show you how to set the resolution of the screen using the desktop utilities. This is the best way to update your screen resolution on the Raspberry Pi.
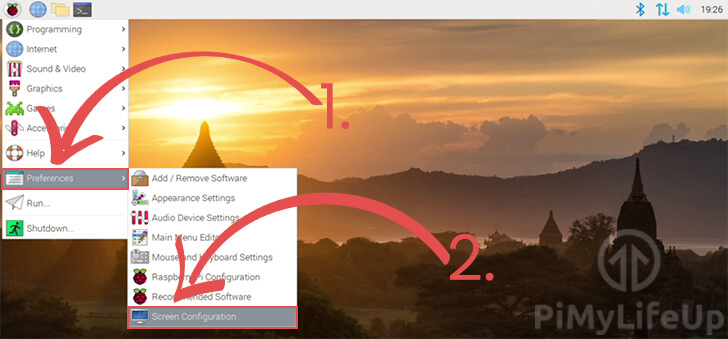
1. While on the desktop interface of your Raspberry Pi, click the icon in the top-left hand corner of the screen.
Clicking this icon will bring up the start menu.
2. Within the start menu, hover over “Preferences“.
Then click “Screen Configuration” to load the tool that we are after.
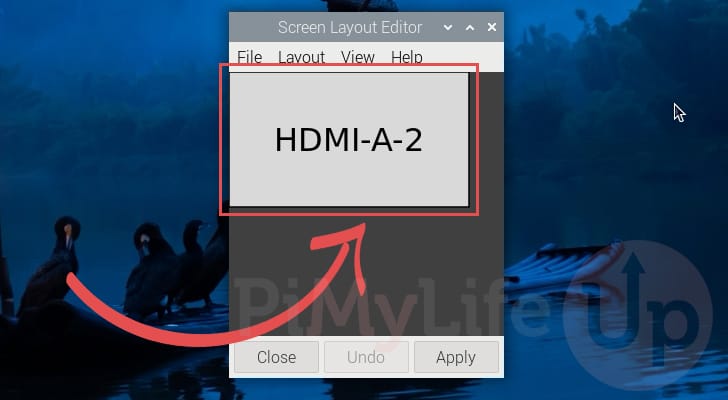
3. With the tool loaded on our Raspberry Pi, we can use it to change the resolution.
First, you need to right-click the display that you want to modify the resolution of.
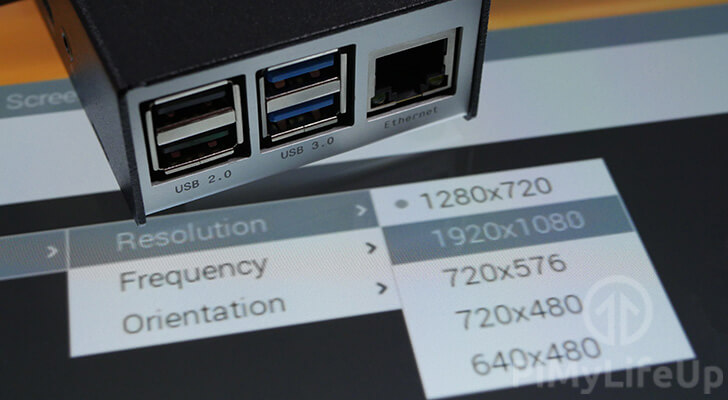
4. Next, hover over “Resolution” (1.).
Hovering over this will show you a selection of resolutions you can set for this current display. To select a resolution, click the one you want (2.)
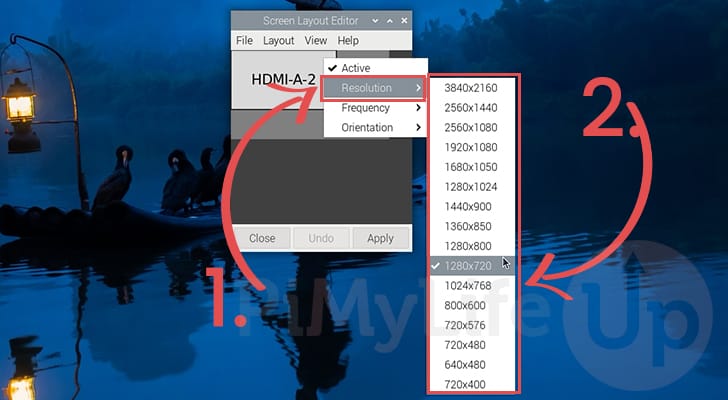
5. Once you have chosen the resolution that you wish to use, you need to apply it by clicking the “Apply” button at the bottom of the page.
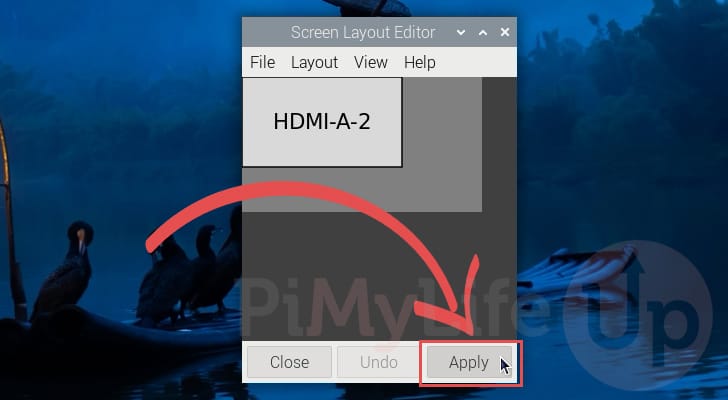
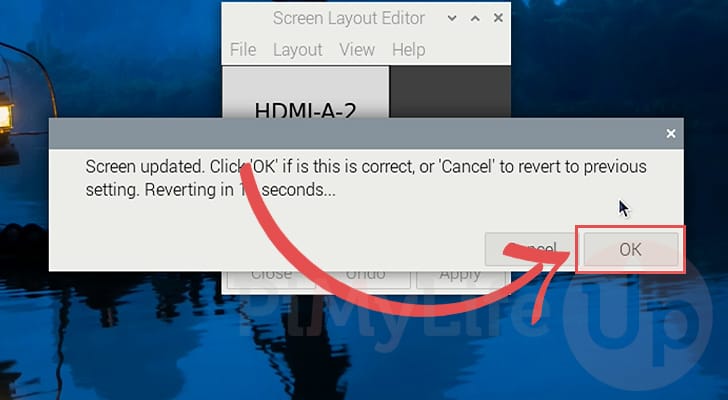
6. To confirm this change, you will need to click the “OK” button within 10 seconds.
This timer helps when you make a change that your screen doesn’t like. If you run into issues, wait 10 seconds for the settings to automatically revert.
Changing the Screen Resolution using the Terminal
In this section, we will show you two different ways of setting the screen resolution for your Raspberry Pi using the terminal.
The first of these methods relies on using the xrandr or wlr-randr tools to control your screen resolution.
The second method directly modifies the /boot/firmware/config.txt file.
You used to be able to modify the screen resolution with the raspi-config tool, but that functionality has since been removed.
Using the xrandr or wl-randr Tools to Change the Screen resolution
We will be splitting this section into two separate ones. The first one will show you how to change the screen resolution if you run a Raspberry Pi OS version that uses Wayland. If you are using a Pi 4 or 5 with the latest version of Raspberry Pi OS, you will be using Wayland by default.
If you are using an older version of Raspberry Pi OS or are using a Pi 3 or older you will still be using the older X11.
Changing the Pi’s Screen Resolution on Wayland
1. Before you set the screen resolution of your Raspberry Pi on Wayland, you will want to get both the device name and a list of supported screen resolutions.
You can get the “wlr-randr” tool to output this information to your terminal using the following command.
WAYLAND_DISPLAY="wayland-1" wlr-randrCopyYou will notice that with these commands, we are starting them by setting the “WAYLAND_DISPLAY” environment variable to “wayland-1“. This allows us to interact with Wayland even if you are setting the screen resolution from the terminal.
2. After running the above command, you should get an output similar to the one shown below. We have removed a bunch of the “Modes” from this to make it easier to look at.
With this result, you can see the screen resolution your monitor can be set to and the refresh rate.
HDMI-A-2 "Centurion Technologies P/L Signal 4K30 (HDMI-A-2)"
  Physical size: 1600x900 mm
  Enabled: yes
  Modes:
    720x480 px, 59.939999 Hz
    720x480 px, 60.000000 Hz
    720x480 px, 60.000000 Hz
    720x576 px, 50.000000 Hz
    720x576 px, 50.000000 Hz
    800x600 px, 60.317001 Hz
    800x600 px, 75.000000 Hz
    1680x1050 px, 59.882999 Hz
    1920x1080 px, 23.976000 Hz (current)
    1920x1080 px, 24.000000 Hz
    1920x1080 px, 120.000000 Hz
    1920x1080 px, 144.001007 Hz
    1920x1080 px, 239.964005 Hz
    2560x1440 px, 59.951000 Hz
    2560x1440 px, 144.005997 Hz
    3840x2160 px, 60.000000 Hz (preferred)
  Position: 0,0
  Transform: normal
  Scale: 1.000000
3. Before you proceed any further, there is one thing you must make a note of, and that is the device name for your monitor.
For the Raspberry Pi 5, if you are using the HDMI ports, you will have two that it can be, and that is “HDM-A-1” and “HDMI-A-2“. For the Pi 4, you should only have the one available to you: “HDMI-A-1“.
Looking at the output above, we will note that our monitor’s output device is “HDMI-A-2“.
If you use one of the other Raspberry Pi monitor connections, your value may differ.
4. Once you know the output name and the resolution that you want to set, you can complete the rest of this process in one single command, as you can see below
With this command, you must fill out four pieces of information:
<OUTPUTNAME>: This is the name of the output on which you want to set the screen resolution.<WIDTH>: Replace this placeholder with the resolution to which you want to set your screen. This value is in pixels.<HEIGHT>: Like the width, but this is for the height of your screen instead.<REFRESHRATE>: The final value you can set is the refresh rate your Raspberry Pi should output to this screen. Ensure you set a valid value for your monitor.
WAYLAND_DISPLAY="wayland-1" wlr-randr --output <OUTPUTNAME> --mode <WIDTH>x<HEIGHT>@<REFRESHRATE>HzCopyFor example, if we wanted to change the resolution of our monitor to 1920×1080 and 60Hz refresh rate, we would run the following command.
WAYLAND_DISPLAY="wayland-1" wlr-randr --output HDMI-A-2 --mode 1920x1080@60HzCopy5. If everything has worked correctly, you should have just changed the screen resolution on a Raspberry Pi running Wayland.
How to use xrandr to Change the Screen Resolution on X11
1. Older versions of Raspberry Pi OS and Pi’s older than the Pi 4 did not use Wayland at the time of publishing. Instead, they rely on the older X11.
Luckily, changing the screen resolution from the terminal is still possible, thanks to a tool called xrandr.
Your first step is to get xrandr to output information about your connected monitors by running the following command.
DISPLAY=:0 xrandrCopyHere we are setting “DISPLAY=:0” so that this command will work over SSH. Basically, we are telling X11 that we are talking with display “0“.
2. After running the command above, you can see resolutionwe are using “HDMI-2“.
Screen 0: minimum 320 x 200, current 3840 x 2160, maximum 8192 x 8192
HDMI-1 disconnected primary (normal left inverted right x axis y axis)
HDMI-2 connected 3840x2160+0+0 (normal left inverted right x axis y axis) 621mm x 341mm
   3840x2160     60.00*+  50.00    59.94    30.00    25.00    24.00    29.97    23.98
   2560x1440    144.01    59.95
   2560x1080     60.00    59.94
   1920x1080    239.96   144.00   120.00   119.88    60.00    60.00    50.00    59.94    30.00    25.00    24.00    29.97    23.98
   1920x1080i    60.00    50.00    59.94
   1680x1050     59.88
   1280x1024     75.02    60.02
   1440x900      59.90
   1360x850      60.00
   1280x800      59.91
   1280x720      60.00    50.00    59.94
   1024x768      75.03    60.00
   800x600       75.00    60.32
   720x576       50.00
   720x576i      50.00
   720x480       60.00    59.94
   720x480i      60.00    59.94
   640x480       75.00    60.00    59.94
   720x400       70.08Copy
3. Once you know the resolution, refresh rate, and output device name, you can set the screen resolution for your Raspberry Pi from the terminal.
The command for changing the screen resolution is shown below. Here you will need to fill out four important bits of information.
<OUTPUT>: Replace this with the output name for your display output. In most cases, this should be either “HDMI-1” or “HDMI-2“.<WIDTH>: This is the resolution width in pixels.<HEIGHT>: This is the resolution height in pixels.<REFRESH>: The final value you must replace is the refresh rate to set your screen at.
DISPLAY=:0 xrandr --output <OUTPUT> --mode <WIDTH>x<HEIGHT> --refresh <REFRESH>CopyFor example, if we wanted to set the resolution of our screen connected to HDMI-2, to 1920x1080 with a refresh rate of 60Hz, we would use the following command.
DISPLAY=:0 xrandr --output HDMI-2 --mode 1920x1080 --refresh 60Copy4. If everything has worked correctly, you should have successfully changed your Raspberry Pi’s screen resolution.
Setting the Screen Resolution of your Raspberry Pi at Boot
The other method to set the screen resolution of your Raspberry Pi is to adjust its boot configuration. For this section, we assume you are running a new version of Raspberry Pi OS.
If you happen to be running an old release such as Buster, try following our legacy guide below.
Working your Output Device Name
1. The output device name is the first thing you will want to work out to set the screen resolution for your Raspberry Pi.
Depending on what connection you are using, this value will differ slightly.
HDMI-A-1: Use this value if you use HDMI 1 on your Raspberry Pi. On the Pi 4 you will see this labeled on the board itself as “HDMI 0“.
If you are using a single HDMI board such as a Raspberry Pi 3, this is the value you will want to use.HDMI-A-2: This value allows you to select the screen resolution for the HDMI 2 output.
On a Pi 4, you will see this labeled as “HDMI 1” on the board itself.DSI-1: If you are using the DSI or DPI connection on your Pi to connect to a screen, you will want to use this value instead.Composite-1: Finally, if you happen to be using a composite connection to your Raspberry Pi, use this value.
Setting the Screen Resolution through cmdline.txt
2. To set the screen resolution at boot, you will need to modify the “cmdline.txt” file. You can either do this on your Raspberry Pi itself, or by putting your SD card into another device and opening up the boot partition.
This guide will assume you are running it on the Pi itself, but basically, all you need to do is open the file called “cmdline.txt” in your favorite text editor.
You can open up this file for editing on your Pi by using the following command.
sudo nano /boot/firmware/cmdline.txtCopy3. To the end of the long line in this file, you will want to add the following to the end of it to set your Raspberry Pi’s screen resolution.
<OUTPUT>: Here you must specify the output device name that you worked out in step 1 of this section.<WIDTH>: With this value, you specify your screen resolution width in pixels.<HEIGHT>: This placeholder must be replaced with your screen resolution height in pixels.<REFRESH>: This is the refresh rate for your screen.
video=<OUTPUT>:<WIDTH>x<HEIGHT>M@<REFRESH>CopyFor example, if we were to set our Raspberry Pi 5’s screen resolution to 1920x1080 at 60Hz, for the second HDMI connection (HDMI-A-2), we would add the following to the end of the line.
video=HDMI-A-2:1920x1080M@60Copy4. Once you have added the above line to the end of the “cmdline.txt” file, you can now save and quit.
If you are using Nano like we are, you can save and exit by pressing CTRL + X, Y, and then ENTER.
5. If your Pi is already running at this point, you will also need to restart the device for this change to take effect. You can restart by running the reboot command.
sudo rebootCopyLegacy Method for Modify the Boot Configuration to Set the Resolution
For those who are running an old version of Raspberry Pi OS. You can set the screen resolution the old school way through the boot configuration file.
To do this, we will need to modify the config.txt file located in the /boot/firmware/ folder. You can edit this file directly on the SD card if you don’t have easy terminal access.
Please note that this section can be a little tricky as there is much more to take in.
1. Begin by modifying the /boot/firmware/config.txt file.
If you are doing this on your Raspberry Pi, you can run the following command.
sudo nano /boot/firmware/config.txtCopy2. Next, you must work out if you want to use the CEA or DMT HDMI groups.
CEA stands for Consumer Electronics Association and is the display standard that is typically used on a TV.
This CEA HDMI group is represented by the number 1.
DMT stands for Display Monitor Timings and is the standard that is typically used by monitors.
The DMT HDMI group is represented by the number 2.
Depending on which one you use will dictate the settings you use in the next step.
Within this file, find and replace the following line.
Find
#hdmi_group=Replace with
Use the replacement for the HDMI group that you intend to use. If you are unsure, you can see the supported resolutions in the tables below.
For the CEA Group
hdmi_group=1For the DMT Group
hdmi_group=23. With the HDMI group chosen, we need to select the resolution.
We do this by modifying the hdmi_mode variable in the config file.
Below we have a trimmed down table showing some of the more used resolution settings for the Raspberry Pi.
If you want to view the full hdmi_mode table, then view the official Raspberry Pi Video documentation.
Use this table to find the “hdmi_mode” value for your resolution that is required for the next step.
CEA Display Resoluton Modes
| hdmi_mode | Resolution | Aspect Ratio | Refresh Rate | Notes |
|---|---|---|---|---|
| 1 | 640×480 | 4:3 | 60hz | |
| 2 | 720×480 | 4:3 | 60hz | |
| 4 | 1280×720 | 16:9 | 60hz | |
| 16 | 1920×1080 | 16:9 | 60hz | |
| 16 | 1920×1080 | 16:9 | 60hz | |
| 16 | 1920×1080 | 16:9 | 60hz | |
| 95 | 3840×2160 | 16:9 | 30hz | Raspberry Pi 4 Only. Use this when dealing with two 4k displays. |
| 97 | 3840×2160 | 16:9 | 60hz | Raspberry Pi 4 Only. To use this hdmi_enable_4kp60=1 must be set in /boot/config.txt. |
DMT Display Resoluton Modes
| hdmi_mode | Resolution | Aspect Ratio | Refresh Rate |
|---|---|---|---|
| 2 | 480p | 4:3 | 60hz |
| 9 | 800×600 | 4:3 | 60hz |
| 16 | 1024×768 | 4:3 | 60hz |
| 85 | 1280×720 | 16:9 | 60hz |
| 35 | 1280×1024 | 5:4 | 60hz |
| 51 | 1600×1200 | 4:3 | 60hz |
| 82 | 1920×1080 | 16:9 | 60hz |
4. Once you have found the hdmi_mode number for your resolution, we can now go ahead and set it in the boot configuration file.
Find
#hdmi_mode=Replace with
Make sure that you replace [YOURHDMIMODE] with the number you found using our tables above.
hdmi_mode=[YOURHDMIMODE]6. Once you have set the HDMI mode and group, we can now save the file by pressing CTRL + X, then Y, followed by the ENTER key.
7. Now to apply the new resolution to your Raspberry Pi, you need to restart it using the command below.
sudo reboot7. If for some reason your display stops working after the change you can try holding the SHIFT key during startup.
Using this key will make the Raspberry Pi ignore our boot configuration file and load up with the default settings.
Conclusion
At this point in the guide, you should now have successfully managed to change the resolution on your Raspberry Pi.
Please feel free to leave a comment below if you have had any issues with adjusting your screen resolution.
If you liked this guide, we highly recommend checking out our many other Raspberry Pi projects and guides.


This is sort of handy… but if you don’t have a screen connected, you can’t actually make the resolution larger than 320×200 when logged in via TeamViewer.
Emmet!!
So far you are the ONLY resource that comes even close to helping… So THANK YOU!
The above said, my display is a ROKU TCL TV (model number 43S423. The resolution is 3840 x 2160 (in your instructions, 95).
I’ve attempted everything possible to make this work, and the display still will not configure to fit the display. Please, please help!!
Thank you again, SO MUCH!
Hi Liz,
So, is the Raspberry Pi outputting to the screen? Some TV’s/monitors handle it all a bit weirdly. Does the image almost fit the screen? You may have to consider setting underscan/overscan.
Additionally, you could try using the desktop tool when configuring the resolution.
Cheers,
Emmet
I am attempting to use a small VGA monitor via an HDMI to VGA converter. Setting the group to 2 and the mode to 16 shows the boot up screen (i.e. Welcome to Raspberry Pi), then flickers and displays “mode not supported.” It seems as if the config.txt settings take effect until the unit fully boots, then another mode or timing is entered. Suggestions?
Hi Rob,
New versions of Raspberry Pi OS handled certain display things such as the resolution a bit differently. May I ask what version of Raspberry Pi OS are you using?
What I reckon is happening is that when the OS boots it is trying to set a resolution higher than what your device supports.
Cheers,
Emmet
Works like a charm. set hdmi_group=1 and hdmi_mode=4 on my Samsung TV & RPi 2 B+
This is sooooooooo useful! Big gigantic thank!
This helped a ton! Thank you.
This looks to be a typo:
“Replace with
Make sure that you replace [YOURHDMIMODE] with the number you found using our tables above.
hdmi_group=[YOURHDMIMODE]”
it’d be “hdmi_mode=[YOURHDMIMODE]” not
Hi Will,
Thank you for pointing out that typo.
I have now corrected that in the tutorial.
Cheers,
Emmet