In this tutorial, we will show you how to use remote play on a Raspberry Pi to stream your PS5/PS4 games.
It is entirely possible to use your Raspberry Pi as a remote play client for the PlayStation 5 and 4.
To achieve this, we will utilize a piece of software on our Raspberry Pi called Chiaki. This software was developed by Florian Märkl and then ported to the Pi’s hardware by Fredrum.
This client sets your Raspberry Pi to operate as a remote play client that can register itself with your local consoles. You can then stream games directly from your PS4 or PS5 to your Raspberry Pi. It is very similar in capability to other game streaming tools you can use on your Raspberry Pi like, Steam Link or Moonlight.
For the best performance with streaming your PlayStation games to your Pi, you should be using a Raspberry Pi 4.
The Chiaki software works best when running under the CLI/Terminal flavours of the operating system.
Finally, you should also have a PlayStation controller connected to your Raspberry Pi. We used a PS5 controller connected by cable to our Raspberry Pi in our testing.
Equipment
The list below shows the equipment we used when running Chiaki on our Raspberry Pi.
Recommended
- Raspberry Pi Amazon
- Micro SD Card Amazon
- Power Supply Amazon
- Ethernet Cable Amazon or Wi-Fi Amazon
- USB Mouse Amazon
- USB Keyboard Amazon
- PlayStation Controller Amazon (PS4 Controller or PS5 Controller)
- HDMI Cable Amazon
- Monitor Amazon
Optional
- Raspberry Pi Case Amazon
We last tested this tutorial on a Raspberry Pi 400 that was running the latest version of Raspberry Pi OS Bullseye.
Installing Chiaki on your Raspberry Pi for PS5 and PS4 Remote Play
Over the following steps, we will walk you through installing Chiaki on your Raspberry Pi.
As mentioned earlier, Chiaki is the client that will add the remote play capability to your Raspberry Pi. Unfortunately, as the port developer doesn’t provide builds, we must compile it ourselves. Luckily, this process is relatively fast and straightforward.
Preparing Raspberry Pi OS
1. Our first step is to update the package list and upgrade any out-of-date packages.
You can perform these updates using the following two commands within the terminal.
sudo apt update
sudo apt upgradeCopy
2. Once the update completes, we can install all the packages we require to compile and get PS5/PS4 remote play working on your Raspberry Pi.
Install all of the required packages by using the command below.
sudo apt install cmake git python3-protobuf protobuf-compiler libopus-dev libssl-dev libudev-dev libevdev-dev libsdl2-ttf-dev libsdl2-image-dev libavutil-dev libavcodec-dev libavformat-dev libswscale-dev libdrm-dev libgbm-devCopyCloning the Chiaki Repository
3. Our next step is to clone the port of Chiaki for the Raspberry Pi to our device.
We can clone the latest version of the code by using the git package we installed earlier in this guide.
git clone --recursive --single-branch --branch rpi02 https://github.com/Fredrum/chiaki.git chiaki-rpiCopy4. Once the clone completes, we will need to change into the directory that was cloned to our device.
You can change to this directory using the cd command below.
cd chiaki-rpiCopyInstalling a Newer Version of SDL
5. Now that we are in the correct directory, we will need to run the “install_sdl.sh” script that came packed with the code.
This script downloads, compiles and installs a particular version of SDL that the PS5/PS4 remote play software relies on for the Raspberry Pi.
You can run this script by using the following line within the terminal.
./install_sdl.shCopy6. After running this script, you will be asked if you want to proceed with the installation.
Type in “Y” then press the ENTER key to continue.
This script will install SDL 2.0.22 from the Official github release onto your system.
Read this script for more details.

Go ahead? [Y/n]
Compiling Chiaki on the Raspberry Pi for PS5/PS4 Remote Play
7. We can finally move on to compiling Chiaki itself to our device.
To begin this process, we must first create a directory called “build” and then change into it by using the cd command.
mkdir build
cd buildCopy
7. As we are now within our “build” directory, we will want to generate the build files for Chiaki.
To generate these build files, you will need to run the following command.
cmake ..Copy8. Once the build files are generated, we can compile Chiaki to our Raspberry Pi.
By using the “-j3” option, we are telling the compiler to run up to three jobs simultaneously.
make -j3CopySetting up Chiaki on your Raspberry Pi
To use remote play on your Raspberry Pi, you must register it with your PS5 or PS4 console.
These steps involve getting your PSN account ID and generating a device pin and the plugging them into the Chiaki software.
Getting your PSN Account ID
1. Chiaki requires a base64 encoded version of your PSN account ID to connect to your PlayStation. Without this account ID, you won’t be able to use the remote play functionality on your Raspberry Pi.
One of the easiest ways to get this ID is to go to the following website on your favourite website.
https://psn.flipscreen.games/
2. Now that you are on the website, you will want to use the textbox and type in your PSN account username (1.).
With your username entered, click the “Submit” button (2.).

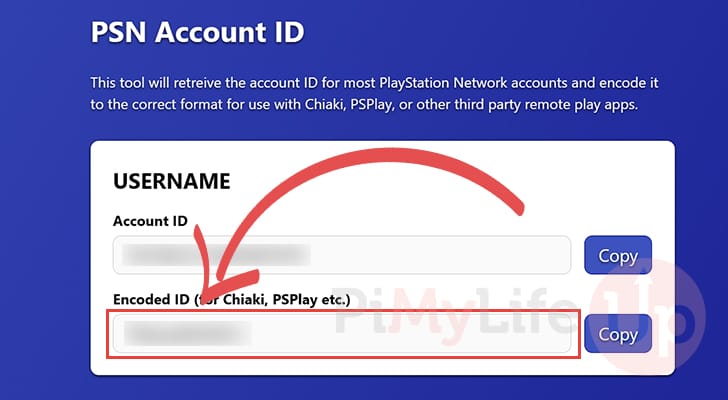
3. After typing in your username, the website should present you with an account ID and a base64 encoded version.
You will want to copy down the “Encoded ID” as this is the one Chiaki will require to interact with the PS5/PS4 remote play from your Raspberry Pi.
Loading Chiaki on your Raspberry Pi
4. You will want to launch Chiaki on your Raspberry Pi, as you must complete the rest of these steps within Chiaki and your PS5 or PS4.
To open Chiaki, you must use the command below within the terminal.
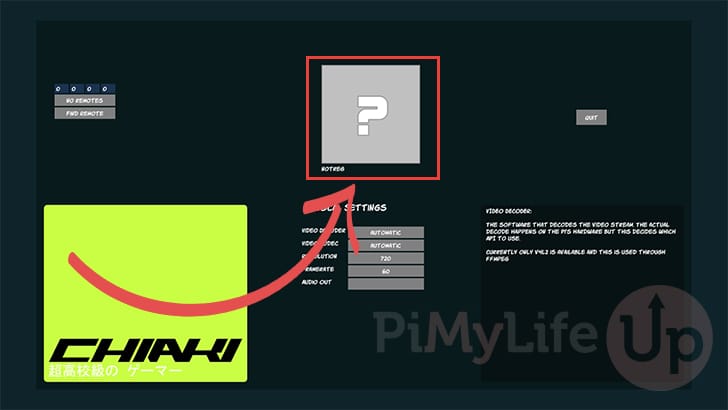
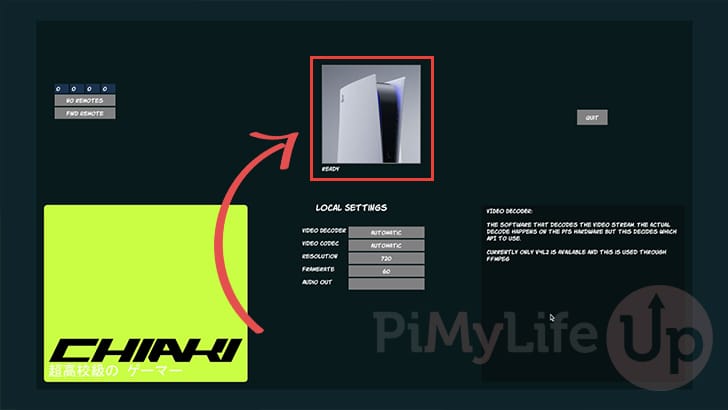
~/chiakia-rpi/build/rpi/chiaki-rpiCopy5. Now that Chiaki is open, you will see a screen similar to the one below with a box with a giant question mark.
It is currently showing a question mark as we haven’t yet registered the console with your Raspberry Pi. Click the console to begin the registration process.
Generating your Link Device Code for Remote Play on the Raspberry Pi
6. We will require a device link code for Chiaki on our Raspberry Pi to use remote play on your PS5/PS4.
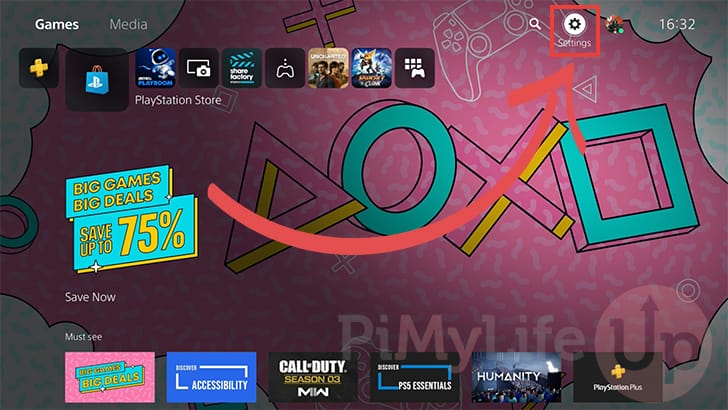
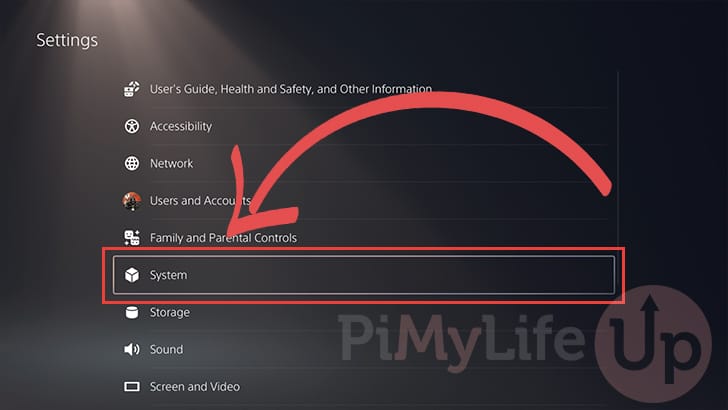
To get this code, you must open the settings page, as shown below.
7. Once you are in the settings page scroll down and switch to the “System” options page.
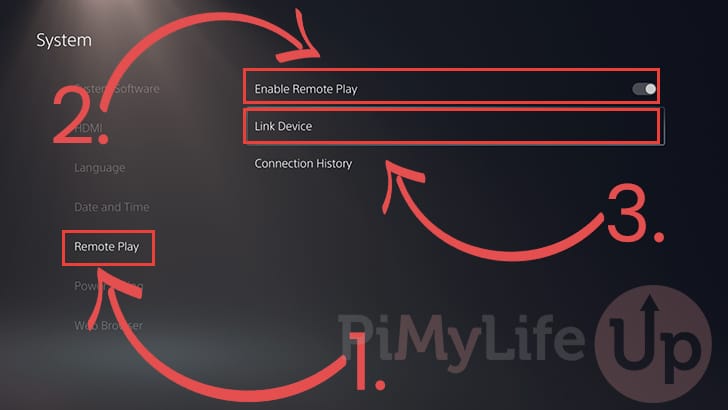
8. Once you are within the “System” settings page, ensure that you are within the “Remote Play” menu (1.).
Next, make sure that you have the “Enable Remote Play” toggle switched to on (2.).
Finally, we can generate the link code we need by selecting the “Link Device” option (3.).
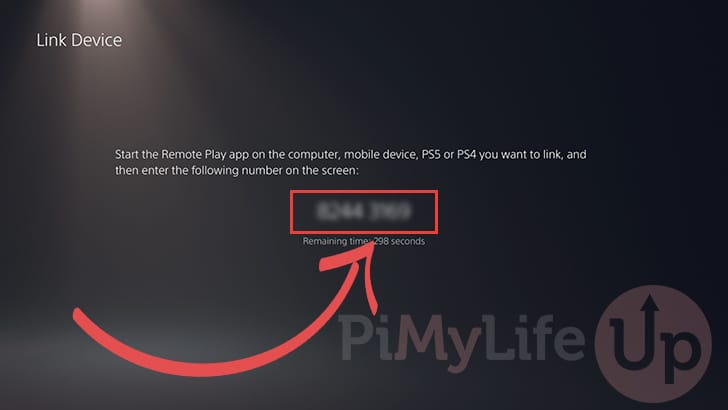
9. You will now see a link device code on your screen. You must now return to your Raspberry Pi to utilize this code.
This code allows Chiaki to connect your Raspberry Pi to the remote play functionality on your PS5/PS4. Please note that you have a limited type to enter this code on your Pi.
Finishing the Registration with your PS5/PS4 for remote play on the Raspberry Pi
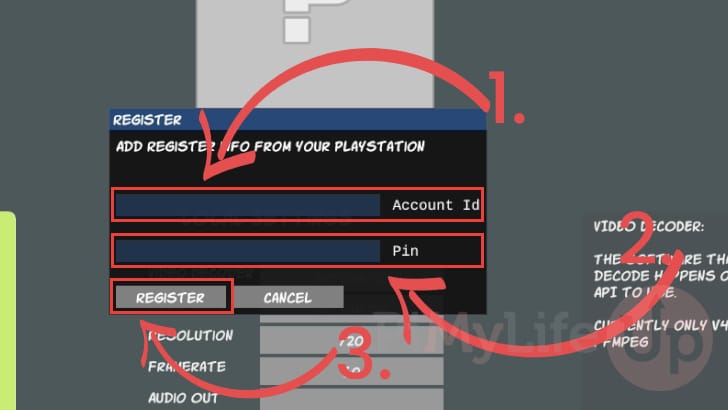
10. Back on your Raspberry Pi, you must now enter the account id (1.) and link device code (2.) you got earlier within this guide.
Once you have typed in both values, you will want to click the “Register” button (3.).
11. If everything has worked correctly, you should see a picture of a console within the Chiaki interface on the Raspberry Pi with text that either says “Standby” or “Ready“.
All you need to do now to begin remote play with your PS5/PS4 from your Raspberry Pi is to select it. The Chiaki interface can even be browsed using your connected controller.
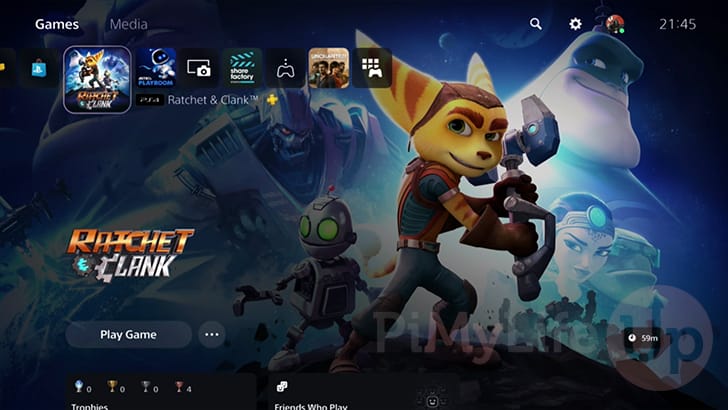
12. Below, you can see that we have successfully connected our Raspberry Pi to our PS5/PS4 using remote play.
We can now play games from our Raspberry Pi as long as we have a PlayStation controller connected to it.
Getting Chiaki to Start at Boot on your Raspberry Pi
Now that you have the PS5/PS4 remote play functionality working on your Raspberry P,i you may want Chiaki to start at boot on your system.
Over the following steps, we will show you the two different ways to get Chiaki to launch at boot. These steps differ slightly depending on whether you are running the desktop or terminal flavours of Raspberry Pi OS.
1. Let us start by beginning to write a service for Chiaki. This service will allow the remote play client to start at boot on your Raspberry Pi.
Begin writing this service file by using the following command within the terminal.
sudo nano /lib/systemd/system/chiaki.serviceCopy2. Within this file, you will want to enter one of the following two services. Pick the one relevant to how you have your operating system set up.
Whichever option you choose, ensure that you replace “USERNAME” with the name of your user. For example, if your user is called “pi” you would use “pi“.
Using Raspberry Pi OS Lite / Terminal
[Unit]
Description=Chiaki RPI

[Service]
Environment=DISPLAY=:0.0
Environment=XAUTHORITY=/home/pi/.Xauthority
Type=simple
ExecStart=/home/pi/chiaki-rpi/build/rpi/chiaki-rpi
Restart=on-abort
User=USERNAME
Group=USERNAME

[Install]
WantedBy=multi-user.target
Copy
Using Raspberry Pi OS Desktop
[Unit]
Description=Chiaki RPI

Wants=graphical.target
After=graphical.target

[Service]
Environment=DISPLAY=:0.0
Type=simple
ExecStart=/home/pi/chiaki-rpi/build/rpi/chiaki-rpi
Restart=on-abort
User=USERNAME
Group=USERNAME

[Install]
WantedBy=graphical.targetCopy
3. Once you have added these lines to the file, you can save and quit by pressing CTRL + X, followed by Y, and then the ENTER key.
4. You can now enable the Chiaki service so that it will automatically start up when your system powers on.
sudo systemctl enable chiakiCopy5. If you want to start Chiaki immediately on your Raspberry Pi, you can run the following command to start the service.
sudo systemctl start chiakiCopyConclusion
Hopefully, by this point in the guide, you will have gotten PS5/PS4 remote play working on your Raspberry Pi, thanks to Chiaki.
Chiaki is a nifty software that allows your Pi to act as a remote play client, meaning you can stream your games to your Pi. If you have a Steam Deck, you can even use Chiaki to stream your games on the move.
Please, feel free to comment below if you have any questions about using Chiaki on your Pi.
If you found this tutorial helpful, be sure to check out our many other Raspberry Pi projects.


Hi Emmet,
thanks for the guide!
However, I can’t get it to work with my Pi 5…any ideas how to do it?
Thanks,
Robert
Hi Robert,
Last time I tested this it worked on my Pi 5. What issue or error are you running into?
Kind regards,
Emmet
EDIIT: It looks like it might actually be possible to use Chiaki4deck instead. Will test that later and write up a guide on how to use it on the Raspberry Pi if everything works properly.
Wouldn’t compile. Any idea where to get help?
Hi Stuart,
Assuming you are running Raspberry Pi OS Bookworm I went and tested and ran into the same error.
It looks like the compile error is caused by a change in the FFMpeg version. I have submitted a fix to the repository for this, so hopefully it will get merged in.
Alternatively you can edit the file yourself by using the following command.
Within this file you will want to find the following line of code.
Then exit and save the file and re-run the compiler.
Kind regards,
Emmet