In this project, we will show you how you can run x64 software on a Raspberry Pi by using Box64.
Box64 is a unique piece of software that allows us to emulate the x64 architecture on an ARM64 device like the Raspberry Pi 4.
Simply put, this software works by taking an x64 instruction and converting that to an equivalent set of ARM64 instructions.
Box64 does some additional optimizations by dynamically recompiling the x64 code into something that will run better on an ARM64 device.
This software is primarily developed by the same developer behind the excellent x86 emulator called Box86. If you like using this emulator, be sure to consider donating to ptitSeb to support their work.
Please note to run Box64, you will need to be using a 64-bit operating system such as the Raspberry Pi OS 64-bit beta or Ubuntu Server.
If you are using a 32-bit operating system, you can instead use Box86, which will allow you to run x86 applications on your Raspberry Pi.
Equipment
Below is a list of the equipment we used when getting the x64 emulator running on the Raspberry Pi.
Recommended
- Raspberry Pi Amazon 3 or Newer
- Micro SD Card Amazon
- Power Supply Amazon
- Ethernet Cable Amazon or Wi-Fi Amazon
Optional
We tested Box64 on a Raspberry Pi 5 using the 64-Bit version of Raspberry PI OS.
Video
In the video we have embedded below, we will walk you through the steps of compiling and installing the Box64 software on your Raspberry Pi. We will even show you how easy it is to use this software to run x64 software on your Pi.
Of course, if you prefer written content, skip passed the video and follow the steps outlined in the guide.
Preparing your Raspberry Pi for Box64
Before we can start running x64 applications on our Raspberry Pi, we will need to first prepare it to compile the software we will be relying on.
There are a couple of packages that we will need to install on the operating system before proceeding.
1. Please note that you must be running a 64-bit operating system to use Box64 on your Pi.
This software will not allow you to run 64-bit software on a 32-bit system. It is purely for running x64 software on an ARM64 system.
2. Before proceeding, we should first ensure that our operating system is up to date.
All we need to do is run the following two commands. The first will update the package list, the second will upgrade any out-of-date package.
sudo apt update
sudo apt upgrade -yCopy
3. Our next step is to install all packages that we need to compile box64 on the Raspberry Pi.
Run the following command to install these packages to your Pi.
sudo apt install git build-essential cmakeCopyThe first package we install is called “git“. It will allow us to easily pull the latest version of the box64 code to our Raspberry Pi.
Our next package is “build-essential“. This is a meta-package that installs several other small packages. These packages are used to compile the box64 code itself.
Finally, we install “cmake“. This package is used to generate the build configuration files that tell the compiler how to operate.
4. Now that we have everything we need, we can finally clone the box64 code to the Pi.
Before you clone the code to your Pi, you need to decide if you want to use the latest release or a tagged release.
- Latest: The latest version will get you the latest fixes and improvements but on the flip side it can sometimes be unstable.
- 0.2.6: This is an older release that some people have had a better experience with. Try this version if you run into issues such as segmentation faults with the latest release.
Latest
This command will get the latest version of the code from the Box64 GitHub repository.
git clone https://github.com/ptitSeb/box64.gitCopy0.2.6
Using the command below will clone the 0.2.6 version of Box64 to your Raspberry Pi.
git clone --branch v0.2.6 https://github.com/ptitSeb/box64.gitCopyCompiling Box64 on your Raspberry Pi
With our Raspberry Pi prepared, we can now compile the x64 emulator on our Raspberry Pi. This process is relatively straightforward as we now have everything we require.
Setting up the Build Directory for Box64
1. Our first step is to change into the directory where we freshly cloned the Box64 source code.
We can use the cd command to change into the correct directory.
cd ~/box64We use the tilde (“~“) symbol so that we change to a folder called “box64” in the user’s home directory. Therefore, if you cloned Box64 to a different location, make sure that you change this to a fixed path.
2. Now, we need to make a directory where the x64 emulator will be compiled on our Raspberry Pi.
We are going to keep this simple and call this directory “build“. We will also change into this new directory.
mkdir build
cd build
Configuring Box64 for the Raspberry Pi
3. We will next need to generate the configuration files so that our Raspberry Pi will know how exactly to compile box64.
We can generate the configuration files needed to compile the x64 emulator by using one of the commands below. These commands differ slightly depending on what Raspberry Pi you are using.
With these commands, we use cmake on the “CMakeLists.txt” file in the directory above the current one (..).
We pass in two options that set a couple of variables. These variables help dictate what system we are building Box64 for.
Command for Raspberry Pi 5 (16k Page Size)
If you are using a Raspberry Pi 5 then you will want to use the following command. This command differs slightly due to the fact Pi OS uses 16K pages by default on the Pi 5.
Please note that if you are using Box86 you must follow the instructions for the Raspberry Pi 4 instead. Box86 does not work with a 16K page size.
cmake .. -DRPI5ARM64=1 -DCMAKE_BUILD_TYPE=RelWithDebInfoCopyCommand for Raspberry Pi 4 or Raspberry Pi 5 (4k Page Size)
The command below will generate the configuration to compile Box64 for your Raspberry Pi 4. This command will also work for a Pi 5 that isn’t using a 16k page size.
cmake .. -DRPI4ARM64=1 -DCMAKE_BUILD_TYPE=RelWithDebInfoCopyCommand for Raspberry Pi 3
Finally, if you are using the older Raspberry Pi 3, you will want to use the following command to configure Box64 for your device.
cmake .. -DRPI3ARM64=1 -DCMAKE_BUILD_TYPE=RelWithDebInfoCopyCompiling and Installing the Software
4. Finally, we can use “make” to compile the Box64 code. The make tool will utilize the information generated by CMake to compile your code.
Run the following command to begin the compilation process. The compilation may look like its hung when it gets to 100%, please give it a few minutes to properly finish.
make -j$(nproc)CopyUsing the “-j” option, we can tell the compiler how many processes it should use to compile the code. Finally, we use the “nproc” environment variable as it contains the number of cores our CPU has.
If you experience any issues with compiling Box64, replace “$(nproc)” with 1.
5. Once your Raspberry Pi finishes compiling the x64 emulator, we will now need to install it.
You can install Box64 by running the following command on your Pi.
sudo make installCopy6. Before your Raspberry Pi will know to use these files, we will need to restart the “system-binfmt” service.
Restarting the service will allow the Pi to understand that it can use Box64 to run x64 applications. Without restarting this service, you will run into errors complaining that the file is in an invalid file.
To restart this service, you only need to use the following command.
sudo systemctl restart systemd-binfmtCopyIf you run into any issues when attempting to restart the service, you will need to restart your Raspberry Pi.
Restarting the Pi is as simple as running the following command.
sudo rebootCopyRunning an x64 Application using Box64 on your Raspberry Pi
At this stage, you should now have the x64 emulator installed and operating on your Raspberry Pi. To show that this is working, we should attempt to install an x64 application.
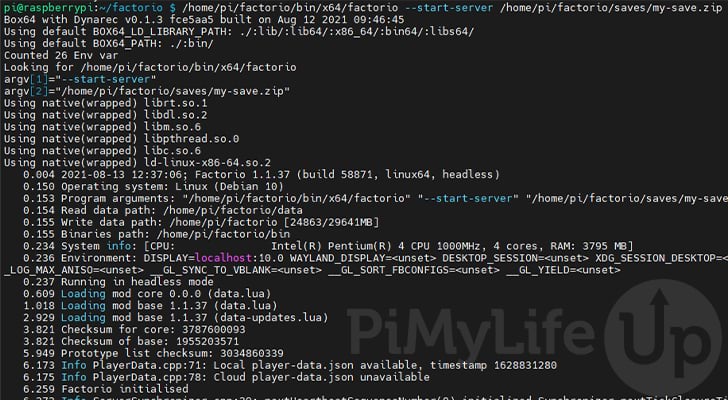
To give you an idea of how the Box64 software works, we will start up a Factorio dedicated server on our Raspberry Pi. This is the perfect piece of software as it is only available as a 64-bit Linux binary.
1. Our first step is to download the latest version of the headless build of Factorio. Luckily for us, the Factorio team has provided a simple endpoint from which we can download the latest version.
Run the following wget command to download the headless build of Factorio.
wget https://factorio.com/get-download/stable/headless/linux64 -O factorio.tar.xzCopy2. With the archive now downloaded, we need to extract its contents to your Pi so that we can run the server.
You can extract the archive to your Pi by running the following tar command.
tar -xJf factorio.tar.xzCopy3. With Factorio now downloaded, we need to utilize it to generate a save game for the server to start from.
The simplest way to do this is to pass in the “--create” option followed by the location where we want this save file kept.
~/factorio/bin/x64/factorio --create /home/$USER/factorio/saves/my-save.zipCopyPlease note this process can take some time as the server needs to generate the starting map.
When you start up any x64 based application, you can immediately see that Box64 is emulating it to run on your Pi. You will see a message like the following when the application starts.
Box64 with Dynarec v0.1.3 fce5aa5 built on Aug 12 2021 09:46:454. Now that we have a save game created, we can launch the dedicated server by referencing the save file.
Use the following command to start up the Factorio dedicated server on your Raspberry Pi.
~/factorio/bin/x64/factorio --start-server /home/$USER/factorio/saves/my-save.zipCopyAt this point, you should now have the Factorio server up and running on your device. Thanks to this, you can see the magic of Box64 at work with it successfully emulating an x64 application on your ARM64 device.
Conclusion
At this stage, you should have successfully compiled and installed the Box64 emulator on your Raspberry Pi.
Box64, of course, isn’t flawless, and there will always be some slowdown introduced by the emulation process.
Thanks to this software, you will now be able to run x64 applications on your Raspberry Pi.
If you experience any errors when running an application, you should report it on the official GitHub with as much information as you can provide.
If you run into any errors with compiling and installing Box64 to your Raspberry Pi, please comment below.
Be sure to also check out some of our other great Raspberry Pi projects.


fresh clean install on raspberry pi 4
Step three at the end I get this error
16.299 Goodbye
0.000 Error Util.cpp:81: filesystem error: create_directories “/home/pi/factorio/saves” failed: Permission denied [/home/pi/factorio/saves]
Hi Michael,
Those steps poorly assumed that your users name is “pi”, I have updated the steps to now use the $USER environment variable. This will automatically be swapped out with your current users name and save you having to manually type it out.
Kind regards,
Emmet
trying to do step 3 of the Factorio test. I keep getting this error message in the terminal:
bash: /home/pi/factorio/bin/x64/factorio: No such file or directory
Am I missing something here?
Hi Lee,
I have made a slight adjustment so that the commands will now reference your current users home directory (tilde symbol ~) rather than the hard coded “/home/pi/” directory. Originally Raspberry Pi OS used to have the “pi” user by default but that changed in newer versions.
Kind regards,
Emmet
Thanks for this good tutorial. It worked very well on my RasPi 5, 8 Gb.
In another tutorial on this page (install wine), I found one important command, that should be mentioned in this tutorial. It is how to install .deb packages for 64-Bit architecture. Since this ist what a lot of people will want to do:
sudo dpkg-deb -x NAME.deb /
I won’t speak for most people, but I want to RUN a .deb file on box64 because it doesn’t come as source code or a tarball like, as I understand, almost all commercial software. Do I need both WINE and Box64 for this, and if so, why?
Hi Matt,
A “.deb” file is just a way of packaging up software for it to be installed. This file needs to be extracted / installed for you to actually run the software contained within it.
The reason you can’t just use like sudo apt install to install the package is that package managerwon’t like the fact that it isn’t marked as being compiled for ARM.
You do not need Wine to run an X86/x64 application as long as it has been compiled for Linux. WINE is just a translation layer that allows Windows applications to run on Linux.
Kind regards,
Emmet
The Command for Raspberry Pi 3 should be:
cmake .. -DRPI3ARM64=1 -DCMAKE_BUILD_TYPE=RelWithDebInfo
In the guide its:
cmake .. -DRPI4ARM64=1 -DCMAKE_BUILD_TYPE=RelWithDebInfo
Hi Reaper1412,
Thank you for the headers up about that typo. I have corrected that mistake.
Kind regards,
Emmet
I did this on a Pi5 with the latest RaspOS and it went well until I tried to run Factorio, when I get an error:
Error: PageSize configuration is wrong: configured with 4096, but got 16384.
Hi Kelly,
The Raspberry Pi 5 ships with a kernel that uses a 16k page size by default. While this has performance improvements a lot of software does not support this and will run into errors such as the one you are seeing.
You will need to recompile Box64 using the 4k page size variant (Same one used for the Raspberry Pi 4).
You will then need to change the kernel to the 4k page size version instead of the normal 16k page size the Raspberry Pi 5 is set to use. We have a guide that covers how to do this in our Box86 tutorial.
Kind regards,
Emmet
For those with a Pi4 having problems running the server and encountering Segmentation faults, version 0.2.4 of Box64 works great (and not the latest as of writing 0.2.6). I recommend amending this guide for troubleshooting.
Hi Ikersson,
I have updated the guide so we now reference pulling a tagged branch (In particular 0.2.4), rather than just mentioning the latest.
Kind regards,
Emmet
does this come bundled with box86 or do i need to get that separate?
Hi RobertC1985,
Box64 only handles 64-bit binaries, so if you want to run 32-bit binaries you will need to install box86 as well.
I hope that helps clarify things.
Cheers,
Emmet
Thanks a lot,
Really clearly explained !!
Hey really cool and Thanks for this good guide.
Hey, nice article. I have been wanting to run a 64bit browser on my Pi 4 8GB which is running the 64bit OS. Is this something you have tried? Do you foresee any difficulty?
Hi Charles,
This isn’t something I have personally tested out. I will be intrigued to hear whether you have any luck with it.
As Box64 is still fairly early on there is a high chance that you may run into performance issues or required functionality not being implemented.
Cheers,
Emmet