In this guide, you will learn how to run x86 applications on a Raspberry Pi using the box86 software.

box86 is a userspace emulation software that allows you to run Linux x86 applications on an ARM device such as the Raspberry Pi.
Using this software, we can run a variety of x86 software on our Raspberry Pi. This supported software includes applications like Zoom or games like World of Goo.
There are some caveats to using box86 on your Raspberry Pi. The first is that it can only run x86 applications. Software built for 64-bit will not run at all.
The second is that you need to be running a 32-bit system. The way box86 is designed is that it converts the typical x86 calls into 32-bit ARM calls.
One of the best features of Box86 is that it features a dynamic recompiler (DynaRec). As the name suggests, a dynamic recompiler takes the instructions and actively recompiles them into optimized ARM instructions.
An interpreter, by contrast, would map the x86 instructions to an ARM equivalent without consideration to how well optimized the result would be.
In the case of box86, the DynaRec feature allows the emulator to run software 5 to 10 times faster than what its interpreter is capable of.
Please note that box86 is purely an x86 to ARM emulator. You can’t run Windows applications using box86 on your Raspberry Pi. Instead, you will need to use Wine alongside box86 for that.
Equipment
Below you can see a list of equipment we used for running x86 apps on our Raspberry Pi using box86.
Recommended
Optional
We tested this tutorial on the Raspberry Pi 400 using the latest release of Raspberry Pi OS Buster.
Preparing your Raspberry Pi for Box86
Before we can compile the x86 emulator to our Raspberry Pi, we will need to do a bit of preparation.
Compiling box86 on the Raspberry Pi requires a few packages that may not be currently installed on your system.
1. To ensure we have an up-to-date package list and are working off the latest packages, lets first update the operating system.
If you are running Raspberry Pi OS, you can run the following two commands to update it.
sudo apt update
sudo apt upgradeCopy
2. Once the OS finishes updating, we can install all of the packages we need to compile box86.
We can install all the packages we want by running the command below.
sudo apt install git build-essential cmakeCopyIn this case, we need to install the git package so that we can clone the repository from GitHub.
The build-essential package contains the compiler itself, among other things that we need to compile box86 itself on our Raspberry Pi.
Lastly, we need to install the cmake package. This tool is to generate build files so that we can compile the x86 emulator on the Raspberry Pi.
3. Now that we have the needed packages installed, let us clone the box86 code.
Cloning code from GitHub is super simple. thanks to the git package.
Run the following command on your device to clone the x86 emulator’s code to your Raspberry Pi.
git clone https://github.com/ptitSeb/box86CopyExtra Steps for 64-bit Operating Systems
If you are running this tutorial on a 64-bit system, you will need to follow some extra steps for Box86 to work correctly on your system.
These steps are not required if you use a 32-bit operating system and skip to the next section.
1. We need to add the 32-bit ARM (armhf) as a potential architecture for our Raspberry Pi’s operating system.
To add this architecture to the package manager, we need to run the following command.
sudo dpkg --add-architecture armhfCopy2. Our next step is to perform an update of the package repository list.
You can update this list by using the command below within the terminal on your Raspberry Pi.
sudo apt updateCopy3. Finally we can install all of the packages that we need for Box86 to run on a multi-arch system (In our case, ARM64).
Install the required packages to your Pi by running the following command.
sudo apt install gcc-arm-linux-gnueabihf libc6:armhfCopyThe first package, in particular, is used so that we can cross-compile the “32-bit” code on our 64-bit ARM operating system.
The rest of the packages are relied on by Box86 to operate correctly in most cases.
Compiling the x86 Emulator on the Raspberry Pi
Now that we have prepared the Raspberry Pi to compile box86, we can now move on.
Compiling the x86 emulator on our device is relatively straightforward now that we have the packages we need.
1. Start by changing into the directory where we cloned the box86 code to.
You can do this by running the following command.
cd ~/box86Copy2. We need to create an additional directory where the compiler will store the box86 builds.
Run the following two commands to create the “build” directory and then change to it.
mkdir build
cd buildCopy
3. Within this directory, we can prepare the box86 emulator to compile on our Raspberry Pi.
We achieve this by making use of the cmake package we installed earlier.
This command differs slightly on whether you are compiling the x86 emulator for the Raspberry Pi 2, 3, 4, or 5.
Generating the Makefile on the Raspberry Pi 4 and Newer
If you are running this on a 32-bit operating system then use the following command.
cmake .. -DRPI4=1 -DCMAKE_BUILD_TYPE=RelWithDebInfoCopyYou can also compile this software on a 64-bit operating system by using the command below instead.
cmake .. -DRPI4ARM64=1 -DCMAKE_BUILD_TYPE=RelWithDebInfoCopyUsing the CMake Command on the Raspberry Pi 3
cmake .. -DRPI3=1 -DCMAKE_BUILD_TYPE=RelWithDebInfoCopyCMake Command for Raspberry Pi 2
cmake .. -DRPI2=1 -DCMAKE_BUILD_TYPE=RelWithDebInfoCopyWhile box86 does support the Raspberry Pi 1 and Zero, it is not worth using it for these devices due to the lack of support for the dynamic recompiler.
4. CMake will now generate the makefile to compile the box86 software on our Raspberry Pi.
We can use this file to compile the x86 emulator on our Raspberry Pi by using the following command.
make -j$(nproc)CopyWe use the “-j” argument to tell the compiler to use multiple processors to compile the software.
Using “$(nproc)” we automatically insert the number of cores our processor has into the command.
5. Once the compiler finishes running, we can install the box86 emulator onto our Raspberry Pi.
Run the following command to install the software on our device.
sudo make installCopy6. Finally, we need to restart the systemd-binfmt service.
Restarting the service after installing box86 allows it to be aware of additional binary formats that it can now support.
sudo systemctl restart systemd-binfmtCopyIf you experience an error when running this command, try restarting your Raspberry Pi.
sudo rebootCopyRunning an Application using box86 on your Raspberry Pi
Now that we have the x86 emulator installed on the Raspberry Pi let us quickly run through a test to show it working.
To showcase how box86 runs on the Raspberry Pi, we are going to install the TeamSpeak server.
We chose the TeamSpeak server as it is only available for the x86 version of Linux and is freely available, and does not have any builds for the ARM architecture.
1. Start by making sure that you are back in the home directory of your Raspberry Pi.
You can use the cd command followed by the tilde symbol (~) to move back to the home.
cd ~Copy2. Once you are back in the home directory, let us use “wget” to download TeamSpeak.
Please note that the version of TeamSpeak we are downloading may not be the latest available.
wget https://files.teamspeak-services.com/releases/server/3.13.3/teamspeak3-server_linux_x86-3.13.3.tar.bz2CopyAs the TeamSpeak server is built for x86 versions of Linux, it wouldn’t typically work on the Raspberry Pi.
However, thanks to box86, we will now be able to run the software thanks to its x86 emulation.
3. Once the archive has finished downloading to your Raspberry Pi, we need to extract it.
We can extract the x86 version of TeamSpeak from its archive to our Raspberry Pi by using the tar command.
tar -xvpf teamspeak3-server_linux_x86-3.13.3.tar.bz2Copy4. Now that we have extracted the TeamSpeak server, let us change to the directory.
Again making use of the cd command, switch to the directory.
cd teamspeak3-server_linux_x86Copy5. Before we can use Box86 to run this x86 application on our Raspberry Pi, we need to do one last thing.
Before TeamSpeak’s server runs, it requires us to accept their terms and conditions.
We can do this by creating a file called “.ts3server_license_accepted” within the same directory as the server.
touch .ts3server_license_acceptedCopy6. Finally, we can see Box86, at work by running the TeamSpeak server.
./ts3serverCopyThe magic of Box86 is that you don’t have to use any additional commands to run x86 software on your Raspberry Pi.
box86 is automatically configured to detect when an x86 application is being run and take over from there.
7. When you run x86 software on your Raspberry Pi’s command line, you should see the following text appear.
By seeing this text, you will know that box86 is now in charge of emulating the software. In our case, it is using the dynamic recompiler.
Box86 with Dynarec v0.2.1 ddd4d37a built on Feb 26 2021 05:11:18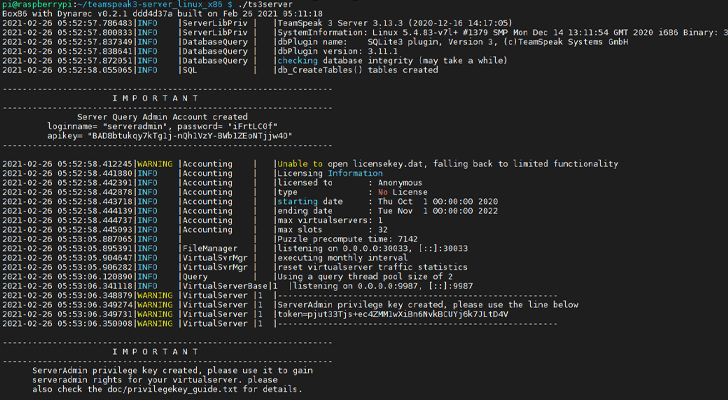
Troubleshooting Box86 on the Raspberry Pi 5
When trying to use Box86 on a Raspberry Pi 5 you might run into a “segmentation fault” error. This error is caused by Box86 not supporting the 16K page size that the Pi 5 supports by default.
Luckily, Raspberry Pi OS ships with multiple kernels that we can switch our Raspberry Pi to using.
To change to the kernel that has the smaller page size, follow our guide.
https://pimylifeup.com/raspberry-pi-page-size/Conclusion
Hopefully, you now understand how you can use box86 to run x86 applications on your Raspberry Pi.
The box86 emulator is a powerful piece of software but has some caveats that you have to deal with.
While the emulator isn’t perfect, it can run a large amount of software at decent speeds with little to no issues.
In this guide, we have shown you how box86 can run software such as the TeamSpeak server. You can also use box86 to run numerous video games.
If it is a relatively old video game or one that uses 2D graphics, then there is the chance that you can run it using box86 on your Raspberry Pi. We have seen games like Undertale, World of Goo, and FTL played on a Raspberry Pi 4 by using box86.
If you have run into issues with getting box86 to run on your Raspberry Pi, please leave a comment below.
Be sure to check out some of our other Raspberry Pi projects.


Hi,
I am using Kali Linux with Raspberry Pi4.
I have an error after type sudo apt install gcc-arm-linux-gnueabihf libc6:armhf libncurses5:armhf libstdc++6:armhf, the error said unable to locate package libncurses5:armhf. Could you help me Plz?
Hi Herman,
You should be able to get away with just using the following command instead.
sudo apt install gcc-arm-linux-gnueabihf libc6:armhf libncurses5:armhf libstdc++6:armhf
and i’m getting that error :/
E: Unable to locate package libncurses5:armhf
Hi Oky,
Sorry to see that you are running into issues with this guide. I quickly tested this again and I can’t seem to reproduce the issue.
What version of Raspberry Pi OS are you using? For example, Bookworm or Bullseye. Additionally, are you using a 32-bit or 64-bit operating system?
Kind regards,
Emmet
In Raspberry PI 3 with 64bit os, use cmake .. -DRPI4ARM64=1 -DCMAKE_BUILD_TYPE=RelWithDebInfo instead…
u Bro, saved it, thanks
It works!
Thanks a lot,
Max.-
Hi,
I have Orange Pi 4 LTS on Armbian (Armbian 22.05.4 Jammy with Linux 5.15.52-rockchip64) and had an issue with compiling.
So to fix the issue I’ve done next:
Then the run
sudo make -j$(nproc)– finished with some warnings, but they seems not critical, as the process finished successfully.Hope that helps to someone, as I’ve spent quite a bit of time to find a solution 🙂
Great tutorial – thanks very much. Got box 86 running teamspeak ok.
Being a newbe, could give me the final step on how to install the zoom app, please.
Many thanks
Nigel
Hi Nigel,
We actually have a guide that shows you how to install Zoom on the Raspberry Pi using Box86.
Cheers,
Emmet