In this project, we will show you how to install and run Wiki.JS on a Raspberry Pi.

Wiki.JS is a powerful, free, and self-hosted wiki that you can run on your Raspberry Pi.
Using a self-hosted wiki solution such as Wiki.JS allows you to organize and store information easily.
One of the benefits of this particular Wiki clone is that it boasts a considerable number of features and has support for a visual editor, markdown, and more. It even boasts support for 2-factor authentication, allowing you to improve the security of your setup.
To get Wiki.JS running on the Raspberry Pi, we will use Docker. Docker allows us to get this software up and running quickly without fighting dependencies.
Please note that you must be running a 64-bit operating system on your Pi for this tutorial to work. Wiki.js only provides ARM64 builds, so this guide will fail for those running a 32-bit system.


Equipment
Below is a list of the equipment we used when setting up Wiki.JS on our Raspberry Pi.
Recommended
Optional
This tutorial was last tested on a Raspberry Pi 5 running the latest version of Raspberry Pi OS Trixie 64-bit.
Installing Wiki.JS on the Raspberry Pi
Over these following steps, we will walk you through the process of getting Docker on your Raspberry Pi and setting it up to run Wiki.JS.
One of the most significant advantages of using Docker is that we can easily install the database server Wiki.JS relies on.
Preparing your Raspberry Pi for Wiki.JS
1. Before installing Wiki.JS, we need to update our Raspberry Pi’s operating system.
Update the package list and any out-of-date packages using the following commands within the terminal.
sudo apt update
sudo apt upgrade -yCopy
2. Once the update completes, you will now want to install Docker to your Raspberry Pi.
Please follow the guide we have linked above before returning to this tutorial. That guide will show you how to install Docker and have it configured to work properly on your device.
3. We must also create a directory to store our Docker compose file.
Create this directory in your current user’s home directory by using the command below.
sudo mkdir /opt/stacks/wikijsCopy4. Once the directory is created, we must change to it by using the cd command.
cd /opt/stacks/wikijsCopyWriting the Docker Compose file for Wiki.JS
5. After following our Docker installation guide, we can now write a Docker compose file for our Wiki.JS installation.
This compose file will set up the Wiki.JS and PostgreSQL container on our Raspberry Pi.
Start writing this compose file by using the following command in the terminal.
sudo nano compose.yamlCopy6. Within this file, you will want to enter the following lines.
While typing in these lines, replace “<WIKIJSPASSWORD>” with a password of your choosing. Keep this password secure, as Wiki.JS will store its data on this database server.
services:

  db:
    image: postgres:15-alpine
    environment:
      POSTGRES_DB: wiki
      POSTGRES_PASSWORD: <WIKIJSPASSWORD>
      POSTGRES_USER: wikijs
    logging:
      driver: "none"
    restart: unless-stopped
    volumes:
      - db-data:/var/lib/postgresql/data

  wiki:
    image: ghcr.io/requarks/wiki:2
    depends_on:
      - db
    environment:
      DB_TYPE: postgres
      DB_HOST: db
      DB_PORT: 5432
      DB_USER: wikijs
      DB_PASS: <WIKIJSPASSWORD>
      DB_NAME: wiki
    restart: unless-stopped
    ports:
      - "80:3000"

volumes:
  db-data:Copy
7. After entering these lines, you can save and quit by pressing CTRL + X, Y, then the ENTER key.
Starting up WikiJS on your Raspberry Pi
8. We are finally at a point where we can start up WikiJS on the Raspberry Pi.
To start this software on your Pi, run the following command within the terminal.
docker compose up -dCopyDuring its initial startup, Docker will pull the latest versions of both Wiki.JS and PostgreSQL to your Pi. This process can take a few minutes, so be patient before proceeding.
Accessing the Wiki.JS Web Interface
9. Once the container starts, you can access the Wiki.JS web interface using your favourite web browser.
All you need to do is know your Pi’s local IP address. The easiest way to get this is to use the hostname command.
hostname -ICopy10. After getting your IP address you will want to go straight to the following address.
Ensure you replace “<IPADDRESS>” with your Pi’s IP.
http://<IPADDRESS>First Run of Wiki.JS on the Rasberry Pi
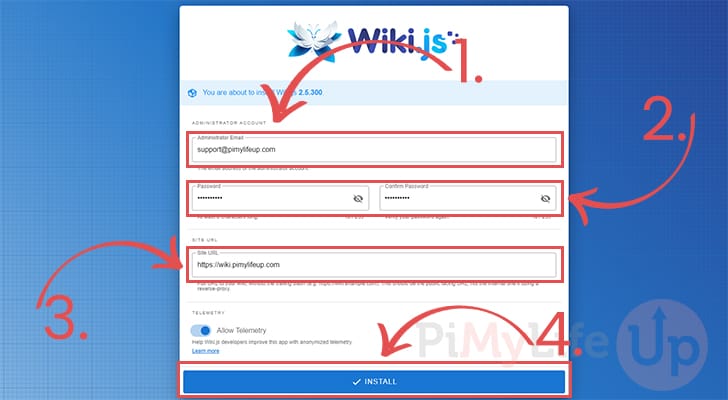
11. When you first access the Wiki.JS web interface, you will be asked to enter some information.
First, specify an email for your administrator account (1.). This is the email you will use to log in to your account.
Next, you need to set a password that you will use to access this account (2.).
Finally, you must also set a URL for your site (3.). If you are using a domain name, this is the place that you will want to enter it.
Once everything is filled out, click the “Install” button (4.) at the bottom of the dialog box.
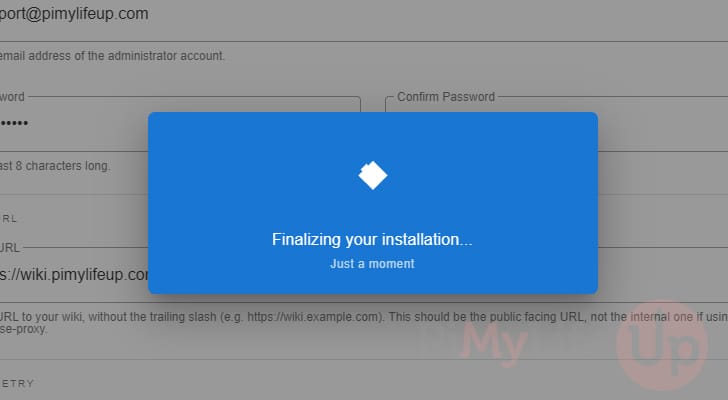
12. Wiki.JS will now finish setting itself up on your Raspberry Pi.
This process can take a couple of minutes, so don’t worry if it appears to have stopped doing anything.
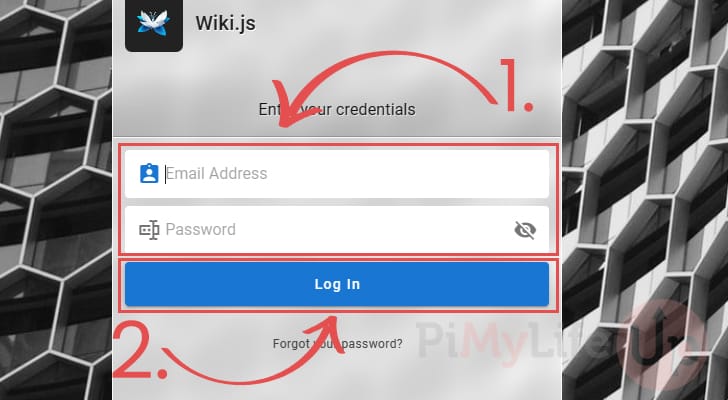
13. After the installation process, you will need to log in using the information you set previously (1.).
Once you have filled out your email and password, click the “Log In” button (2.).
14. You are finally at the point where you can start setting up Wiki.JS to your liking.
You can now browse its administration page or immediately begin creating a home page for your new self-hosted wiki.

Updating your Raspberry Pi to the Latest Version of Wiki.JS
One of the key advantages to using Docker to self-host Wiki.JS on your Raspberry Pi is that it greatly simplifies the update process.
These next few short steps will help you upgrade to the latest release of the software.
1. The first thing you will need to do is change to the directory where we wrote the Compose file for Wiki.JS.
If you followed our tutorial exactly, you can get to this folder by running the command below.
cd /opt/stacks/wikijsCopy2. After switching to the correct folder, you will want to tell Docker to download the latest release of Wiki.JS onto your Raspberry Pi.
Getting the latest release downloaded to your Pi is as simple as using the command below in the terminal.
docker compose pull3. With the new image downloaded, we need to get our Raspberry Pi to run the new release. To achieve this all we need to do is run the same command we used to start Wiki.js in the first place.
Docker will detect that a new version is available and automatically stop the running container and start it again using the new image.
docker compose up -dCopyConclusion
Hopefully, at this stage, you will now have Wiki.JS running on your Raspberry Pi.
This software is a powerful self-hosted wiki that allows you to store and document information easily.
Please feel free to comment below if you have questions about using this software on your Pi.
We have numerous other projects for the Raspberry Pi that are well worth checking out.