In this Raspberry Pi screen sharing tutorial, we are going to show you how to setup VNC so that you can share screens.
Sharing screens is incredibly helpful if you require viewing what is being displayed on the main screen.
Usually, VNC will create a new session on the Raspberry Pi meaning you won’t be able to see what is happening on the screen from the current user or any other users that are connected to the Raspberry Pi.
To be able to share the screen, we utilize a VNC package called Vino. Vino uses the same VNC protocol as others, but instead of creating a new session it just repeats what is currently being displayed in the main session.
There other methods of setting up a VNC server that you’re able to use but Vino is pretty solid and gets the job done.
Please note to use Vino you have to be running a version of the Raspbian operating system that has a GUI. You can not be running a lite version or headless version of Raspbian. If you want just to share the terminal, then look onto our terminal sharing tutorial that teaches you how to utilize tmate.
Equipment List
Below are all the pieces of equipment that I used for this Raspberry Pi screen sharing tutorial. Don’t forget you will also need a power supply for your Pi.
Recommended
- Raspberry Pi Amazon 2 or newer
- Micro SD Card Amazon
- Power Supply Amazon
- Ethernet Cable Amazon (Recommended) or Wi-Fi Amazon
Optional
- Raspberry Pi Case Amazon
Installing Vino for VNC Screen Sharing
1. One of the very first things we must do before we go ahead and get screen sharing up and running on our Raspberry Pi is to make sure it is running the latest available software.
Do this by running the following command within the terminal on the Raspberry Pi.
sudo apt update
sudo apt upgradeCopy
2. With our Raspberry Pi now entirely up to date, we can now move to install Vino; this is the VNC server we will utilize to provide us screen sharing on the Raspberry Pi.
We have to install Vino since the default one present on the Raspberry Pi does not accept this behavior and creates each connection is a new session.
Type the following command onto the terminal on the Raspberry Pi to install it.
sudo apt install vinoCopy3. Using the gsettings command, we can control various settings for Vino; this allows us to switch on and off things such as password authentication and encryption. You may need to run some of these to get Vino to play nicely with your
Enabling Login via password
To enable logging in via password, utilize the following two commands on your Raspberry Pi’s terminal. Make sure that you replace “YOUR_PASS_HERE” with the password you would like to use to log in over VNC.
gsettings set org.gnome.Vino authentication-methods "['vnc']"
gsettings set org.gnome.Vino vnc-password "$(echo -n "YOUR_PASS_HERE" | base64)"Copy
Disabling Login via Password
If for some reason you don’t want any authentication requirements when connecting to your Raspberry Pi over VNC you can enter the following command. This command will disable the password requirement.
gsettings set org.gnome.Vino authentication-methods "['none']"CopyDisabling Encryption
Some VNC Viewers such as TightVNC do not support the encryption method that Vino utilizes. To avoid issues with this, we can disable the encryption by running the following command on the Raspberry Pi.
We recommend you first try out your VNC Viewer with this option enabled before trying it without as encryption does have its obvious security benefits.
gsettings set org.gnome.Vino require-encryption falseCopyDisable User Confirmation
Like encryption, sometimes the user confirmation can cause issues with VNC Viewers. If you have problems with connecting to your Raspberry Pi via VNC, then try disabling this by running the following command.
gsettings set org.gnome.Vino prompt-enabled falseCopy4. Now you can utilize the command below to grab your Raspberry Pi’s local IP address. Remember when typing in this Linux command to capitalize the I.
hostname -ICopy5. Now we can proceed to start the Vino VNC server. We can do this by running the following command on the Raspberry Pi.
/usr/lib/vino/vino-serverCopy6. With the Vino server up and running now is the time to test it out on your device, our next section will go over utilizing a VNC Client on Windows. If you already have a VNC Client and can test the connection you can skip past the next part. If you have issues, try disabling encryption or user confirmation.
Testing Vino with a VNC Client
1. On the device, you want to use to connect to your Raspberry Pi download a compatible VNC Client. For our guide, we utilized the popular TightVNC client for Windows. You can find download TightVNC from their official website.
Once you have downloaded and installed a VNC Client to your computer, you can proceed to the next step of this guide.
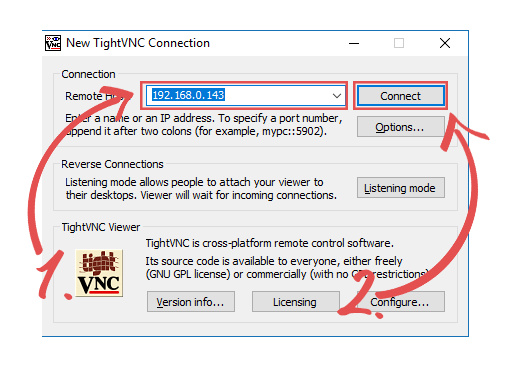
2. With TightVNC or any other VNC client now installed to your computer, launch it up. If you are using TightVNC, you should see a screen like what is shown below appear on your screen.
In the text box next to “Remote Host:” (1.) type in the IP address of your Raspberry Pi. Then simply press the “Connect” button (2.).
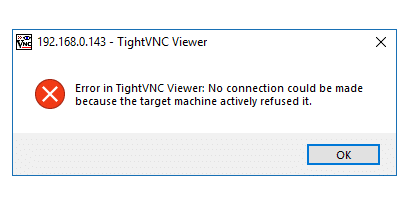
3. If a successful connection has been made, then you should now be seeing your Raspberry Pi’s desktop.
If you encounter the error “No Security Types Supported” then go back to Step 3 in our “Installing Vino” section and follow the steps for disabling encryption.
4. If you don’t run into any errors and can see your desktop through the VNC client, then you can safely proceed onto the next section of this tutorial that shows you how to setup Vino, so it automatically starts at boot.
Starting Vino at Boot
1. Now getting Vino to startup at boot on your Raspberry Pi requires us to do a few things first. One of the first things we must do is create a script that will trigger the command to start up Vino server when called.
We create this within the sudoers.d directory to ensure it will be launched with the correct rights for any user.
Start writing the script within the /etc/sudoders.d/ by typing the following command into the terminal on your Raspberry Pi.
sudo nano /etc/sudoers.d/vinosrv.shCopy2. Within this file type in the following two lines of code.
The first line just tells the interpreter that the operating system should try running the application /bin/bash to read the file. The second line executes the vino-server application.
#! /bin/bash
/usr/lib/vino/vino-serverCopy
3. Once you are sure, you have entered the correct two lines of code into the file you can save it by pressing the following. Press CTRL + X, then Y and then press ENTER to save the file.
4. Now we need to make the vinosrv file executable; this is so that on autostart the users can run the file. To do this, you need to just type in the following command onto the terminal on the Raspberry Pi.
sudo chmod +x /etc/sudoers.d/vinosrv.shCopy5. With the file now made executable, we will now add the file to the autostart for LXDE. We add it to this as it ensures that the Vino-Server will be loaded when the operating system’s interface loads up.
Begin modifying the file by running the following command on the Raspberry Pi.
sudo nano /etc/xdg/lxsession/LXDE-pi/autostartCopy6. To this file add the following line to the bottom, this will ensure that Vino server is loaded at the startup of the operating system’s interface.
@/etc/sudoers.d/vinosrv.shCopy7. Your file should end up looking like something below with the addition of the line above.
@lxpanel --profile LXDE-pi
@pcmanfm --desktop --profile LXDE-pi
@xscreensaver -no-splash
@point-rpi
@/etc/sudoers.d/vinosrv.shCopy
8. Press CTRL+ X, then Y and then press ENTER to save the file.
9. Now try restarting your Raspberry Pi by running the following line on your Raspberry Pi.
sudo rebootCopy10. With the Raspberry Pi rebooted try making a connection using a VNC client to your Raspberry Pi. If successful you have finished setting up Vino on your Raspberry Pi, and successfully have screen sharing up and running.
Conclusion
Hopefully, by the end of this Raspberry Pi screen sharing tutorial, you will have your Raspberry Pi up and running with VNC screen sharing working and your computer successfully connecting to it.
I hope this useful Pi guide has helped with setting everything up, if you have any issues with the tutorial or any feedback feel free to drop a comment below.


hi thanks for the guide, i getting error on configuring auto start, can you help
pi@raspberrypi:~ $ sudo chmod + x /etc/sudoers.d/vinosrv.sh
chmod: cannot access ‘x’: No such file or directory
Hi Allfreen,
There was a very slight mistake in that command, there should be no space between the + and the x. The command should be as below
sudo chmod +x /etc/sudoers.d/vinosrv.shWe have now corrected the tutorial.
Cheers,
Emmet