In this Raspberry Pi Spotify tutorial, we will be going through all the steps to set up the Spotify connect service. This setup is headless, so you will need to control it using another device.
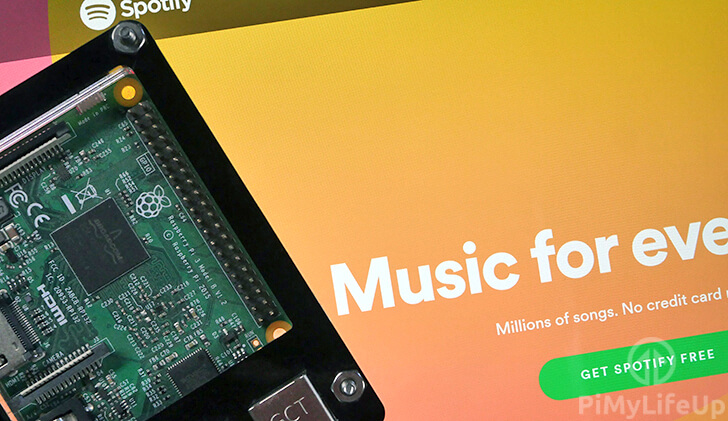
Using the Raspotify software package, we can set up your Raspberry Pi so that it can work as a cheap Spotify Connect device.
Working as a Spotify Connect device allows you to easily stream songs from any Spotify app to your Raspberry Pi. This setup is an affordable way of connecting any speakers to Spotify.
In addition to showing you how to install the Spotify connect software, we will walk you through some of the basic configuration options that you can specify.
While this isn’t the full Spotify, it does allow you to easily use any other device to play music from your Raspberry Pi. It also allows you to run Spotify on your Raspberry Pi in a completely headless setup.
You will need a Spotify premium account to be able to complete this tutorial.


Equipment List
Below are all the bits and pieces that I made use of for this Raspberry Pi Spotify tutorial.
Recommended
- Raspberry Pi Amazon
- Micro SD Card Amazon
- Power Supply Amazon
- Ethernet Cable Amazon or Wi-Fi Amazon
- Spotify Premium Spotify
Optional
This project is all about audio, so it might be worth purchasing a USB Audio Card or a Raspberry Pi sound card. The default Raspberry Pi setup is good enough for most users.
Setting up a Raspberry Pi Spotify Connect Device
1. Our first task is to ensure everything is up to date with our operating system. It will make installing the Spotify software to our Raspberry Pi a little easier.
To do this, we will need to run the following two commands. The first will update the package list. The second command upgrades the installed packages.
sudo apt update
sudo apt upgradeCopy
2. Next, we need to make sure that both “curl” and “apt-transport-https” packages are installed to our Raspberry Pi.
Without these, we won’t be able to set up the raspotify repository on Raspbian.
Run the following command to install our needed packages.
sudo apt install -y apt-transport-https curlCopy3. With the packages we need installed we can go ahead and add the “raspotify” GPG key and its repository.
Without the GPG key, the apt package manager won’t be able to verify the files it’s retrieving from the repository.
You can do these two things by running the following two commands.
curl -sSL https://dtcooper.github.io/raspotify/key.asc | sudo tee /usr/share/keyrings/raspotify-archive-keyrings.asc >/dev/null
echo 'deb [signed-by=/usr/share/keyrings/raspotify-archive-keyrings.asc] https://dtcooper.github.io/raspotify raspotify main' | sudo tee /etc/apt/sources.list.d/raspotify.listCopy
4. Now that we have the raspotify repository added to our Raspberry Pi, we can now go ahead and install the raspotify package.
This package will handle turning our Raspberry Pi into a Spotify Connect device. We can install the package by running the two commands below.
We need to rerun the update due to us adding the raspotify repository in the previous step. Without an update, the package manager won’t know what’s contained in that repository.
sudo apt update
sudo apt install raspotifyCopy
5. With the “raspotify” software now installed, the software should start automatically and be ready for connections.
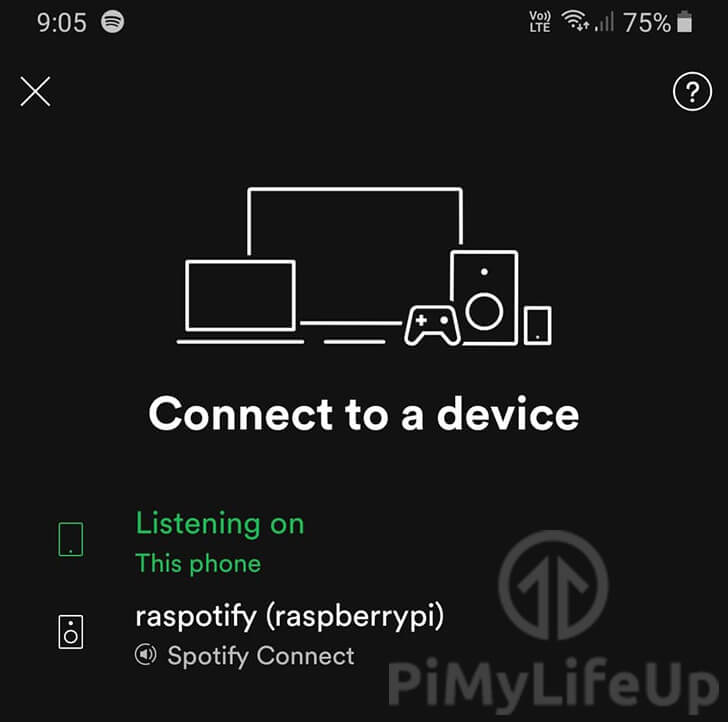
You should now be able to connect to your Raspberry Pi’s Spotify software. You can do this by opening up the Spotify app on your chosen device and selecting it from the “Connect to a device” menu.
Configuring the Spotify Connect Software
1. While the Raspotify software works perfectly fine right out of the box, you can make changes to its configuration.
You can use this configuration file to adjust things such as the bitrate or the device name.
Run the command below to begin modifying the “raspotify” config file.
sudo nano /etc/raspotify/confCopy2. Within this file, you will see multiple different options that you can configure yourself. We will go into a couple of these and explain what you can use them for.
When changing options within this file, make sure that you remove the hashtag (#) at the start of the line. Otherwise, the settings will not take effect.
LIBRESPOT_NAME="Librespot"This option defines the name that Spotify connect service on the Raspberry Pi will use. You can set this to something to easier identify where the Raspberry Pi is or what the Pi is connected to.
By default, Raspotify will set the device name to “raspostify” followed by the hostname of your device.
LIBRESPOT_BITRATE="160"With this option, you can specify the bitrate that you would like the device to utilize.
You can pick three different values for this option, 96 for low-quality, 160 for medium-quality or 320 for high-quality audio.
LIBRESPOT_USERNAME=""If you want to utilize your Spotify account, there are two options in particular that you will need to use.
The first of these options is “LIBRESPOT_USERNAME“. Within the double quotes, type in the username for your account.
Please note that the username and password options may not be what you use normally to log into the account. You will need to retrieve these details by going to the “Set device password” screen on your Spotify account.
If the link above directs to your profile homepage and there is no option to set a device password, simply enter your normal Spotify Username and password.
LIBRESPOT_PASSWORD=""The second option you will need to use is the one that allows you to set the password to use to login to your account.
Please type your password between the double quotes on this line before continuing.
When Raspostify connects to Spotify, it will use these credentials, allowing better integration with your account and making the Raspberry Pi easier to be discovered by the software.
3. If you have made any changes, you can save the file by pressing CTRL + X then Y followed by ENTER.
4. Once you have made any changes to the raspotify configuration file, you will need to first restart the “raspotify” service by running the command below.
sudo systemctl restart raspotifyCopyHopefully, by now, you will now have successfully set up your headless Raspberry Pi Spotify device. It’s an excellent way to have a barebones audio player that can use any speaker that supports USB or a 3.5mm connection.
There are plenty of other media projects that you can do with the Raspberry Pi. I highly recommend checking out the Kodi media center if you’re after something that can do a little bit of everything.
If you run into trouble following this trouble or have some feedback then please don’t hesitate to leave a comment below.


Nevermind, It’s working! works from my phone, not from laptop!?
Does not work on my mod 3
Still working great in 2025. Thank you!
Thank you, this worked flawlessly.
Works on Banana Pi M1 with Armbian as well. Thx a lot 🙂