In this tutorial, we will show you how to run Spoolman on your Raspberry Pi.
Spoolman is a really easy-to-use software for managing your 3D printer filament on your Raspberry Pi. It has various features that make managing your filament inventory even easier, especially if you are using software like OctoPrint.
When you pair Spoolman with OctoPrint or Moonraker, it can automatically update your inventory with the amount of filament that has been consumed.
This information is presented within a simple and easy-to-use web interface. This web interface even allows real-time updates so you can monitor your filament usage in real time. The team even actively manages a list of filaments, so adding a new filament to your inventory is as simple as possible.
The Raspberry Pi makes a great place to run Spoolman as it is super low-powered and has more than enough performance to manage your filament inventory. This same hardware can also be used to run OctoPrint without any slowdown in your inventory management or your 3D printing.
We will use its Docker container to make setting up Spoolman on your Raspberry Pi as simple as possible. Docker allows you to get software like Spoolman up and running in minutes without worrying about whether a certain library is available on Raspberry Pi OS.
Another neat thing about Spoolman is that the team provides builds for both 32-bit and 64-bit ARM systems, so you can use it regardless of your choice of Raspberry Pi.
Equipment
Below is the equipment we used when installing and running Spoolman on our Raspberry Pi.
Recommended
- Raspberry Pi Amazon
- Monitor Amazon
- Micro SD Card Amazon
- Power Supply Amazon
- Ethernet Cable Amazon or Wi-Fi Amazon
Optional
We tested this tutorial on a Raspberry Pi 5 running the latest version of Raspberry Pi OS Bookworm.
Setting up Spoolman on your Raspberry Pi
Over the following sections, we will walk you through installing and setting up Spoolman on your Raspberry Pi.
One thing to do before you continue with this guide is to set up a static IP address for your Raspberry Pi.
We have embedded a video below that will visually walk you through the steps to installing this software on your Pi. If you prefer our written instructions, continue on to the next section.
Preparing your Raspberry Pi
1. Before installing Spoolman on your Raspberry Pi, we must prepare the underlying operating system to run it.
Your first step is to update the package list cache and upgrade any out-of-date packages by running the following two commands in the terminal.
sudo apt update
sudo apt upgrade -yCopy
2. After the upgrade has completed, you must install Docker on to your Raspberry Pi.
We will be using Docker to run Spoolman as it simplifies the whole process; it also makes updating a very simple process and makes us less prone to issues that operating system updates might cause.
If you haven’t installed this runtime previously, follow our guide on installing Docker to the Raspberry Pi.
https://pimylifeup.com/raspberry-pi-docker/3. Our next step is to use the mkdir command to create a place where we will store the Compose file for Spoolman. This will also be the same place where we will store Spoolmans data.
You can create this directory by running the following command within the terminal. We use the “-p” option to generate the full path, regardless of whether a directory is missing.
sudo mkdir -p /opt/stacks/spoolman/dataCopy4. With the directory created, we need to use the chown command to ensure the “/data” path is owned by the user with the ID of 1000.
The Spoolman container will fail to run on our Raspberry Pi if we don’t do this due to permission issues. The container is pre-set to use the user with the ID 1000.
sudo chown 1000:1000 /opt/stacks/spoolman/dataCopy5. We now have our Pi completely prepared to run Spoolman. Change into the folder we just created by using the cd command within the terminal
cd /opt/stacks/spoolmanCopyWriting a Docker Compose File for Spoolman on your Pi
6. Now that we are in the correct place, we can begin writing the Docker Compose file for Spoolman. This Compose file will tell Docker how to start up and manage Spoolman on your Raspberry Pi.
You can begin writing this Compose file using Nano using the following command.
sudo nano compose.yamlCopy7. Within this file, you will want to fill out the following lines. With these lines we are setting the image to the Spoolman one, setting a volume so that the data is stored on your local machine, and exposing the Spoolman web interface on port 7912.
There is one thing you will need to replace within this file: your timezone.
Ensure that you replace “<TIMEZONE>” with a valid TZ identifier. You can find a list of these on Wikipedia. An example of a valid value for this would be “Australia/Hobart“.
services:
  spoolman:
    image: ghcr.io/donkie/spoolman:latest
    restart: unless-stopped
    volumes:
      - ./data:/home/app/.local/share/spoolman
    ports:
      - "7912:8000"
    environment:
      - TZ=<TIMEZONE>Copy
8. After filling out this file, save and quit out of Nano by pressing CTRL + X, Y, and then ENTER.
Starting up Spoolman on your Raspberry Pi
9. Here comes one of the easiest parts of this guide. All we need to do to start up the Spoolman service on your Raspberry Pi is to run the following command within the terminal.
With this command, Docker will process the Compose file, download the Spoolman container, and start it up.
docker compose up -dCopyAccessing the Spoolman Web Interface
10. With Spoolman up and running on your Raspberry Pi, you will want to get your local IP address for your Pi.
The easiest way to get your Pi’s IP address is with the hostname command, as shown below.
hostname -ICopy11. To access the Spoolman web interface, you will want to go to the following address in your favorite web browser.
Ensure that you replace "<IPADDRESS>” with that of your Raspberry Pi.
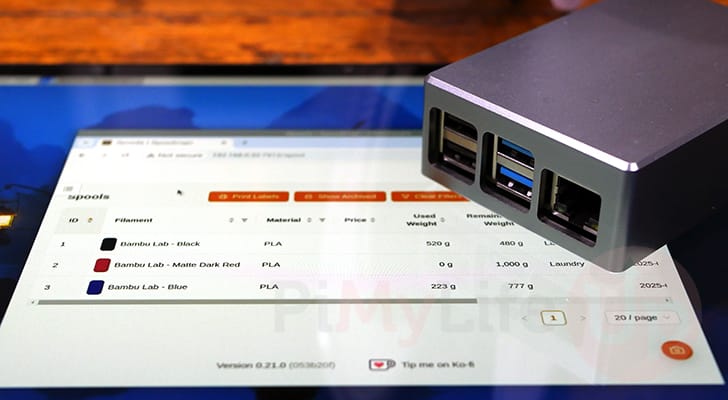
http://<IPADDRESS>:791212. If everything has worked properly, You should have full access to the Spoolman web interface.
You can now begin to add and track any of your filaments using its easy-to-use UI. To take this further, you should integrate this with your 3D printer so that it can automatically update your filament usage.
We won’t cover that within this guide as we have a Bambu Lab printer requiring a specific third-party add-on to communicate with this software. This involves more setup steps that would be a little to much to cover in this one guide.

Upgrading to the Latest Release of Spoolman on the Raspberry Pi
One key advantage of using Docker to set up Spoolman on your Raspberry Pi is that it makes the upgrade process significantly faster.
These next steps will show you how to easily upgrade the running container.
1. To upgrade your Spoolman container on your Raspberry Pi, you will need to change to the directory where we wrote the Compose file at the start of this guide.
You can change to the correct directory by using the following command.
cd /opt/stacks/spoolmanCopy2. Once you are in the correct directory, you can get Docker to download the latest release of Spoolman by running the following command within the terminal.
Please note that this command will download a new release but will not upgrade the currently running container.
docker compose pullCopy3. To move your current running Spoolman installation to the new release, you must use the following command in the terminal.
This command will detect that a new image is available, stop the currently running container, and then start it again using the newly pulled version of Spoolman.
docker compose up -dCopyConclusion
Hopefully, by this point in the tutorial, you will have successfully managed to get the Spoolman software running on your Raspberry Pi.
Spoolman is a great software for keeping track of your 3D filament. It allows you to build an inventory in just a few short clicks, and with some of its integrations, you can have your filament weight automatically tracked.
Please feel free to comment below if you have had any issues getting Spoolman to work.
If you liked this guide, be sure to check out some of our many other Raspberry Pi projects.