In this project, we will be showing you how to install Seafile on the Raspberry Pi.
Seafile is an open-source file hosting software that can run on the Raspberry Pi.
This service allows you to have a central place to upload your files. It then allows you to synchronize these files to any other the supported Seafile clients.
One of the advantages of using a file hosting solution such as Seafile is that you retain control of your data. You don’t have to put your trust in a service like Google Drive or Dropbox to respect your privacy.
There are two different versions of Seafile that you can use. One is the free community edition, and the other is the paid enterprise release. In this guide, we will focus purely on the community version.
You can find a comparison between the community and enterprise editions on Seafile’s website.
Seafile is similar to other self-hosted file hosting services you can run on your Raspberry Pi, such as Owncloud and Nextcloud. However, Seafile has more of a focus on being a file hosting service, rather than replicating the experience of Google Drive and Onedrive. If you are just after file hosting, Seafile is definitely the less bloated experience.
Please note you must be running a 64-bit version of Raspberry Pi OS for this guide to work. The Docker image we use for Seafile does not support 32-bit operating systems.


Equipment
Below is a list of the equipment we used while installing Seafile onto the Raspberry Pi.
Recommended
- Raspberry Pi Amazon
- Micro SD Card Amazon
- Power Supply Amazon
- Ethernet Cable Amazon or Wi-Fi Amazon
- External Hard Drive Amazon or USB Drive Amazon
Optional
This tutorial was last tested on a Raspberry Pi 5 running a 64-bit version of Raspberry Pi OS Bookworm.
How to Install Seafile on the Raspberry Pi
In the following steps, we will guide you through the process of installing Seafile on your Raspberry Pi.
To greatly simplify the setup process, we will be utilizing Docker. The advantage of using Docker is that we don’t have to spend a lot of time installing and configuring multiple services.
Additionally, you don’t have to worry about your Seafile setup potentially conflicting with other software you’re running on your Pi. Seafile and its dependencies are all kept in their isolated container.
Preparing your Raspberry Pi for Seafile
1. Before we begin, we must update the package list and upgrade any out-of-date packages
You can perform both tasks using the following two commands in the terminal.
sudo apt update
sudo apt upgrade -yCopy
2. We must now ensure that we at least have the “wget” and “pwgen” packages installed on our Raspberry Pi.
We will wget to retrieve the Compose files from the Seafile team. The “pwgen” package will be installed to generate a unique key for Seafile to use.
sudo apt install wget pwgenCopy3. Once the system finishes updating, you must install Docker on your Raspberry Pi.
The guide we linked above walks you through all the steps to installing and configuring Docker on the Pi.
https://pimylifeup.com/raspberry-pi-docker/4. After installing Docker, our next step is to create a directory using the mkdir command to store our Seafile Docker compose file.
We will create this folder within the directory “/opt/stacks/” as it provides a convenient location to store all our Docker stacks. The use of the “-p” option makes your system create each missing part of this directory.
sudo mkdir -p /opt/stacks/seafileCopy5. After creating a directory for Seafile, change into it by using the cd command within the terminal.
cd /opt/stacks/seafileCopyRetrieving the Compose Files for SeaFile on the Raspberry Pi
6. Let us start this section by defining the version of Seafile that we intend to install on our Raspberry Pi.
We set this as a bash variable so we can easily refer to the correct version over the next few steps.
SEAFILE_VERSION=12.0Copy7. With the version set, let us start by downloading the base environment file for Seafile. This is the file we will be using to configure Seafile.
sudo wget -O .env https://manual.seafile.com/$SEAFILE_VERSION/repo/docker/ce/envCopy8. Next, we can save the Docker Compose file that will set up the core services that Seafile relies on. The first is Seafile itself, the second is a database server, and finally, is Memcached, which will be used for Seafile’s caching system.
sudo wget https://manual.seafile.com/$SEAFILE_VERSION/repo/docker/ce/seafile-server.ymlCopy9. We will also be saving the Docker Compose file for SeaDoc. This is an extension to Seafile that enables its online collaborative document editor. While not required, it can be incredibly useful to have.
sudo wget https://manual.seafile.com/$SEAFILE_VERSION/repo/docker/seadoc.ymlCopy10. The final piece of this puzzle that we need to download is the Compose file for Caddy. Caddy is what Seafile will use to make the service actually accessible; it also provides HTTPS functionality if you enable it.
sudo wget https://manual.seafile.com/$SEAFILE_VERSION/repo/docker/caddy.ymlCopy11. With all the Compose files now saved, we will need to actually configure Seafile.
Now, before we can do that, we will need to generate a unique password that will be used for the “JWT” private key. It is crucial that this is secure, as it will be used to keep sessions secure.
pwgen -s 40 1CopyConfiguring the Seafile Environment
12. You can now open the “.env” file for editing by using the command below within the terminal.
We are using “nano” as it is one of the easiest terminal-based text editors to use.
sudo nano .envCopy13. With the file now open, we will need to make several changes to ensure that Seafile works as intended on your Raspberry Pi.
Setting the Storage Location
- If you want your files to be stored in a different location on your Raspberry Pi, for example, on an external hard drive, you will want to look for the following line.
SEAFILE_VOLUME=/opt/seafile-dataCopyReplace the path defined here with the path to where you want Seafile to store its files. In this example, we are changing ours to be stored in the “/mount/hdddrive/seafile-data” directory.
SEAFILE_VOLUME=/mount/hddrive/seafile-dataCopy- Likewise, you will also want to make this change to the Seadoc volume path. You can adjust this path by finding the following line.
SEADOC_VOLUME=/opt/seadoc-dataCopyFor example, setting our mount path to “/mount/hddrive/seado-data” would mean changing the line to resemble the following.
SEADOC_VOLUME=/mount/hddrive/seadoc-dataCopyConfiguring your Hostname and Protocol
- Here, you will specify the domain name you want to use to access your Seafile installation.
If you are using this locally or without a domain name, you can set it to your IP Address instead. If you are using a domain name, ensure that this is publicly routable to your machine.
SEAFILE_SERVER_HOSTNAME=seafile.example.comCopyFor example, setting our hostname to “seafile.pimylifeup.com” would mean the line would look like what we have shown below.
SEAFILE_SERVER_HOSTNAME=seafile.pimylifeup.comCopyIf you don’t have a domain name, you will want to use either your local IP address or your external IP address. In our example below, we are using the local IP address assigned to our Raspberry Pi.
SEAFILE_SERVER_HOSTNAME=192.168.0.22Copy- Now, if you have a domain name that can actually be used to access your Pi, then you can enable the HTTPS functionality. To achieve this, find the following line within the file.
SEAFILE_SERVER_PROTOCOL=httpCopyOnce you have found this line, all you need to do is swap out “http” with “https“. When your container starts up, Caddy will automatically try to fetch an SSL certificate for your chosen domain name.
SEAFILE_SERVER_PROTOCOL=httpsCopySetting your TimeZone and Private Key
- Your next step is to set the time zone for Seafile to utilize. By default, Seafile will set the timezone to UTC (
ETC/UTC).
TIME_ZONE=Etc/UTCCopyYou can find a list of tz database time zones by going to Wikipedia. The values you need are under the TZ Identifier column.
For example, I live in Hobart, Australia, so I would use “Australia/Hobart” for this value.
TIME_ZONE=Australia/HobartCopy- The next step is to specify the key that we will use to help ensure the security of your session keys. To do this, you will need to find the following option.
JWT_PRIVATE_KEY=CopyOnce you have found this line, add the password you generated earlier using the pwgen command to the end of the line.
JWT_PRIVATE_KEY=EXAMPLEKEYGOESHEREDONOTUSETHISONECopyConfiguring the Database Passwords
- Next, we need to set the password that Seafile will use for its database server on your Raspberry Pi.
To set this password, you will want to find the following line within the file.
SEAFILE_MYSQL_DB_PASSWORD=PASSWORDCopySwap out “PASSWORD” with a secure password of your own. It’s crucial to make this something that can not easily be guessed.
SEAFILE_MYSQL_DB_PASSWORD=RANDOMPASSWORDHERECopy- You will also need to set a separate password that will be used for the database server’s root user. This is only used during the initial startup process, but it is still crucial that you make this something secure.
INIT_SEAFILE_MYSQL_ROOT_PASSWORD=ROOT_PASSWORDCopyChange “ROOT_PASSWORD” with a new password, this isn’t something you need to remember.
INIT_SEAFILE_MYSQL_ROOT_PASSWORD=DIFFERENTPASSWORDCopySetting up your Seafile User Details
- We are now at the final stage of configuring Seafile on your Raspberry Pi, which involves creating the user account you will use to access Seafile.
The first step in this process is to locate the line that defines the admin email.
INIT_SEAFILE_ADMIN_EMAIL=me@example.comCopyYou will now want to replace this with the email address you wish to use to access your Seafile installation. For example, we would change the line to look like the following if we were using the email “seafile@pimylifeup.com“.
INIT_SEAFILE_ADMIN_EMAIL=seafile@pimylifeup.comCopy- Next, we need to set the password you will use for your admin account. To set the password, look for the following line immediately below the email.
INIT_SEAFILE_ADMIN_PASSWORD=asecretCopyTo set your password, replace “asecret” with the password you will want to use to access Seafile using your web browser.
INIT_SEAFILE_ADMIN_PASSWORD=randomsecurepasswordCopySaving your Changes
13. After filling out this file, you can now save and quit by pressing CTRL + X, followed by Y, and then the ENTER key.
Starting Seafile on your Raspberry Pi
14. We are finally at the point where we can start Seafile on our Raspberry Pi.
All we need to do is use the following command. This command tells Docker to start the containers specified within the compose file we wrote.
When you first run this command, this process can take a few minutes. It needs to download and set up a container for Seafile, the SQL database, and memcached.
docker compose up -dCopyBy using the “-d” option, we are also telling Docker to detach from the current terminal session. This allows Seafile to continue to run in the background.
Accessing the Seafile Web Interface
15. Now that we have gotten Seafile up and running on your Raspberry Pi, we can access its web interface.
To access this interface, you must know your Pi’s IP address. The easiest way to get this IP is to use the hostname command.
hostname -ICopy16. With your IP address now handy, go to the following address in your web browser.
If you had to change the default port away from the default “80“, you must add it to the end of the URL.
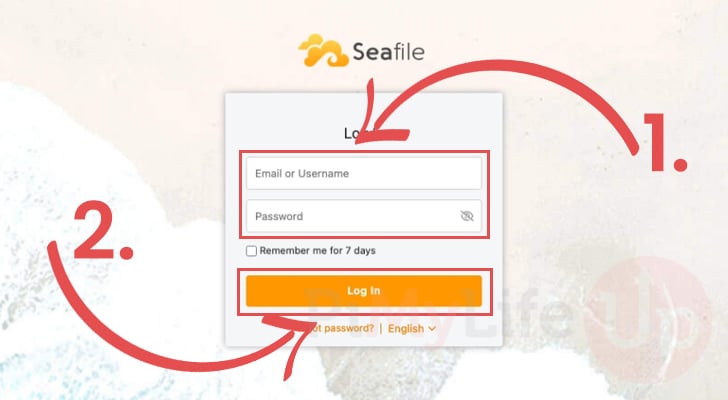
http://<YOURIPADDRESS>17. You will now be greeted with the login screen for Seafile.
Start by typing in the email and password (1.) that you set within the Docker compose file earlier.
After filling out your details, click the “Login” button (2.).
18. You will now see the welcome screen. At this point you have successfully installed Seafile, on your Raspberry Pi. However, there is one task you should complete before using Seafile.

Updating your Password
19. One of the first things you must do is update your password. At the moment, you are using the one that is specified within the Docker compose file, which isn’t the most secure thing to be doing.
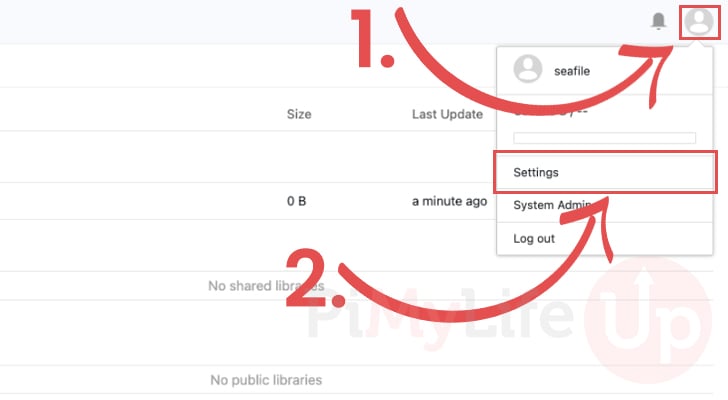
To begin this process, click your profile in the top-right corner (1.).
Next, you will want to click the “User Settings” option (2.) in the pop-up menu.
20. Now that you are on the user settings screen, scroll to the “Password” heading and click the “Update” button.

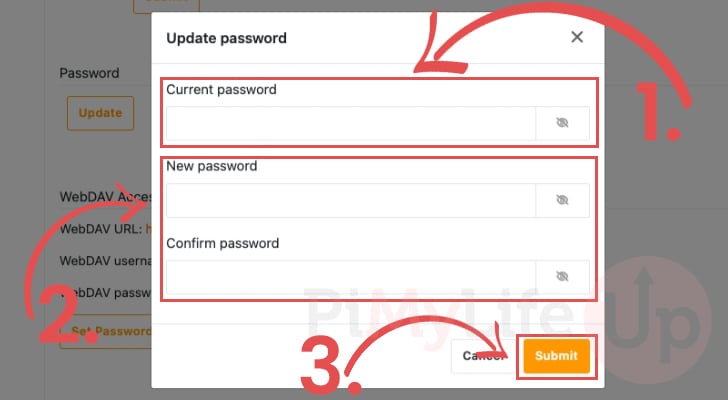
21. You can now set a new password for your admin account for your Raspberry Pi Seafile installation.
First, you must specify the current password for your account (1.).
Next, type in a new password that you will use to log in from now on (2.)
Finally, after completing your details, click the “Submit” button (3.).
22.At this point, you have successfully updated your password for your Seafile account. You can now begin to upload your files to your new installation and configure it to your needs.
Conclusion
Hopefully, you will have successfully installed Seafile on your Raspberry Pi and got it up and running.
Seafile is a decent self-hosted file hosting solution and an excellent alternative to the more resource-intensive Nextcloud and OwnCloud solutions.
Please feel free to leave a comment below if you have any questions about installing Seafile on your Raspberry Pi.
If you found this tutorial to be helpful, be sure to check out our many other Raspberry Pi projects.


Testing out config, I am getting a 502 Bad Gateway error. This appears to be the culprit…
nginx: [warn] server name “” has suspicious symbols in /etc/nginx/sites-enabled/seafile.nginx.conf:5
nginx: the configuration file /etc/nginx/nginx.conf syntax is ok
Below is my .yml, which has been updated to remove the “. If i edit /etc/nginx/sites-enabled/seafile.nginx.conf to update the server name in the container, then i no longer get the 502 error.
However it will resurface when the container is restarted.
Am i doing something wrong here?
Hi Kevin,
Sorry to see that you have been running into issues with this guide.
I have actually gone and overhauled the entire guide so that we now use Seafile 12.0 (13.0 is new and doesn’t currently support the Pi). This requires some significant changes but should be a bit more reliable since Seafile now uses the web server separately.
Please try the updated steps and let me know if you are continuing to run into issues.
Kind regards,
Emmet
This is a great guide! Thanks! I’m running Open Media Vault (OMV)on my Pi, with the OMV docker plugin. Seafile will not work with it, and I can’t figure it out. I’ve tried previous versions as well as the latest with no luck. I’m thinking it’s a file permissions issues that the OMV docker user is applying that seafile does not like. Thanks again for this amazing guide! I may just buy another pi and run seafile in native docker.
Hi Wil,
My first thought would be that Seafile is using a different user than OpenMediaVault.You would need to work out the UID and GID of your user and then assign them using environemnt varaibles for the Docker container. From memory you should be able to see these values from within the users interface in OMV.
To set Seafile to use a particular user, you would need to add the following option with the UID and GID underneath the Seafile container in the stack.
For example, if our ID was 1000 and GID was 1000 we we would adjust it to look similar to what we have shown below.
Kind regards,
Emmet
Dear Emmet,
Is it possible to show how ssl would be setup with seafile? I am having a terrible time trying to add a nginx docekr into the existing setup and i simply get bad gateway with the https://seafile:443 wher I use an ip for seafile. I looked at the seafile docker manual sections but really i couldnt get any traction
Many thanks!!
Hi Ken,
I would actually suggest using something like Nginx Proxy Manager in front of this if you are in the need for SSL. It makes setting up and routing traffic a lot easier from my own experience.
Kind regards,
Emmet
Thank you once again for an excellent guide.
I discovered that the pro edition is free for home use for up to a maximum of 3 users which is perfect. All I did was register a username and password, in case anyone else is interested in the additional features.
However, what isn’t clear for me is how to install the professional version of the software during the docker installation, could you provide any guidance please?
Many thanks for your time and any additional guidance you may be able to provide
Hi Ken,
Using the pro version does require a few changes to this guide. It doesn’t look like the team distribute the pro version through Docker hub which makes it a little harder to check whether they actually provide ARM versions for the Raspberry Pi.
1. Your first step is to login Docker to Seafile’s Docker repository.
According to their documentation you will find the username and password to login to this repository within their customer center download page.
2. Once logged in you will want to make a change to the Docker Compose file that we have written.
Find the following line within the file.
Replace it with the following
Please let me know if that helps you get the pro version up and running. I haven’t had the chance to test any of this myself.
Kind regards,
Emmet
Hello Emmet,
Thank you very much for your help, I have successfully installed seafile!
I did check their web repository and I didn’t see an ARM version, but I followed your advise by first performing the docker login on the pi cmd terminal.
After that I simply followed the remainder of the instructions to create a directory and a compose.yaml script, populating it with the passwords, email and the PI’s IP address.
The docker up -d command ran without a hitch and I have logged into Seafile which is fantastic, all down to your excellent guide and help with the pro version image query.
As a final question, is there a way for me to check that the pro image was indeed pulled via seafile webpage, just to be sure that it didnt revert to a community edition?
Warm regards
Ken
After completing step 8. I got this answer:
✔ Container seafile-memcached Running 0.0s
✔ Container seafile-mysql Running 0.0s
✔ Container seafile Started 1.6s
Everything seems to be OK, but step 11. doesn’t work! … “Address is invalid”
Hi Wolfgang,
I just re-ran through the tutorial and didn’t run into the same issue.
Please ensure that you have replaced “
<IPADDRESS>” with the IP of your Raspberry Pi. Additionally, ensure that you have no other services running on port 80 as that will cause Seafile to crash during startup unless you have changed the host port away from port 80.Kind regards,
Emmet
I’m getting to Step 8, and it does start the process, but bombs out a couple of seconds in with:
Error response from daemon: manifest for seafileltd/seafile-mc:latest not found: manifest unknown: manifest unknownThe fix for this is to go into the yml file and change the image line to:
image=seafileltd/seafile-mc:11.0-latestHi Colin,
Thanks for a heads up about this issue, I have updated the guide to point to the updated tag for the Seafile container.
Kind regards,
Emmet
Thank you for this! I was looking for a replacement to Nextcloud and your tutorial made it quite easy to follow and set up Seafile as an experimental alternative
You are right, I was confused at first because kernel was 64 bits one but all software in the system is 32 bits, will have to reinstall and see. Cheers!
Step 8 won’t work at least with a raspberry pi 4 I get:
no matching manifest for linux/arm/v8 in the manifest list entries
Hi Daniel,
As mentioned at the start of the tutorial, you must be running a 64-bit version of Raspberry Pi OS.
You can verify this by following our guide that shows you how to check if the OS is 32-bit or 64-bit.
Kind regards,
Emmet
Both commands say aarch64, still getting same issue “no matching manifest for linux/arm/v8 in the manifest list entries”
uname -m
aarch64
arch
aarch64
Hi Rohan,
The command you will want to use is “dpkg-architecture –query DEB_HOST_ARCH”.
The uname and arch commands can be unreliable as Raspberry Pi OS can still use a 64-bit kernel even when running in a 32-bit userland.
Kind regards,
Emmet