In this quick guide, we will explain what the red and green lights on the Raspberry Pi are used for.
If you have ever paid attention to your Raspberry Pi, you will notice that it features two lights. One of these lights is red, and one of them is green.
These red and green lights on your Pi are used to help indicate the current state of the mini-computer. For example, these lights can help you diagnose why your Raspberry Pi might not be booting.
If you want a quick explanation, the red light typically reflects the power status of your Raspberry Pi. In contrast, the green light is used to show whether the Raspberry Pi is reading from the SD card during start-up.
Over the following sections, we will dive into how these lights are labeled and precisely what they indicate, whether they may be flashing or solid.
The Red and Green Lights
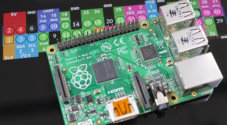
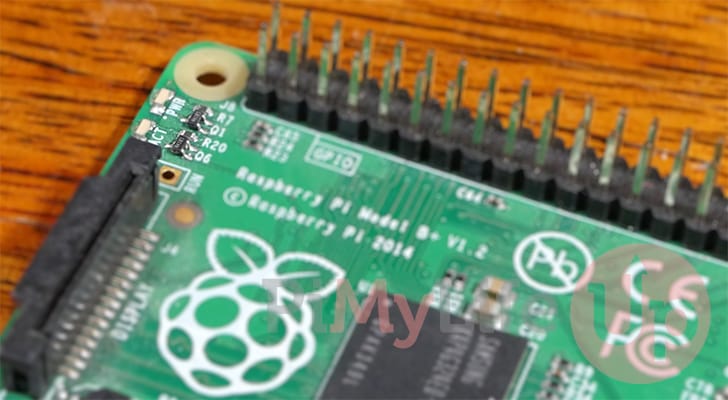
The red and green lights are typically found on the edge of the Raspberry Pi, with labels underneath them that indicate what they are used for.
Since the Raspberry Pi 2, all models of the Raspberry Pi (Except for the Zero) have featured the following two lights.
- The red light has the label “
PWR” directly underneath it. This label tells you that this particular light reflects the power status of the device.
Please note that the Pi Zero does not feature a red LED on its board. - The green light on a modern Raspberry Pi is labeled “
ACT” or “OK” and is used to show SD Card activity.
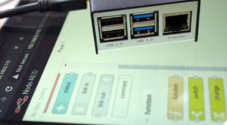
If you use an original Raspberry Pi, you will find it has two additional green lights and one yellow light. These have different labels and are used to indicate the status of the ethernet connection.
The “LNK” and “100“lights were moved to the ethernet connector in later Raspberry Pi versions.
- If the green light on your Raspberry Pi has the label “
FDX” (Full-Duplex connection), it shows whether your device has an active network connection. - If the light has the label “
LNK” it indicates activity on the ethernet connection. It will flash on any network activity. - The yellow light labeled “
10M” or “100” was used to indicate whether the Raspberry Pi has negotiated a 100MBit connection.
Red and Green Lights on the Raspberry Pi
If you find this confusing, you can use the following table to check the light’s label against what it is used to represent.
Most people will likely be running a Raspberry Pi 2 or newer, so you only have to worry about the “PWR” and “ACT” lights.
Additionally, if you use a Pi Zero, you will find it only has the green “ACT” light.
| Light Label | LED Color | Explanation |
|---|---|---|
| PWR | Red | Indicates the power status of the Raspberry Pi |
| ACT / OK | Green | Shows the SD-Card Activity |
| FDX | Green | Indicates that a network connection has been made. |
| LNK | Green | Flashes on network activity |
| 10M / 100 | Yellow | Shows whether a 100 MBit connection has been made. |
The RED (PWR) Light on the Raspberry Pi
Let us start by exploring the Red LED on your Raspberry Pi. The Raspberry Pi uses this light to show the power status of your device and has the label “PWR“. Out of the red and green lights, this one is the easiest one to understand.
Using the red light, you can check whether your device is getting power, and it is also a way to see whether your Raspberry Pi isn’t getting enough power delivered.
If the red light on your Raspberry Pi is continuous, it indicates that your device is getting enough power to power on safely and should be performing correctly.
However, if this light is blinking, it shows that it is not being delivered enough voltage by your power supply. The voltage has to fall below 4.64 volts for your Pi to enter this state.
Finally, if the red light on your Pi remains off, it shows insufficient voltage is being delivered, triggering a “brownout“. The Pi keeps itself off to prevent damage due to inadequate power.
If you are facing either the blinking or no light, it is recommended to try swapping out the power supply and or cable. Typically, it is best to stick with the official power supply as the Pi can be quite picky about its power.
Red LED Status Table
To make it easier to understand this, refer to our table below to see what the various state of the red LED on your Raspberry Pi might mean.
| Red Light | Status |
|---|---|
| Consistently Lit | Sufficient Power |
| Blinking | Voltage is below 4.64 volts. |
| Off | Insufficient power to turn on safely. |
Luckily this LED is fairly simple to understand as it really only has three states that it can indicate. However, they are also beneficial for understanding power issues with your Raspberry Pi.
Typically, if you are facing issues with your Pi’s power, you can easily fix them by investing in the official power supply.
The Green (ACT) Light on the Raspberry Pi
This section will focus on the green LED on your Raspberry Pi with the label “ACT“. This light is significantly more complicated to understand as it has numerous states.
What makes this more confusing is that the behavior of this light has been changed with the Raspberry Pi 4 and 400.
Raspberry Pi 1, 2, 3 Green ACT Light
The following explanation is only valid for the Raspberry Pi 3 and older. Due to changes in the way the Pi 4 boots using an EEPROM, these flash patterns mean something else on that device.
The ACT LED on your Raspberry Pi is used to indicate the status of the system. Under ideal situations, it will show SD card activity, but on failure, it will show the status of the Raspberry Pi itself.
- If the green light on your Raspberry Pi is consistently lit, then it indicates that you have a successful SD card connection.
- When the light is consistently blinking, it shows that your Raspberry Pi is either writing or reading from the SD card.
- If the LED remains off, there is some issue with booting from your SD card. Try updating to the latest version of Raspberry Pi OS or replacing the SD Card entirely.
However, when the green LED is flashing in a particular pattern, it usually indicates a failure. These issues mainly involve data stored on your SD Card or USB.
- Three Flashes – The Pi has failed to find the “
start.elf” file on your SD card or USB. This file is used to start the GPU on your device. - Four Flashes – The “
start.elf” file was found on your SD card / USB but was not launchable and is potentially corrupt. - Seven Flashes – Seven flashes indicate that your Pi’s SD card or USB is missing the “
kernel.img” file. The kernel is what helps an operating system interface with the hardware itself. - Eight Flashes – This pattern indicates that the system can’t recognize the RAM on your Raspberry Pi. Typically, this is fixed by upgrading to a newer version of the official operating system.
If updating the operating system doesn’t fix the issue, it means your SDRAM is damaged.
Green LED Status Table
The table below lets you quickly see what the green LED flashes mean on your Raspberry Pi. Read the text above if you need a better explanation.
| Flashes | Status |
|---|---|
| 3 | Failed to find “start.elf” on boot device |
| 4 | Found “start.elf” but was not launchable |
| 7 | Unable to find “kernel.img” on boot device |
| 8 | Unable to recognize SDRAM |
| Constantly On | Successfully booted from the SD card |
| Constantly Blinking | Writing or reading from SD Card |
Raspberry Pi 4 Green ACT Light
Unlike the red LED on your Raspberry Pi, the green ACT LED behaves significantly different on a Pi 4. This difference is due to the Pi 4 using an EEPROM for booting rather than relying on a boot ROM located on an SD card / USB.
While the green ACT LED is still used on the Raspberry Pi to indicate the system’s status, the flashing light pattern has a different meaning.
- If the green light constantly flashes in a regular pattern, it will typically indicate that the bootloader cannot detect an SD Card with a valid “
start.elf” file. - If the green LED light remains solid, your Raspberry Pi should be starting up and hasn’t yet run into an issue.
One of the advantages of the Pi 4’s new EEPROM bootloader is that it can provide more complicated diagnostics. Since the patterns are slightly more complex, we will use a table to represent them.
To indicate the status, the Raspberry Pi will flash for a specific number of long flashes, followed by a number of (0 or more) short flashes. You will need to count these, then refer to the table below to see exactly what error is occurring.
| Long Flash | Short Flash | Status |
|---|---|---|
| 0 | 3 | Generic boot failure |
| 0 | 4 | Bootloader was unable to find “start.elf” |
| 0 | 7 | Failure to find “kernel.img” on the boot device. |
| 0 | 8 | SDRAM Failure |
| 0 | 9 | Insufficient SDRAM |
| 0 | 10 | In HALT State |
| 2 | 1 | Partition of boot device not FAT |
| 2 | 2 | Failed to read from boot partition |
| 2 | 3 | Extended partition not using FAT format |
| 2 | 4 | File signature/hash mismatch |
| 4 | 4 | Unsupported board type |
| 4 | 5 | Fatal Firmware Error |
| 4 | 6 | Power Failure Type A |
| 4 | 7 | Power Failure Type B |
If your Raspberry Pi still fails to boot and the green ACT light is not blinking, and you have a solid red light, it may indicate that the EEPROM is corrupted. You can attempt to recover this by updating the Raspberry Pi’s bootloader.
Conclusion
At this point in this guide, you should hopefully know what the red and green lights indicate on the Raspberry Pi.
These lights are crucial for diagnosing what happens with your Pi when it won’t boot, or you don’t have a display connected to it.
Please feel free to comment below if you have any questions about how this device’s red and green lights work.
If you found this guide useful, we have plenty more available on our website. We also have numerous Raspberry Pi projects that are worth checking out.