 by
by In this tutorial, we will show you the basics of setting up a Raspberry Pi Pirate Radio using the FM Transmitter software and a piece of wire.
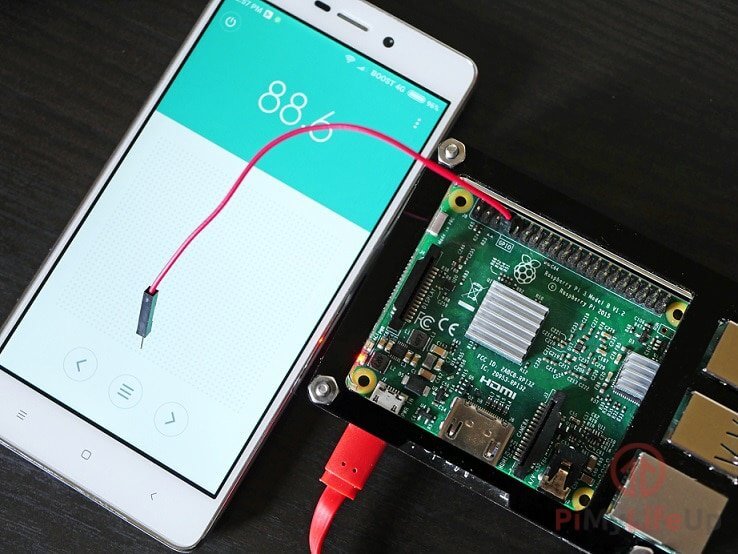
This piece of software allows you to broadcast an FM signal through your GPIO 4 pin. This broadcast means you can set up your own little radio station.
However, please make note that the sound quality and range will be quite poor due to the signal being limited to mono and that most wires aren’t the best antennas.
Also, please note that there are laws and regulations around broadcasting on FM Frequencies; make sure that you check the laws of your country before proceeding with this tutorial to ensure you aren’t breaking any laws.
Equipment List
Below are all the bits and pieces that I used for this Raspberry Pi Pirate Radio tutorial. You will need an internet connection to complete this tutorial.
Recommended
- Raspberry Pi Amazon
- Micro SD Card Amazon
- Power Supply Amazon
- Ethernet Cable Amazon
- 30cm (11 in), 12 AWG Wire Amazon
Optional
- Raspberry Pi Case Amazon
Setting up your Raspberry Pi Pirate Radio
Before we get started with this tutorial, we first need to hook up a wire to the GPIO 4 pin, which is also known as the seventh physical pin. If you are unsure of what GPIO pin we are talking about, you can check out our GPIO guide.
This wire will act as our antenna for the Raspberry Pi Pirate Radio. For our tutorial, we just used a simple breadboard wire which isn’t the best antenna, but it is good enough to work as a proof of concept. A 30 cm (11 in) piece of 12 AWG wire should work good enough to broadcast over a small room.
1. Now, before we set up our basic pirate radio and install the FM transmitter, we need to run an update on the Raspberry Pi by using the following two commands.
sudo apt update
sudo apt upgrade
2. With the update now done, let’s install all the packages we will need to be able to set up our pirate radio.
Run the following install commands on our Raspberry Pi to grab all the packages we need.
sudo apt install -y sox make gcc g++ git libmp3lame-dev3. Now that we have all the packages we need installed, we can move on to cloning the FM Transmitter software to our Raspberry Pi. This software will allow us to broadcast music through our antenna, which is connected to GPIO 4.
If you want to learn more about the software, head to the FM Transmitter GitHub.
To clone the software, run the following commands on your Raspberry Pi.
cd ~
git clone https://github.com/pimylifeup/fm_transmitter.git
4. Let’s now compile the software; we can do this by moving into the directory and running make.
Run the following two commands on your Raspberry Pi to do this.
cd ~/fm_transmitter
make
5. With the FM Transmitter software now compiled onto our Raspberry Pi, we can now try playing our first music file. Of course, to be able to do this, we first need a supported file.
Let’s run the following commands to grab a test file from our file server.
wget https://files.pimylifeup.com/pirateradio/boxcat_games_epic_song.wavThe music tracked is titled “Epic Song” and is by Boxcat Games and is available under the creative commons 3.0 license. For this project, the audio has been converted from .mp3 to .wav.
6. Now that we have a supported file downloaded to our Raspberry Pi, let’s try running the software to start up our pirate radio. To do this, we can type the following command into the terminal to run it.
This command converts the file into a supported format, pipes it to our FM Transmitter software, and then plays it on the 100.3 band.
sox /home/pi/fm_transmitter/boxcat_games_epic_song.wav -r 22050 -c 1 -b 16 -t wav - | sudo ./fm_transmitter -f 100.3 -The arguments for this command do several things. First, we use sox to convert our WAV file to ensure we are feeding uncompressed data to the transmitter software.
-rdefines the sample rate that SOX will convert the file.-cdefines the number of channels; due to limitations of the FM Transmitter software, we cut it down to a single channel.-bdefines the bit rate that the output should be sampled at.-tis used to specify the type of file that Sox should be converting this file to. In our case, this should be wav.
We then pipe (|) the converted data from sox directly to the FM transmitter program we compiled earlier so that we can start broadcasting the sound.
With the FM Transmitter command, we pass in the frequency we want to transmit on by using the -f option.
7. You can now test to see this is working by tuning to the 100.3 FM band on your radio device. You should hear the music come through if it is working successfully.
Once you are happy that it is working, we can move on to the next segment of this tutorial, and this segment will involve setting it up so our Pirate Radio can also play MP3 files since this is not supported by default.
To achieve this, we will need to compile several pieces of software.
Adding MP3 Support to your Raspberry Pi Pirate Radio
To add MP3 support, we need to compile and install FFmpeg. Thankfully, FFmpeg is available as a package from the official Raspberry Pi OS repository, so all you need to do is enter one command.
1. To install FFmpeg, simply enter the following command.
sudo apt install -y ffmpegCopy2. With FFmpeg now installed, we can play MP3 files. To do this, we will use the PiStation.py script included with the FM Transmitter software.
While we do not have a sample MP3 file handy to download, you can run any MP3 file you want by using the following command, replacing the last segment with the location of the file.
cd ~/fm_transmitter
sudo python3 ./PiStation.py -f 100.3 example.mp3
Hopefully, by now you have learned how to set up a basic pirate radio using the FM Transmitter software. This transmitter software will allow you to broadcast any music you want by just using your Raspberry Pi.
Remember, though, that you need to adhere to your country’s radio laws; most countries have a lot of restrictions on what frequencies you can use and the range that you can broadcast.
We hope you have enjoyed learning the basics of how to set up your own Pirate Radio with the Raspberry Pi and just a piece of wire. Drop a comment below if this tutorial helped you out or whether you ran into any issues.





Hi, I get this error when running PiStation.py following the example on the page.
I’m using Trixie.
Someone suggested that the lower frequency should have a sign.
Here’s the error:
Hey Glenn! That error is a Python version issue. The script was written for Python 2, but Trixie ships with Python 3 as the default, and `print` requires parentheses in Python 3. You can try running the script explicitly with Python 2 (`python2 PiStation.py`) if it’s still installed, or you’ll need to update the `print` statements in the script to use the Python 3 syntax (e.g., `print(“Frequency argument out of range.”)`). Hope that gets you up and running!
We have updated the script so it should now work on Python 3. However, I haven’t had the time to test it yet.
I tried to get this working today. Step 6 didn’t work on my Raspberry pi4B.
sox /home/pi/fm_transmitter/boxcat_games_epic_song.wav -r 22050 -c 1 -b 16 -t wav – | sudo
after -t wav I assume the it is {space} hypen | {pipe} {space} sudo ???
Hi Paul,
Sorry about that it looks like there was a mistake in the tutorial where part of the command ended up being stripped out.
I have now updated the step so that it includes the part where we are piping the result of sox to the FM Transmitter software.
Let me know if that solves your issues.
Cheers,
Emmet
thanks so much for the instructions! was able to make one yesterday!
here’s a simple bash script that loops through your mp3 files in a ‘/music/’ folder infinitely for anyone interested 🙂
make sure u have mp3info installed:
while :do
for file in './music/*'
do
sudo python ./PiStation.py -f 100.3 $file &
sleep 'mp3info -p "%mm %02ss\n" $file' &&
sudo killall fm_transmitter
done
done
Got a surprise. After work on this project for about 2 hours. and fine-tuning the code. I figured out how to get a live stream from Shoutcast to play through this Pi Radio. The guys who wrote this software are awesome. Need to give them a big shout out. I saved this startup script in Shoutcast.sh file
sudo sox -t mp3 /home/pi/Music/*.pls -t wav – | sudo /home/ft/PiFmRds/src/pi_fm_rds -freq 95.7 -ps Gators_Radio -audio –
Change *.pls to whatever you like. But be sure to put the content inside the pls file.below.
[playlist]
numberofentries=1
File1=http://199.180.75.116:80/stream
Title1=(#1 – 538/825) JAZZGROOVE.org – LAID-BACK JAZZ – The Jazz Groove. Ad Free. (West)
Length1=-1
Version=2
This is a functional Jazz station on Shoutcast.
Technically, if you have a live broadcast on Shoutcast. Or your own Shoutcast server. You can do live shows or broadcast directly from your PC through the server that converts to a PLS file and play it on your Raspberry Pi Radio Transmitter. I am always willing to help. If you have issues.
Happy Broadcasting
How to to play all wav, mp3 files one folder one after another?
What’s the range of this broadcast? Can someone 1 KM away hear it?
Depends on the antenna you use but typically it will only be able to broadcast 1-2 metres.
We were able to broadcast throughout our entire house with no extra wire/antenna connected. Didn’t try to broadcast to another home.
When I tried this when it first popped up on another Pi project site, I took a portable radio through my neighborhood.
I was able to get about 300 meters using an antenna trimmed to a quarter wave and elevated about 3 meters.
There are a lot of variables including obstructions and even the weather.
Thanks for a great tutorial, really enjoyed going through it and got it to work perfectly! However, I can’t seem to figure out how to play multiple files, like if you had a full playlist. Is there any way to go about this?
Well, you could make a simple python script that lists all the songs inside a specified directory, then loops over them and for each one executes the fm_transmitter program, you can even add that script to a cron, so that it runs automatically after the pi boots up.
is there anyway to make it brodcast from a usb mic in realtime?
Look at the github for the project: git clone https://github.com/somu1795/fm_transmitter.git. It has a section on USB mic input.
Hi and thanks for this post! After I update and upgrade successfully, and when I try to execute step 2 in the first section above, I get an error as shown below. Any ideas? Thanks!
pi@raspberrypi:~ $ sudo apt-get install -y sox make gcc g++ git arecord libmp3lame-devE: Unable to locate package arecord
Try using alsa-utils instead of arecord, let me know how you go!
A couple of things wrong with the instructions:
1. The ‘arecord’ package is provided by ‘alsa-utils’ now so replace the package name as shown:
sudo apt-get install -y sox make gcc g++ git alsa-utils libmp3lame-dev2. Step #6 in the .wav broadcast chopped off the full sudo command. The entire thing should be:
sox /home/pi/fm_transmitter/star-wars.wav -r 22050 -c 1 -b 16 -t wav - | sudo ./fm_transmitter -f 100.6 -Obviously you can change your frequency to whatever.
Otherwise this is pretty neat 🙂 I also noticed that I didn’t need to attach a wire to GPIO #4. I have a breadboard attached and attaching the wire didn’t seem to do anything. Shrug.
Thanks for the article and the site – looking for small projects like this to do with my kids.
Thanks for that Lou!
Hi,
Well… 100.6MHz is not the most interesting channel. As you mentioned, it’s forbidden in most countries as it’s the public FM band with costly licenses… I don’t want the guards to come to my home (being close to a naval base, I *know* they’re listening to everything and that they have the goniometry equipment to locate me in minutes).
How can I select something else, such as 107.5MHz (or above), or un-listened channels like the 433KHz band, or, even funnier, make a radio system changing frequency every 50th of a second (so only the receiver(s) can re-assemble the broadcast as each packet contains its broadcast timeframe and the curve equation to get the frequency of a block from the time value)?