In this article we will be exploring the Raspberry Pi Robot Dog kit from SunFounder called PiDog.
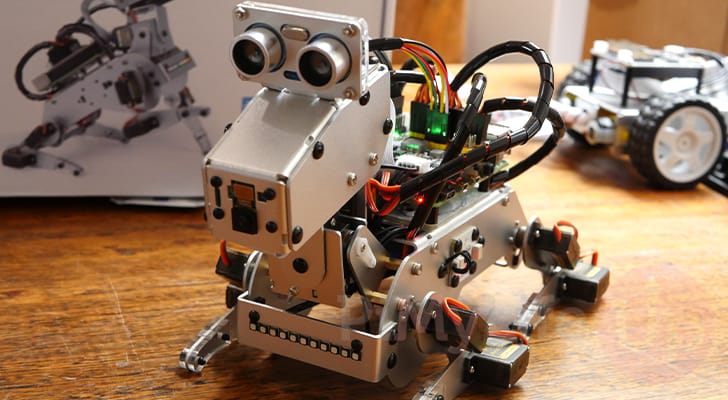
The PiDog is one of the coolest and most complicated Raspberry Pi kits we have checked out.
This kit allows you to turn your Raspberry Pi into a feature-packed robot dog. Each limb has its own individual servos, allowing quite a bit of control over the robot’s movement.
It even features a camera to allow face tracking, a distance sensor so it can tell how far away it is from an object, and even more. We will go over some of these features in our unboxing section.
One thing to warn you is that this is not a kit you can quickly throw together. If you plan on building the PiDog, we recommend you set aside a few hours. There are plenty of components that need to be pieced together, and they often have specific orientations that you need to follow.
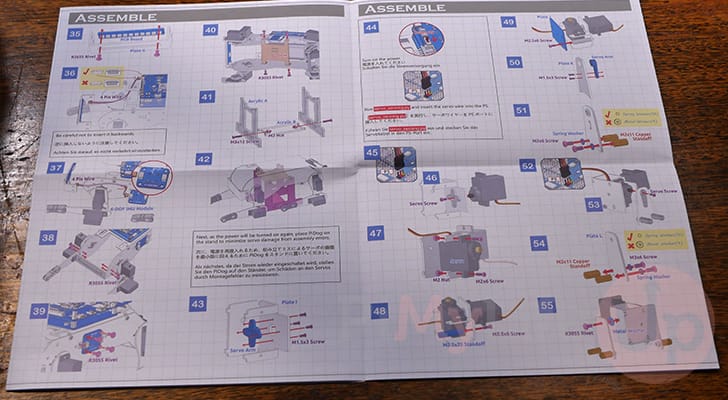
In fact, in the official instructions, there are 74 steps that you will need to follow to put this PiDog together and over 44 sets of parts that you will be using.
To summarize our thoughts on this product, we found the PiDog to be a really neat project for the Raspberry Pi. It has a ton of fun functionality that is very easy to use. The only thing that might put people off is that building the PiDog is definitely a laborious task, but if you enjoy putting things together then you will love this kit.
It is definitely a kit we would recommend for those who want something to get them into robotics and programming. If you are thinking of giving this to a younger person as a gift, you may have to help out a bit with the building process, but after that, the PiDog is really simple to use and program.
You can purchase the SunFounder Raspberry Pi PiDog Kit from their official website or from Amazon.
Please note that the PiDog has multiple versions. You can buy it in a kit with the Raspberry Pi 4 and one without if you have a spare Pi lying around. It also has a kit that comes with a Pi Zero W 2 if you want to save some money and don’t need the extra power of the Pi 4.
We were sent the PiDog for free from SunFounder. Besides sending the product for free, SunFounder didn’t set any expectations on what we write. What we have written within this guide is our own opinions on this robot dog kit.
Unboxing the PiDog
Let us begin this article by exploring how the PiDog is boxed and some of the components you will find within it.
Like most of SunFounder’s Raspberry Pi kits, this product is shipped in a sturdy outer box that should be strong enough to survive some of the more uncaring postal services. Ours was shipped all the way from China with minimal scuffing and no damage to anything within the box itself.
The box showcases what you should expect in your new Raspberry Pi PiDog kit and gives you a quick overview of the kit.

Inside the box, you will find an instruction sheet alongside three boxes. Inside these boxes are all the components you need to build your PiDog. It even includes the screwdrivers and wrenches you need, so you don’t have to worry about having the right screwdriver on hand.
Ignore the numbers on these boxes, as you will need various pieces from all the boxes when you put your PiDog together. The numbers are purely there to help pack all the parts during shipping.
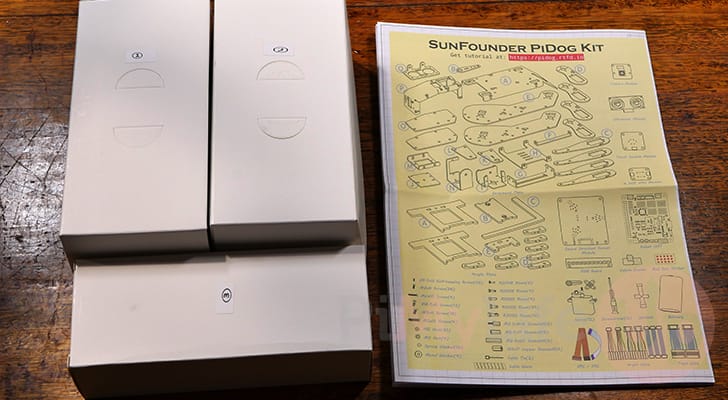
After taking everything out of the box, you will find there are a lot of parts. In fact, at a quick count, over 44 different sets of parts and tools are included in this kit.
Let us quickly explore some of the main components in this kit and what they are used for by the PiDog and your Raspberry Pi.
- Camera Module: The camera module allows the PiDog to perform tasks such as facial detection and object tracking. You can use this to get the robot to follow you or perform tasks when a face is detected.
- Ultrasonic Module: Using the ultrasonic module, the Raspberry Pi can see how far away something in front of the device.
- Touch Switch Module: The touch switch module is used within this kit to detect when you touch the head of the PiDog. It is used in SunFounders Python example to allow the PiDog to react when you touch it.
- 6 DOF IMU Module: The 6 DOF IMU is an accelerometer and gyroscope with a wide range of usages. For example, you can use it to see if your PiDog has fallen over or been picked up.
This sensor can also help keep your Raspberry Pi-powered robot dog balanced. - Sound Direction Sensor Module: One of the final major parts of the PiDog is the sound direction module. This module works by using an array of microphones; using this array, the Raspberry Pi can understand where a sound is coming from, and you can program your PiDog to react accordingly.
- ROBOT HAT: This is the brains of SunFounders robots and is used to handle and control all of the PiDog’s functionality. It allows us to control all 12 of the PiDog’s servos with relative ease.
- RGB Board: The final component is the RGB board. This is simply an array of RGB lights that you can control. You can use it to show emotion or reaction from your robot dog or even to debug your code.
Building the Raspberry Pi Robot Dog
Building the Raspberry Pi Robot Dog is one of the trickier builds that we have had to complete with our Raspberry Pi. It isn’t necessarily because it is complicated to build but more due to the sheer number of parts you have to assemble.
However, before you even think about building your PiDog kit, we recommend you prepare your Raspberry Pi by installing Pi OS and following SunFounder’s instructions to get all of the required libraries installed. This will make your life easier when you need to start zeroing the servos.
When setting up your Raspberry PI, ensure you enable SSH and Wi-Fi.
The instruction sheet that comes with your PiDog kit is something you need to follow exactly. The orientation of parts is super important, especially when building the legs and placing the servo motors in the correct orientation.
Overall, there wasn’t a lot wrong with the PiDog building experience. It was an experience that was more time-consuming than it was hard. The instructions remained clear on where each part should go, and SunFounder provided little red stickers to make identifying the correct orientation of components like the logs much easier.
Additionally, the kit comes bundled with extra parts of almost every single screw, nut, rivet, and bolt, so even though I managed to lose some during building, I never had to be worried about not being able to finish building the robot dog.
My only suggestion for anyone wanting to build the SunFounder PiDog kit is that you leave enough time to build the project. Also, make sure you have a decent amount of space so you can spread out the parts neatly. I made the mistake of building it on my work desk, which quickly became covered in numerous parts.
Testing the SunFounder PiDog
One of the great things about most of SunFounder’s Raspberry Pi kits is that they provide very solid documentation and some great examples that showcase all of the functionality of their kits.
Let us run through a few of their examples to give you an idea of how the Raspberry Pi PiDog operates. You can even open up the code of these examples to see how you could adjust it to suit your needs.
The first example is a simple script that runs the PiDog through simple steps. The wake-up script gets the PiDog to stretch and then hold in a sitting position until the script ends.
Next, we ran the patrol example. This example moves the PiDog forward; if it detects something in front of it, the PiDog will stop moving, put itself in a standing position, and then play a barking sound.
It gives you an idea of how to utilize the ultrasonic distance sensor to perform actions when the PiDog has gotten close to an object.
We next use the “rest” script. This example puts your PiDog into a “resting” mode. It will continue to lay at rest until a sound is heard.
If the sound direction sensor hears a sound, then the PiDog will stand up and tilt its head. It is a good example of seeing the range of motion that the Raspberry Pi robot dog supports.
The second last script we tested out was the “pushup” script. This simple script performs some specific movement before continually performing push-ups until the script is terminated.
Our final example uses the built-in speaker to make your Pi Dog howl.
Conclusion
Overall, the PiDog is one of the cooler Raspberry Pi kits. It allows you to build your very own robot dog that you can control programmatically through Python.
The included Python libraries make controlling the PiDog a relatively simple process. You can choose to control each leg individually, or you can utilize a varied set of preset actions.
The only real challenging part of this kit is the building process, but if you are happy taking your time, it is quite neat putting everything together and ending up with a rather neat-looking robot dog.
Build quality-wise, it feels like SunFounder didn’t really cheapen out on any of the parts, and like the other kits we have tried out, it also came with enough spares for all of its screws.
Please feel free to comment below if you have any questions about the PiDog and our experience building and using this device.
If you want to buy the SunFounder PiDog kit, you can buy it from SunFounder’s official store or Amazon.


Is there any compatible simulator, like Gazebo, to test PiDog features?