In this tutorial, we will show you how to run a Palworld server on the Raspberry Pi.

Palworld is a popular multiplayer survival game that focuses on crafting and catching “pals.” It sports a massive world and the possibility to play with up to 32 players.
While Palworld does not have an ARM-based version of their dedicated server, there are ways we can get around this. That way is to utilize the Box86 and Box64 emulators.
The caveat is that you won’t be able to run the full 32 players on your Raspberry Pi, but it should be good enough to handle a few, especially if you have a Pi with 8GB of memory.
Throughout this guide, we will walk you through the process of setting up and running the Palworld server on your Raspberry Pi. We even show you how to set up and install the Box86 and Box64 servers we use to get the server running.
For the best experience with the Palworld server, you should use a Raspberry Pi 5 with 8GB of memory. You can still use this on weaker Raspberry Pi’s but your mileage will vary.
Additionally, you must be running a 64-bit operating system, so you must be running at least a Raspberry Pi 3.
Equipment
Below is the equipment we used to set up Palworld server on our Raspberry Pi.
Recommended
Optional
This tutorial was tested on a Raspberry Pi 5 running on the latest version of Raspberry Pi OS Bookworm 64-bit.
Installing and Running a Palworld Server on your Raspberry Pi
Over the following sections, you will learn how to install and run a Palworld server on your Raspberry Pi.
Getting this server working requires us to rely on the Box86 and Box64 emulators. Having to use these emulators means you will have a slight loss in performance, but from our testing, it was still decent enough for a couple of players to play without issue.
Preparing your Raspberry Pi to Run the Palworld Dedicated Server
1. Before we can install the Palworld server on our Raspberry Pi, we must complete a few tasks.
The first is to ensure our operating system is entirely up to date. You can do this by using the following two commands.
sudo apt update
sudo apt upgrade -yCopy
2. Our next step is to install the “curl” package. We will use curl to download the SteamCMD tool to our Raspberry Pi later in this guide.
While this package is typically pre-installed, running the command below ensures it exists.
sudo apt install curlCopy3. Next, you must follow our guide on installing Box86 to your Raspberry Pi.
This software allows us to emulate the 32-bit x86 architecture on our Raspberry Pi, allowing us to run the SteamCMD tool, which we can use to download the Palworld server.
If you are following this tutorial using a Raspberry Pi 5, follow our troubleshooting section in the Box86 tutorial to move to a standard 8kb page size.
4. After installing Box86, you must follow our tutorial that shows you how to install Box64 on your Raspberry Pi. If you are running a Raspberry Pi 5, you must use the steps for the Pi 4; otherwise, Box86 will not work.
This software is similar to Box86 but aims to emulate the x64 architecture on ARM64. This is the critical part of running the Palworld dedicated server.
Creating a user to Run the Server
5. With Box86 and Box64 installed on our Raspberry Pi, we can finally continue this tutorial.
Our next step is to create a server that we will use to run the dedicated server and create a home directory to store everything in.
You can create a user called “palworld” using the following command.
sudo useradd palworld -mCopy6. After creating our “palworld” user we can use the “sudo” command to change to that user.
Changing to the user saves us the hassle of using the chown command on all the files we are about to create.
sudo -u palworld -sCopySetting up SteamCMD for Palworld on the Raspberry Pi
7. The final piece we must install to our Raspberry Pi before we can get into the key parts of setting up the Palworld dedicated server is SteamCMD.
SteamCMD is a tool that allows us to download apps and games from Steam without needing a full-blown client.
Let us start by creating a directory to store this tool in and change into it by using the cd command.
mkdir ~/steamcmd
cd ~/steamcmdCopy
8. Next, you will want to run the following command within the terminal.
This command downloads the latest version of the SteamCMD installer and extracts it into the current directory.
curl -sqL "https://steamcdn-a.akamaihd.net/client/installer/steamcmd_linux.tar.gz" | tar zxvf -Copy9. To ensure this tool works correctly, we must run it. The first time you start SteamCMD, it will automatically self-update and download all required libraries.
./steamcmd.shCopy10. Once SteamCMD has fully loaded, you can quit by using the following command within the tool.
quitCopyGetting the Steamworks SDK Redistributable for Palworld
11. To get the Palworld dedicated server to run on our Raspberry Pi, we must first download the Steamworks SDK Redistrutable.
There is a particular library we need from this redistributable.
./steamcmd.sh +force_install_dir ~/steamworkssdk +@sSteamCmdForcePlatformType linux +login anonymous +app_update 1007 validate +quitCopy12. Once the download is complete, we must create a directory using the command below. This directory is where the Palworld server will scan for the “steamclient.so” library.
mkdir -p ~/.steam/sdk64Copy13. Finally, you can copy the library to the correct location by running the following command.
cp ~/steamworkssdk/linux64/steamclient.so ~/.steam/sdk64/CopyInstalling the Palworld Dedicated Server on a Raspberry Pi
14. We are at the point where we can now download and install the Palworld dedicated server to your Raspberry Pi.
Thanks to installing and setting up the SteamCMD tool earlier, this is as easy as using the command below. This command will use SteamCMD to download the latest version of the server.
This process can take a few minutes as the server is large.
./steamcmd.sh +force_install_dir ~/palworldserver +@sSteamCmdForcePlatformType linux +login anonymous +app_update 2394010 validate +quitCopyRunning the Palworld Server
15. With the server downloaded, you must change to its directory by running the following command.
cd ~/palworldserver/Copy16. Now that you are in the right place, all you need to do to launch your Palworld dedicated server on your Raspberry Pi is to run the following command.
When running the server, you may see a few errors; many of these aren’t critical, and the server should continue running.
./PalServer.sh
Copy
You should now be able to access your server through the IP address of your Raspberry Pi. Before you do that, you should configure the server.
To configure the server, you must stop it temporarily by pressing CTRL + C.
Configuring the Server
17. To give us a good base to work off of for the Palworld servers configuration file, let us copy the defaults.
Using the command below, you can copy the defaults to where the custom values are loaded.
cp ~/palworldserver/DefaultPalWorldSettings.ini ~/palworldserver/Pal/Saved/Config/LinuxServer/PalWorldSettings.iniCopy18. Once you have copied over the default values, you can begin editing the config file by typing in the following command.
We use the nano text editor as it is one of the easiest to use. However, you can use whichever text editor you feel comfortable with.
nano ~/palworldserver/Pal/Saved/Config/LinuxServer/PalWorldSettings.iniCopy19. There are many settings that you can tweak for your Palworld server on your Raspberry Pi. This includes adjusting the maximum amount of players, setting a password, modifying mob density, and more.
You can read more about the various options by viewing the official documentation. Considering you are running this on a Raspberry Pi, you might want to consider reducing the “pal appearance rate” and the maximum number of players.
The one option we will focus on in this guide is the “ServerPassword“. Setting a password forces someone to have to type it in before they can access the server.
To adjust the password, you should find the following text within the config file.
ServerPassword=""CopyOnce you have found the server password setting, type in your password between the double quotes.
ServerPassword="pimylifeup"Copy20. After making changes to the configuration file, you can save and quit by pressing CTRL + X, Y, and then ENTER.
Starting the Palworld Server when your Raspberry Pi Boots
21. If you want your Palworld Server to start every time you power on your Raspberry Pi automatically, we will have to write a service file.
Before we do this, ensure you have switched to your main user. If you haven’t already, you can exit the “palworld” user by using the following command.
exitCopy22. Once you return to using your normal user, you can begin writing the service file for our Palworld server using the following command.
sudo nano /etc/systemd/system/palworld.serviceCopy23. Within this file, type in the following lines.
These lines dictate how the Palworld server starts and runs on our Raspberry Pi. The key addition to this file is the command we run before the server is started.
This command will automatically update your Palworld server whenever the service is started or restarted.
[Unit]
Description=Palworld Server
Wants=network-online.target
After=network-online.target

[Service]
User=palworld
Group=palworld
WorkingDirectory=/home/palworld/
ExecStartPre=/home/palworld/steamcmd/steamcmd.sh +force_install_dir '/home/palworld/palworldserver' +login anonymous +app_update 2394010 +quit
ExecStart=/home/palworld/palworldserver/PalServer.sh -useperfthreads -NoAsyncLoadingThread -UseMultithreadForDS > /dev/null
Restart=always

[Install]
WantedBy=multi-user.targetCopy
24. After adding the above lines to the service, save and quit by pressing CTRL + X, Y, and then ENTER.
25. With the service now written, you will want to enable it. Enabling it will allow systemd to run the Palworld server when your Raspberry Pi powers on.
You can enable the service by running the command below.
sudo systemctl enable palworldCopy26. Enabling a service won’t automatically start it.
If you want your server to start immediately, you can use the following command in the terminal.
sudo systemctl start palworldCopy27. If you ever want to stop your Palworld server, all you will need to do is run the command below.
sudo systemctl stop palworldCopy28. Finally, you must disable the service to stop the Palworld server from being automatically started when you power on your Raspberry Pi.
You can disable the service we wrote by using the command below.
sudo systemctl disable palworldCopyConnecting to your Raspberry Pi Palworld Server
At this point you should hopefully have your Palworld server up and running on your Raspberry Pi.
With your server running, you will want to know how to access it. First, if you plan on having outside access to this server, ensure you have port forwarded the port 8211 to your Pi and have set up a static IP address.
1. If you don’t know the local IP address of your Raspberry Pi, you can list it by using the command below in the terminal
hostname -ICopyYou should see something like the following appear in your terminal.
192.168.0.1232. With your IP address in hand, launch Palworld on your computer.
After you run the game, you will want to click the “Join multiplayer game” option.

3. You should now be greeted with a list of official Palworld servers.
At the bottom of this page, you should see a textbox and a button. Use the textbox to type in your IP address followed by the port “8211” (1.).
Once you have typed in your Raspberry Pi’s IP, click the “Connect” button (2.) to connect.

Troubleshooting Connecting to a Passworded Palworld Server
4. If you have passworded your Raspberry Pi Palworld server, you may encounter an issue when connecting.
For some reason, a password box never appears, meaning your connection is refused by the server. You will want to change to the “Community Servers” tab to correct this.
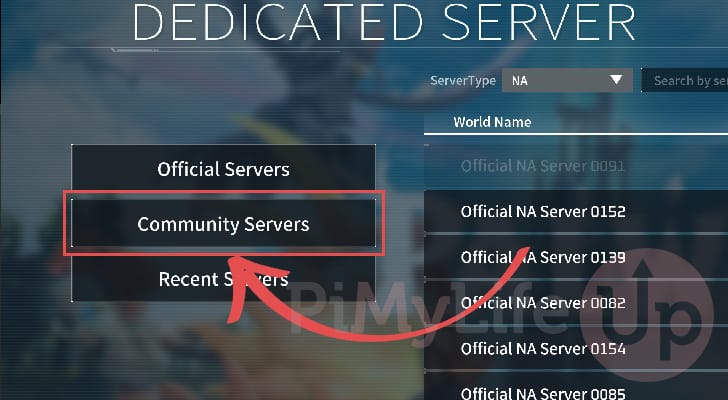
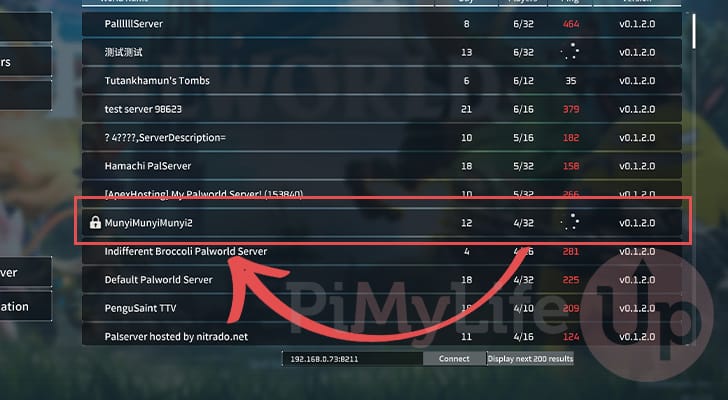
5. Once on the community servers tab, find a passworded server and double-click it. You can tell a server is passworded by the padlock symbol.
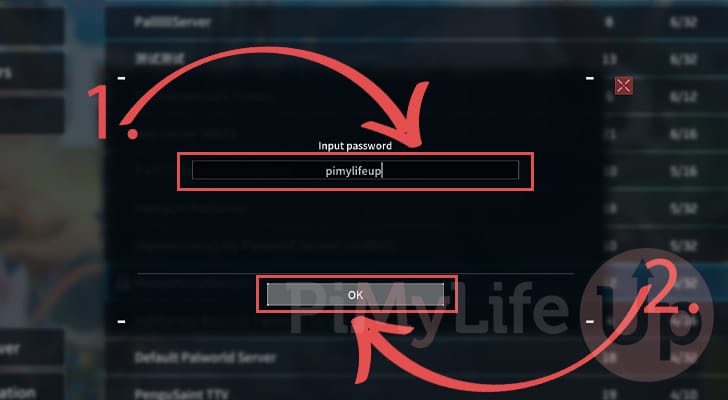
6. Upon attempting to connect to this server, you will be asked to enter a password (1.). Type in the password you set for your server.
After typing in your password, click the “OK” button to proceed (2.).
7. You will be asked if you want to connect to your selected server.
Since we don’t want to connect to this random server, click the “No” button.
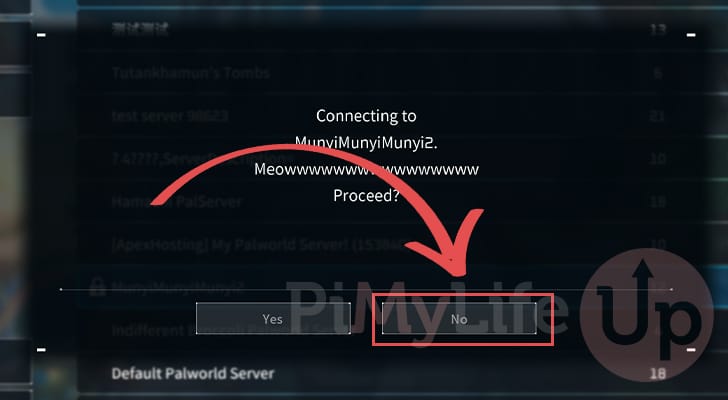
8. Finally, you should now be able to use the textbox at the bottom of the screen to connect to your Raspberry Pi Palworld server.

Conclusion
Hopefully, at this stage, you will have successfully got the Palworld dedicated server running on your Raspberry Pi.
The Raspberry Pi is a decent solution for a Palworld server if you plan on handling only a few players. It doesn’t use much power, so you can let it run 24/7.
Please feel free to comment below if you have any questions or concerns with running this server on your Pi.
If you found this tutorial to be helpful, we highly recommend checking out our many other Raspberry Pi projects.


Set up a Palworld 1.0 server on my Pi 4 Model B 8bg. Flawless! works like a charm. My only question would be how to make it a community server. I can only play it locally on my own network. i tried to add -publiclobby but im probably doing something wrong. thanks
I set up a server on a Raspberry Pi 4 recently and found that the Box64 version is important—both the latest and version 0.2.4 caused fatal errors, leading to segmentation faults. I used version 0.2.6 to resolve this issue. Hope this helps you guys!
I tried here, not working anymore.
Not sure if Palworld change something in server or limits of Pi4 are not enough, but cannot run anymore.
Hi Oauramos,
I haven’t had time to retest this project, but wouldn’t surprise me if some of the recent content additions to Palworld have just pushed it passed being able to run on the Pi. It was already a pretty tall order for the device but it was at last useable with the original release.
Will try and find some time to see if there is anything that can be done to get it up and running again.
Kind regards,
Emmet
I am currently trying to make an auto script to install all of this with a single bash file.
But i was wondering why is it that you create another user palworld instead of just installing it as pi user? Do the server files for palworld and the steamcmd client need to be in a specific user name to operate or would it still work in the pi user.
I ask this because it would simplify the bash.
Respectfully,
Dennis
Hi Dennis,
You can definitely get away with just using the default user on your Raspberry Pi. It is just typically a good practice to run server software such as the Palworld server under a different user to make it easier to manage and isolate it from your other users slightly. However, it is not a requirement to run the server.
Kind regards,
Emmet
when i use ./steamcmd.sh i keep on getting this error: Loading Steam API…dlmopen steamservice.so failed: Cannot dlopen(“steamservice.so”/0xf09dc9a8, 2)
I have already used the troubleshooting from Box86
Hi Kuro,
From memory that initial error can be completely ignored, the SteamCMD tool should continue to load after that warning.
Kind regards,
Emmet
The same issue happened to me like the other comment on the RPi4 running 64bit. Your resolution did solve this but now I am getting
“palworld@raspberrypi:~/palworldserver $ ./PalServer.sh
./PalServer.sh: 5: /home/palworld/palworldserver/Pal/Binaries/Linux/PalServer-Linux-Test: Exec format error”
Any fix?
Hi Charlie,
That error would typically indicate that you haven’t install Box64 correctly.
Did you run into any errors when installing Box64 to your Raspberry Pi?
Kind regards,
Emmet
Is it normal to have a load of errors when trying to compile the Box64 on Pi 4?
Hi Tim,
That doesn’t sound right to me, and I quickly re-ran the compilation process on my Pi to double check and there should be no errors duriong compilation.
Can you please check to verify that you are running a 64-bit bit operating system.
Kind regards,
Emmet
Hi there im having a problem at step 9 when i try to use the command to start the steamcmd.sh i get the error
/usr/local/bin/box86: error while loading shared libraries: libm.so.6: ELF load command address/offset not page-aligned
thank you very much for your help
Hi Can,
Are you running a Raspberry Pi 5? If so you will need to follow the troubleshooting instructions in the Box86 tutorial.
By default, the Pi 5 using a 16k page size which can create issues when running various software.
Kind regards,
Emmet
yes just checked and it was exactly that problem now it works fine thank you very much!
will there be an articel about how to update the palworld server maybe?
*edited for errors
On Step 11 (./steamcmd.sh +force_install_dir ~/steamworkssdk +@sSteamCmdForcePlatformType linux +login anonymous +app_update 1007 validate +quit),
I am getting the error: “ERROR! Failed to install app ‘2394010’ (Requires 64bit operating system)”
However, when I check the OS with uname -m, I get “aarch64”, which I believe is a 64bit OS.
Note that when installing x86 I did do the extra steps for a 64-bit Operating System. I also did the “segmentation fault” troubleshooting for Raspberry Pi 5 (and I checked the setup with the TeamSpeak server steps, and it worked).
Hi Diana,
Sorry to see that you are running into issues gtting this to work. I tested it again and personally didnt have an issue. Let us try to work around this though.
We can try and work around this by forcing SteamCMD to attempt to pick a specific build.
Use the following command to download the Steamworks SDK (step 11)
And the following to download the server itself (Step 14)
Please let me know if this solves the issue you are running into.
Kind regards,
Emmet
Hi, I got it to download using the commands provided in the replies. but I get the following error when I try to run the server:
./PalServer.sh: 5: /home/palworld/palworldserver/Pal/Binaries/Linux/PalServer-Li nux-Test: Exec format error
I have both box 64 and 86 installed.
Hi Mullo,
That error typically indicates that the system for some reason does not recognize that it can attempt to run x86 and x64 software. You can try restarting your Raspberry Pi to attempt to resolve this issue.
Kind regards,
Emmet
Heyo i am tyring to set this up on an oracle arm64 copmuter, the oracle cloud arm64 bit pc running ubuntu. I installec box 86 and 64 but on step 14 here I get
Hi Alex,
I have never used Oracle cloud before, but let us try to get this to work.
Can you try using the following two steps in place of step 11 and step 14. The addition to these steps is the “+@sSteamCmdForcePlatformBitness 64” option. This should override SteamCMD and force it to download the 64-bit releases.
Use the following command to download the Steamworks SDK (step 11)
And the following to download the server itself (Step 14)
Please let me know if this helps.
Kind Regards,
Emmet