In this tutorial, we will be showing you how to set up a Palworld Server using Docker.

Docker is an excellent solution for running a Palworld Dedicated server on your device. It makes the whole setup process straightforward, and you can avoid installing tools like SteamCMD, as they are all contained within the container.
While the Palworld developers don’t provide their own Docker containers, many community members do. The one we will be using is by a GitHub user with the username thijsvanloef.
Another advantage of using Docker is that it can simplify managing your Palworld server. The container will track whether your server is running and automatically restart if it crashes. It even has additional features such as RCON already set up and configured.
By the end of this guide, you will have your Palworld server up and running within a Docker container.
If you prefer not to use a Docker container, check out our guide on installing the Palworld server from scratch, or if you are using a Raspberry Pi, we have a guide on installing the Palworld server to a Pi.
Setting up a Palworld Server using a Docker Container
Over the following steps, we will walk you through setting up a Palworld server using a Docker container.
Setting up this container is a relatively straightforward process. To access this server outside your home network, you must at least port forward port 8211 to your server. Additionally, you should ensure that your server has a static IP address. If you are hosting this from home, ensure you contain a DHCP reservation set (Static IP Address).
Installing Docker to your Operating System
1. Our first step is to install Docker to the operating system. Without the Docker runtime, we won’t be able to run the Palworld server container. If you have installed Docker previously, skip to step 4.
We can easily install Docker to your operating system using the following command. This command will pull the Docker install script from the official website and execute it.
curl -sSL https://get.docker.com | shCopy2. After installing Docker, you will want to add your current user to the “docker” group by running the command below.
Adding your user to this group will allow you to control Docker without elevating to the super user.
sudo usermod -aG docker $USERCopy3. Since we made changes to our user’s groups, you will need to either log out or restart your system for it to take effect.
If you are using the terminal or SSH, you can log out by running the following command.
logoutCopyAlternatively, you can restart your device completely by typing in the command below.
sudo rebootCopyPreparing Folders for your Palworld Docker Compose File
4. Our first step after installing Docker is to create a directory to store our Palworld server’s Compose file and its data.
To create this directory, use the command below within the terminal.
sudo mkdir -p /opt/stacks/palworld/dataCopyUsing the “-p” option tells the mkdir command to create the entire path. Without this option, mkdir will throw an error if any of the directories are missing.
5. After creating the directory, we need to ensure the ending “/data” directory is owned by the user with id “1000“.
You can take ownership of this directory by running the following command.
sudo chown 1000:1000 /opt/stacks/palworld/dataCopy6. At this stage, we can now change to the “/opt/stacks/palworld” directory by using the cd command.
cd /opt/stacks/palworldCopyWriting a Docker Compose File for Palworld
7. We are now at the point where we can write a Compose file for our Palworld Docker server. A Compose file is like a set of instructions for Docker to follow when setting up a container.
You can begin writing this file by using the following command within the terminal.
sudo nano compose.yamlCopy8. Within this Compose file, you must type in the following lines.
<NUMPLAYERS>: You will want to replace this value with the maximum number of players you want with access to the server.
The maximum number of players you can set is “32” and the minimum is “1“.<SERVERPASSWORD>: The next option you want to set is the password. By setting the password, a user must enter it to connect to your Palworld Docker server.
A user can join your server without a password by setting this to an empty string ("").<ADMINPASSWORD>: Using this option, you will set an admin password. This password will be used to control the server through remote control.
Ensure that you set a complicated password, as someone can control your server if they work out your password.<COMMUNITY>: You also have the choice of whether your server should appear within the community servers list.
If you want it accessible from the community servers list, set this value to “true“. Alternatively set this option to “false” to hide your server.<SERVERNAME>: Use this option to configure is the name of your server. You can type in any string you want here.
For example, you could name your server “PiMyLifeUp Palworld Docker Guide“.<SERVER_DESCRIPTION>: Replace this placeholder with a brief description of your server.
For example, you could use the following as your description, “Palworld Server for PiMyLifeUp“.
services:
   palworld:
      image: thijsvanloef/palworld-server-docker:latest
      restart: unless-stopped
      container_name: palworld-server
      stop_grace_period: 30s
      ports:
        - 8211:8211/udp
        - 27015:27015/udp
      environment:
         PUID: 1000
         PGID: 1000
         PORT: 8211
         PLAYERS: <NUMPLAYERS>
         SERVER_PASSWORD: "<SERVERPASSWORD>"
         MULTITHREADING: true
         RCON_ENABLED: true
         RCON_PORT: 25575
         TZ: "UTC"
         ADMIN_PASSWORD: "<ADMINPASSWORD>"
         COMMUNITY: <COMMUNITY>
         SERVER_NAME: "<SERVERNAME>"
         SERVER_DESCRIPTION: "<SERVERDESCRIPTION>"
      volumes:
         - ./data:/palworld/Copy
9. Once you have finished writing out the lines above, you can save and quit by pressing CTRL + X, Y, and then ENTER.
Starting your Palworld Server using Docker for the First Time
10. With the Compose file written, you can start up your Palworld Server Docker container using the following command.
Docker will download the Palworld container and begin to run it immediately. The container will continue to run until you tell it to stop.
We will start the container for the first time without detaching to see when it has finished setting up.
docker compose up.
docker compose upCopy11. Please note that Palworld will take some time to set up on your system.
The container will need to download the Palworld server itself to your device. Depending on your internet connection, this process can take a few minutes.
Once you see the following text, your server is ready to connect. However, before you continue, you might want to re-adjust settings such as the Pal spawn rate.
To stop your server, you need to press CTRL + C.
palworld-server  | [S_API FAIL] Tried to access Steam interface STEAMAPPS_INTERFACE_VERSION008 before SteamAPI_Init succeeded.
palworld-server  | [S_API FAIL] Tried to access Steam interface SteamNetworkingUtils004 before SteamAPI_Init succeeded.
Configuring your Server
12. After you run the Palworld server for the first time, it will automatically generate a config file.
To adjust things such as the Pal spawn rate and other features, you can begin editing the configuration file by using the following command.
sudo nano /opt/stacks/palworld/data/Pal/Saved/Config/LinuxServer/PalWorldSettings.iniCopy13. Within this file, you will find numerous settings. We control Some of these through the Docker container environment variables, and they will be overwritten, but you can adjust others manually.
For an overview of these options, check out the official Palworld Server documentation.
14. After making changes to the configuration file, save and quit by pressing CTRL + X, Y, and then ENTER.
15. Any changes to the configuration file will only take effect once you restart your Palworld Server’s docker container.
You can restart the container by using the following command in the terminal.
docker compose restartCopyManaging your Palworld Server
In this section, we are going to walk you through some of the ways that you can manage your Palworld Docker server.
Thanks to the container we are using, we can easily create backups and connect and interact with the server using RCON.
This section will also show you how to update the Palworld server or the Docker container with a few short commands.
Updating your Palworld Docker Server
You can easily update your Palworld server without updating the entire container. This is because the container automatically looks for updates to Palworld every time it starts.
The following steps will show you how to restart your Palworld container with a simple couple of steps.
1. Since we want to restart the container, we need to change to the directory where we wrote the Docker Compose file for Palworld earlier.
You can change to this directory by running the following command.
cd /opt/stacks/palworldCopy2. Once you are in the correct directory, you can restart your Palworld Compose stack using the command below within the terminal.
This command will restart your server. Once it comes back online, the container we are using will automatically check for updates
docker compose restartCopyUpdating the Palworld Server Docker Container
In this section, we will be showing you how to update the Palworld Server Docker container.
The container is a bunch of scripts to install and launch the Palworld server, so it shouldn’t need updating often. You can check what improvements new versions of the container have introduced by viewing the releases page.
1. To update the Palworld server container, we must change to the directory in which we wrote the Docker Compose file.
You can change to this directory using the cd command within the terminal.
cd /opt/stacks/palworldCopy2. Once you are in the correct directory, you can get Docker to pull the latest version of the Palworld container by running the command below.
The pull command will only download the parts of the image that have changed since you last updated.
docker compose pullCopy3. Docker won’t automatically move your container to the new version. To get it to update you have to tell Docker to start the compose file.
If the service is already running, Docker will detect that a new image is available and restart it using the new image.
docker compose up -dCopyCreating a Backup of your Palworld Save
One of the advantages of using Thijs van Loef’s Docker container for the Palworld server is that it has additional functionality baked in.
One of those pieces of functionality is the ability to create a backup of your game world easily.
1. Getting the Docker container to create a backup of your service is super simple.
All you need to do is use the following command within the terminal. This command starts the “backup” tool baked into the “palwrold-server” container.
docker exec palworld-server backupCopyAfter running the command above, you should see a message saying a backup was successfully created.
2. You can verify that you have a backup of your Palworld save by using the ls command within the terminal.
This command lists out all of the files within the “/opt/stacks/palworld/data/backups” directory.
ls -l /opt/stacks/palworld/data/backupsCopyAfter running the command above, you should see a list of any backups you have created. Since we have only run the backup once, we only have the single file.
palworld-save-2024-01-28_05-29-03.tar.gzUsing RCON to Control your Palworld Docker Container
The final feature we will be checking out that is built into the Palworld Docker container is the RCON CLI. RCON stands for remote control and is a protocol you can use to issue commands to your Palworld server.
Baked into this container is an RCON CLI. In this section, we will show you how to use the CLI to interact with the game server.
1. To launch into the Palworld Docker Containers RCON CLI, you only need to use the following command within the terminal.
This issues a command to the container we started earlier, asking it to start up the “rcon-cli“. By passing in the “-it” option, we tell Docker that this command should be interactive.
docker exec -it palworld-server rcon-cliCopy2. You should now have access to the command line interface for your Palworld server.
We recommend checking out the official documentation if you want a list of commands you can use.
3. Once you are done with the command line interface, you can quit by typing the following command.
:qCopyConnecting to your Palworld Docker Server
Once your Palworld server is up and running within your Docker container, you will want to know how to connect to it.
This section will show you the quick steps to join your new server.
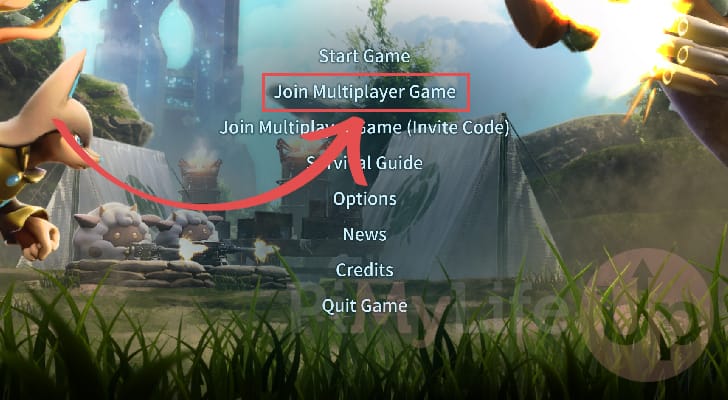
1. With Palworld open on your device, you will want to select the “Join Multiplayer Game” option.
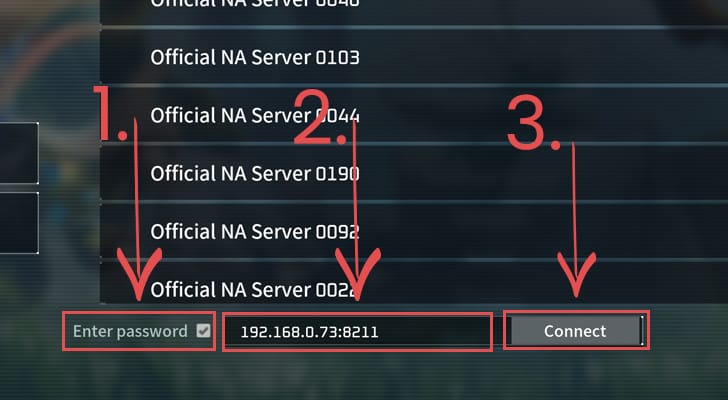
2. You will be taken to a screen with a list of official servers. At the bottom of the screen, you will see three elements.
If you have set a password for your Palworld server you will want to tick the “Enter password” checkbox (1.).
Next, you will see a textbox (2.) which you must use to type in the IP Address of your server followed by the port “:8211“. For example, to connect to our local server, we used “192.168.0.73:8211“.
To connect to the server, click the “Connect” button (3.).
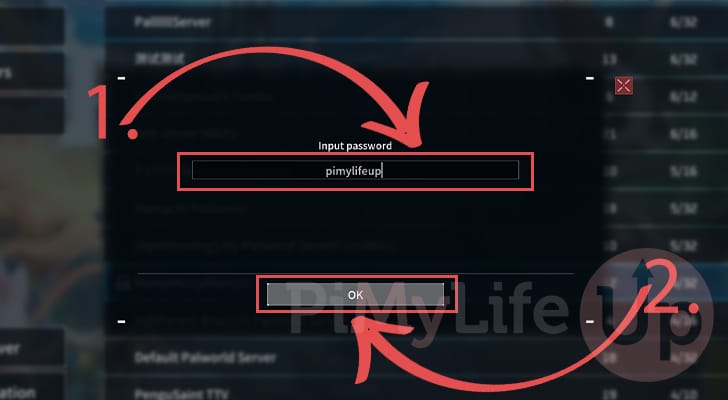
3. If you checked the “Enter Password” checkbox, you will now be asked to enter a password (1.). Type in the password for your Palworld Docker Server.
After typing in your password, click the “OK” button (2.) to connect to the server.
Conclusion
Hopefully, at this stage in the tutorial, you will now have your Palworld server up and running within a Docker container.
Using Docker allows you to get a Palworld server up and running quickly. Depending on the image you are using, you can even have a ton of extra functionality with little to no extra effort.
Please feel free to leave a comment below if you need any help with getting the game server up and running using Docker.
If you found this tutorial helpful, we highly recommend checking out our numerous other tutorials.