In this tutorial, we will show you how to set up a dedicated server for Palworld on Ubuntu.

Palworld is a multiplayer action-adventure survival game focused on monster catching and crafting.
One of the neat things about this game is that you can host your very own dedicated Palworld server. Running a dedicated server means you can keep your world running 24/7 and free up room on your personal computer.
You don’t need to own the game or use your Steam account to run a server; the developers offer the dedicated server as a separate Steam application that you can install anonymously.
Over the following steps, you will learn how to install the Palworld dedicated server to your Ubuntu or Linux machine. We will even show you how to set up a systemd service file so your server will keep running, even after your machine restarts.
Setting up the Palworld dedicated server isn’t a complicated process, so if you aren’t too familiar with Linux or using the terminal, then don’t worry, as we will walk you through all of the steps to
One thing to warn you is that at the time of publishing, only the Steam versions of Palworld support connecting to the dedicated server.
If you are using a Raspberry Pi, you will need to follow our Pi specific guide.
Installing and Setting up the Palworld Server on Ubuntu
The following steps will walk you through setting up a Palworld dedicated server on Ubuntu.
If you are using a desktop flavor of Ubuntu, you will need to open the terminal. You can open the terminal easily by pressing CTRL + ALT + T on your keyboard.
While this guide focuses on setting up a Palworld server on Ubuntu, these should work on almost any Linux system. If you are running a Debian-like operating system, you should be able to follow the steps without worry.
Preparing your Ubuntu Server for Palworld
1. We must do a few things before we can install the Palworld server on our Ubuntu machine.
The first is to ensure we have an up-to-date operating system to work off. You can update the package list cache and upgrade any out-of-date packages by using the following command.
sudo apt update
sudo apt upgrade -yCopy
2. Next, we must ensure that the “software-properties-common” package is installed on your system.
This package makes performing changes to repositories a straightforward process.
sudo apt install software-properties-commonCopyInstalling SteamCMD
3. To download and install the Palworld server on our Linux system, we must use SteamCMD.
SteamCMD is a command line interface we can use to download games and servers straight from Steam. You can install this command line tool by following our guide on installing SteamCMD on Linux.
https://pimylifeup.com/linux-steamcmd/Creating a User to Run the Palworld Server on Ubuntu
4. With SteamCMD now installed, we must create a user to run the Steam CLI through. It is not recommended to use a root user to run this software.
Let us create a user called “steam” by utilizing the following command.
sudo useradd -m steamCopy5. After creating the user, we need to modify its “.bashrc” file to adjust the path environment variable.
At the moment, the user will be unable to find the SteamCMD tool we just installed as the “/usr/games” path is missing.
You can begin modifying this file by using the command below.
sudo nano /home/steam/.bashrcCopy6. To the bottom of this file, add the following line.
This simple line adds the “/usr/games/” directory to the start of the “PATH” environment variable.
export PATH="/usr/games/:$PATH"Copy7. After making the above changes, save and quit by pressing CTRL + X, Y, and then ENTER.
8. To begin installing the Palworld dedicated server to our Ubuntu device, we will want to change to the “Steam” user we created earlier.
You can swap to this user by running the following command.
sudo -u steam -sCopy9. Now change to the home directory of this user by using the cd command below.
cd ~CopyInstalling the Palworld Server to your Ubuntu System
10. Before we can install and use the Palworld dedicated server we have to do some initial set up.
By running the following command, we will be downloading the Steamworks SDK redistributable. We need a specific file from this to run the server.
steamcmd +force_install_dir '/home/steam/Steam/steamapps/common/steamworks' +login anonymous +app_update 1007 +quitCopy11. Next, we must create a directory where the Palworld server will look for the “steamclient.so” file.
Create this directory by using the mkdir command.
mkdir -p /home/steam/.steam/sdk64Copy12. With the directory created, we can copy over the “steamclient.so” library the server requires to run.
cp '/home/steam/Steam/steamapps/common/steamworks/linux64/steamclient.so' /home/steam/.steam/sdk64/Copy13. We can now use the following command to download the Palworld dedicated server to our Linux machine.
The server is fairly large, so this process may take a few minutes to complete.
steamcmd +force_install_dir '/home/steam/Steam/steamapps/common/PalServer' +login anonymous +app_update 2394010 validate +quitCopyStarting up your Palworld Dedicated Server on Ubuntu
14. We are finally at the point where we can start up the Palworld server on Ubuntu.
To begin this process, change to the directory where the start script is by typing in the command below.
cd /home/steam/Steam/steamapps/common/PalServerCopy15. Finally, you can start your server using the following command.
You will see a couple of errors as it first starts up, but you can ignore these issues unless they continue to appear after the initial startup.
./PalServer.shCopyOnce you see the following text, you server should be up and running.
[S_API FAIL] Tried to access Steam interface SteamNetworkingUtils004 before SteamAPI_Init succeeded.16. You can now access your Palworld server by connecting using your IP address.
If you are hosting this from your home, you must port forward port 8211 to allow outside access.
To stop the server, you simply need to press CTRL + C.
Configuring your Palworld Dedicated Server
17. After starting up your Palworld dedicated server, you will likely want to re-adjust the default settings.
To give you a good base, let us make a copy of the default settings using the command below.
cp /home/steam/Steam/steamapps/common/PalServer/DefaultPalWorldSettings.ini /home/steam/Steam/steamapps/common/PalServer/Pal/Saved/Config/LinuxServer/PalWorldSettings.iniCopy18. You can now begin modifying the configuration file by using the nano text editor.
nano ~/Steam/steamapps/common/PalServer/Pal/Saved/Config/LinuxServer/PalWorldSettings.iniCopy19. Within this file, you will find an assortment of different values that you can configure. We won’t be diving into all of these, but you can check out the official documentation to learn more.
One option you will likely want to change is the server password. Setting a password stops just anyone from hopping on your Palworld server.
To set the password, find the following setting within the file.
ServerPassword=""CopyOnce you find the option, type in a password between the double quotes ("").
ServerPassword="pimylifeup"Copy20. Once you have made changes to the configuration file, save and quit by pressing CTRL + X, Y and ENTER.
Getting your Palworld Server to Start at Boot
21. If you are still using the Steam user from earlier, you will want to return to your normal user using the following command.
exitCopy22. We can begin writing a service file for our Palworld server by typing in the command below.
This service file will tell Ubuntu how it should start the server.
sudo nano /etc/systemd/system/palworld.serviceCopy23. Within this file, type in the following lines.
These lines will automatically start your Palworld server when your Ubuntu device powers on. Additionally, before it starts, the service will use SteamCMD to check for updates.
Additionally, we pass in some additional options that are recommended by the developer when we launch the server itself.
-useperfthreads: This is an Unreal Engine option that tells the engine to use threads to try to improve performance.-NoAsyncLoadingThread: Using this, we tell the server not to use user a separate thread for asynchronous loading. This is set to reduce the number of running threads and improve the performance of the server.-UseMultithreadForDS: The final option is a simple one that tells the engine to use multithreaded for the dedicated server.
[Unit]
Description=Palworld Server
Wants=network-online.target
After=network-online.target

[Service]
User=steam
Group=steam
WorkingDirectory=/home/steam/
ExecStartPre=/usr/games/steamcmd +force_install_dir '/home/steam/Steam/steamapps/common/PalServer' +login anonymous +app_update 2394010 +quit
ExecStart=/home/steam/Steam/steamapps/common/PalServer/PalServer.sh -useperfthreads -NoAsyncLoadingThread -UseMultithreadForDS > /dev/null
Restart=always

[Install]
WantedBy=multi-user.targetCopy
24. Once you have finished writing the service, save and quit by pressing CTRL + X, followed by Y, and then ENTER.
25. With the service now written, we must enable it using the command below.
Enabling the service allows the system manager to start your Palworld server automatically when your operating system starts.
sudo systemctl enable palworldCopy26. If you want the server to start immediately, all you need to do is use the command below. This command tells the system manager to start our Palworld server immediately.
sudo systemctl start palworldCopy27. To stop the Palworld server from running, you must run the command below.
sudo systemctl stop palworldCopy28. You can also stop the server from running at startup by turning off the Palworld service we created.
sudo systemctl disable palworldCopyConnecting to your Palworld Dedicated Server
Now that your Palworld dedicated server is up and running, you will probably want to know how to connect to it.
Connecting to your server is a super straightforward process for the most part. All you will need to know is the IP address of your machine. If you are connecting locally, you can get this using the hostname command on your server, or if you are connecting externally, you will need to know your IP address.
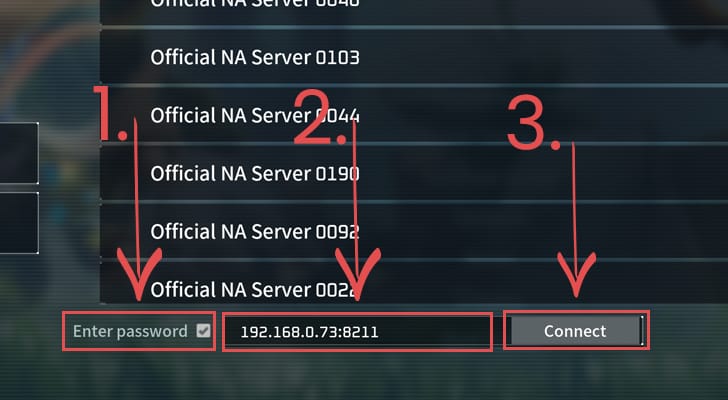
1. With Palworld open, you will want to select the “Join Multiplayer Game” option.

2. At the bottom of the screen, you will see a checkbox, textbox and a button.
If you are using a password to protect your Palworld server, you will want to check the “Enter password” checkbox (1.).
Using the textbox, you will want to type in your IP address followed by the port “8211” (2.).
After setting your IP address and port, you can click the “Connect” button (3.) to join your server.
Conclusion
At this stage, you will hopefully have a Palworld Dedicated server running on your device.
Running the dedicated server allows you to have a server that runs 24/7 without needing to own the game or run it on your gaming computer. It also allows Palworld to support significantly more players.
Please feel free to leave a comment below if you have run into any issues with getting your Palworld server to start up.
If you found this tutorial to be helpful, we recommend checking out our many other Ubuntu tutorials.


Hi Emmet,
thx for your instructions. Managed to host my own Palworld server thx to your guide.
Proxmox PVE 8.2.7
VM : Debian 6.1.112-1
Hi Emmet,
Just wanted to let you know that I was able to run the Palworld server within 10 minutes using your post.
Server info:
Proxmox PVE 8.1
VM : Ubuntu Server 23.10
Hi , not used to working with linux at all but wanted to run it on linux since lightweight. your tutorial did a great job setting it up.
Now in the rise of palworld mods, 99% are made for windows and so want to transfer to windows.
But my linux knowledge is so bad i have no clue how to copy all the files and save data (to transfer and as a backup)
i cant access the steam folder because of permissions.
is there a command to copy all the data that is in this steam folder so i can copy it to my main users desktop with read permissions so i can freely change , copy or edit these files?
Thank you in advance
Hi Dubzix,
You can copy the entire “PalServer” directory to your current users directory by using the following command.
You will then want to take ownership of these files with your user so you can actually access them.
Please let me know if that solves your problem of copying the files.
Kind regards,
Emmet
After running the steam install the common directory does not exist. This issue is similar to what the other users have reported.
ls -l ~/Steam/steamapps/common/
total 4
-rwxrwxr-x 1 steam steam 242 Jan 28 19:48 libraryfolders.vdf
Hi Magik,
Can you verify that you were running these commands under the “steam” user we created during the guide?
Setting the install directory like we are, should mean all your server files will be within the “/home/steam/Steam/steamapps/common/” directory.
Kind regards,
Emmet
First off, thanks for the hard work and the amazing tutorial, it does not go unappreciated! Now for the fun part. My server has been crashing about every minute for the past 10 minutes. Logs attached. It appears to be a limit on ram but I have 16 Gbs allocated to the machine. Any input would be helpful!
Hi Dragon,
Sorry for taking a bit to respond.
At a glance it looks like that something is going wrong when the server either goes to load your save that is causing a segmentation fault.
Can you temporarily move your existing save to see if the issue persists on a new save.
I have run the server on a Raspberry Pi 5 and that only has 8GB of RAM so you shouldn’t be running into memory allocation issues straight off the bat like the logs are showing.
Kind regards,
Emmet
Anyone had luck running this on a Google Cloud Compute Ubuntu instance? Gave it a go but hit some errors running the server by the end:
Hi Gala,
Despite those messages your server should actually be up and running after you see the message “
[S_API FAIL] Tried to access Steam interface SteamNetworkingUtils004 before SteamAPI_Init succeeded.“.Are you having any issues connecting to your Palworld server after you start it?
Kind regards,
Emmet
Hello, thought I chime in that I get a similar message and I cannot connect to my palworld server. If I do a `netstat -tulpn` command I don’t see palworld listening on port 8211.
Hi Flameancer,
Sorry to hear that you are running into issues getting the server up and running. May I ask what operating system you are using and whether you ran into any errors while following the guide?
Kind regards,
Emmet
Hello, excellent tutorial. But I was wondering how to go about updating the server whenever there is a new version of it, or is this done automatically whenever the server is started?
Hi Zo,
If you are running the service, updating the service is as simple as restarting the service. It will check for an update before starting the server again.
You can restart the service by using the following command.
Alternatively, if you are running it just through the “
palserver.sh” script, you will want to stop the server and then run the command below.Let me know if that doesn’t answer your question.
Kind regards,
Emmet
Everyone! Although its very anoying you can safely ignore
“`
“Loading Steam API…dlmopen steamservice.so failed: steamservice.so: cannot open shared object file: No such file or directory”
“`
Your server is UP and running….
Can you comment on why “force_install_dir” wasn’t used? I thought it was required. Otherwise a great Article!!
Hi Ryle,
Glad you liked the tutorial.
You only need to use the “force_install_dir” option if you want to specifically set where an application/game is installed.
Since we are happy enough for SteamCMD to resort to its default of installing to your home directory we can avoid using the option entirely.
However, thinking on it more, it might be prudent to set it to ensure there is a consistent location.
Kind regards,
Emmet
Hi Ryle,
I have made some adjustments to the tutorial so that the Steamworks SDK and Palworld server should be installed to a more consistent location.
Please let me know if this fixes the issue you are having.
Kind regards,
Emmet
Solid changes and evolving article!
Can you add any notes as to why in the service creation and startup you are using the arguments but don’t mention them in the initial step for starting the server?
Also fun fact: you can use an FQDN as opposed to an IP address when connecting directly, so long as you have an appropriate DNS record of course.
Great work!!
Hi Ryle,
The main reason I don’t use them earlier on in the tutorial is just to keep it clean. I almost assume most people will end up running it as a service.
I have updated the service section with a very rough explanation on what those options are meant to do.
Kind regards,
Emmet
I’ve tried 5 or 6 different versions of this Linux install and it gets hung up on the same step every time and I don’t know how to fix this. I’m stuck on step 15. It gives me this error and I don’t know enough about linux to even attempt to fix it
Hi L,
Sorry to see that you are having issues, the folder should exist after installing the SDK redistribution.
Can you try listing out the folders within the “~/Steam/steamapps/common” directory by using the following command.
Kind regards,
Emmet
I’m getting an error cp: cannot stat ‘/home/steam/steamapps/common/Steamworks SDK Redist/linux64/steamclient.so’: No such file or directory”
when I am trying to copy over the files for steamclient.so
I tried CDing into the steam folder and LS the folders but it is empty, this is the result after I run the steamcmd updater
Hi Brandon,
Sorry to see that you are having issues with this tutorial. I quickly tested the tutorial again from scratch and everything seems to be working fine on my end so not sure what is happening here.
Can you list out the contents of the “/home/steam/Steam/steamapps/common” directory by using the following command.
Additionally, what operating system are you using and its version?
Kind regards,
Emmet
Hi!
Do you think this could work on a raspberry pi using box64, just as we did for Valheim server?
Hi Linku,
Unfortunately, at the moment I don’t think it is quite possible. There is an issue with unimplemented opcodes at the moment meaning Box64 can’t run the server at all at the moment.
Outside of Box64, there is the issue that the Palworld devs recommend 16GB of RAM to run the server so you will quickly run into memory issues. With any luck they will manage to optimize the dedicated server and it will become a possibility in the future.
Kind regards,
Emmet
Depending on how fast your filesystem is, it should work fine on a 8GB Pi4.
4-6 Users…