In this project, we will be showing you how to set up your Raspberry Pi as an Orb sensor.
ORB is a relatively new piece of software that is designed to continuously monitor the quality of your internet connection, not just its speed.
With ORB, you continuously monitor your network’s responsiveness, reliability, and download and upload speed. The data from each of these is used to develop what they call the Orb score. This score is a better indicator of how your network operates, as just because it’s fast doesn’t mean it isn’t dropping out all the time or has poor latency.
Orb is also built to monitor various aspects of your network; thanks to its being lightweight, it can easily be run as a sensor on small, low-powered devices like the Raspberry Pi.
Setting up an Orb sensor on your Pi enables you to continuously check your network’s speed, reliability, and responsiveness without consuming a ton of power. Additionally, you could easily deploy multiple Pi’s around your home network to check how each part is performing. For example, you could see how your internet is working over Wi-Fi and various parts of your home and then have one set up with an Ethernet connection to identify whether your Wi-Fi is having issues, your Ethernet, or just your ISP is not being great.
The only real downside of setting up the Orb sensor is that it requires you to utilize the Orb app. While this app supports Windows, macOS, Android, and iOS, it does mean you lose the convenience of viewing your data through a web interface. The plus side, however, is that if you do use an Orb account, you can easily keep an eye on how your network is performing even while you are away.
If you prefer your data isn’t stored and processed by a third party, you can always set up your own Internet speed monitor on your Raspberry Pi with Python or get one running with Docker.


Equipment
Below is the equipment we used when setting up and running our Raspberry Pi as an Orb sensor.
Recommended
Optional
We last tested this tutorial with a Raspberry Pi 5 running the latest available version of Raspberry Pi OS Bookworm Lite (64-bit).
Installing and Running the ORB Sensor on the Raspberry Pi
In the following sections, we will show you how to easily begin monitoring your network using a Raspberry Pi and the ORB sensor.
Please note that the Orb sensor requires a Raspberry Pi 3 or newer to run. It does not support older versions of the Pi. Additionally, you MUST be running a 64-bit operating system. There is no support for 32-bit operating systems.
Below, we have embedded a video that will walk you through the entire process of installing and running the Orb Sensor on your Pi. If you prefer to follow this guide at your own pace, continue on to our written steps.
Setting up the ORB App on a Device
1. Before you begin setting up your Raspberry Pi as a network monitor with the ORB sensor, you will need to install the ORB application on another device.
While the ORB sensor works perfectly fine on a Pi, its main app does not have support, and we need this app to see the data being returned by the sensor.
Luckily, you can install the ORB app on your Windows, Mac, iOS, or Android device. The ORB team’s website links to all of their available apps.
Please note that at the time of publishing, ORB only has its sensor available on Linux.
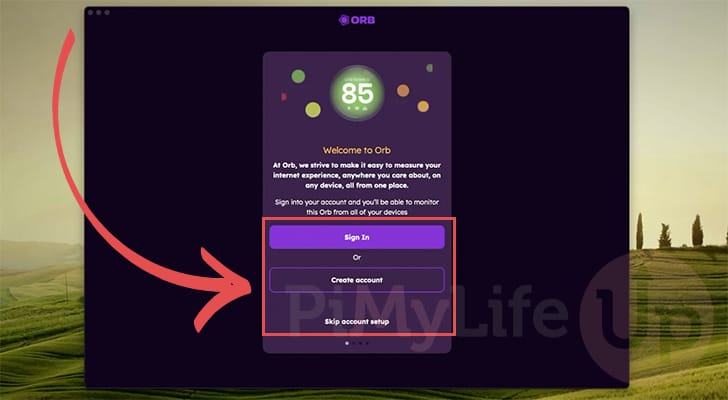
https://orb.net/get-orb2. The first time you launch ORB, you will need to go through their initial setup experience. Immediately, you will be presented with three different options.
The first enables you to log in to an existing ORB account. The second enables you to create an account, and the third and final option allows you to skip creating an account entirely.
If you want to be able to easily track all of your ORB sensors from different apps, we highly recommend creating an account. It will enable you to view the status of your network even when you are away.
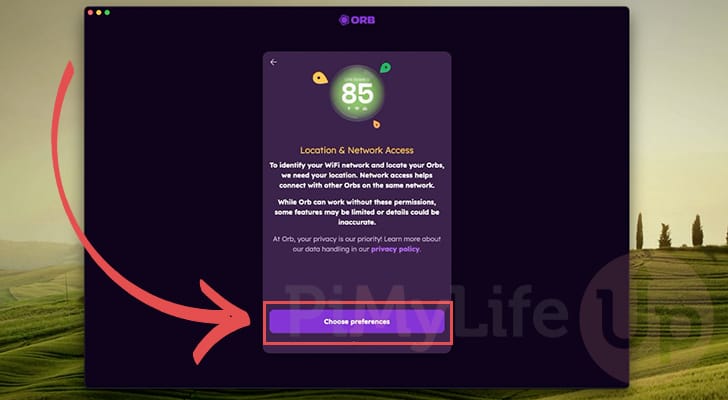
3. Depending on the operating system you are setting the ORB app up on, you will next be asked to grant the application permissions to access your network.
Due to the way ORB works, it will require these permissions to talk with your Raspberry Pi and gather datasd from the sensor.
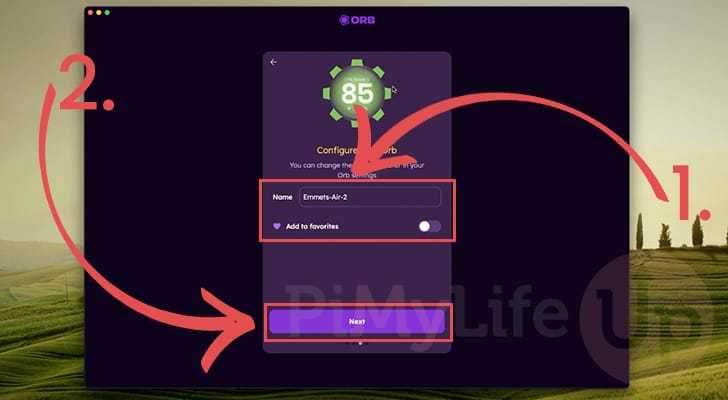
4. UP next, you will be prompted to give a name for your current sensor (1.). We recommend using something memorable that enables you to easily identify this sensor amongst your others. You can even set this sensor as a favorite.
Once set, click the “Next” button (2.) to finish setting up the ORB app.
5. You will now be given a quick overview of how ORB calculates a score for each of your sensors. This is good to read over quickly as it shows how ORB considers more than just speed, with other factors like responsiveness and reliability also mattering.
Once you are happy, click the “Let's go!” button.

6. Once you see the ORB dashboard, we can proceed to set up the sensor on your Raspberry Pi.

Preparing your Raspberry Pi to run as an ORB Sensor
7. These next steps will show you how to easily set your Raspberry Pi up to run as an ORB sensor. You can use whatever operating system you desire, but we personally highly recommend using Raspberry Pi OS Lite, especially if you don’t need any desktop functionality.
Once you have the terminal on your Raspberry Pi open, we will first want to update the packages using the following two commands. The first command will update the package list cache, and the second will upgrade any out-of-date packages.
sudo apt update
sudo apt upgrade -yCopy
8. Once the package list has been updated, the only additional packager we need to install the ORB sensor on our Pi is curl.
You can install curl by using the following command.
sudo apt install curlCopyAdding the ORB Sensor Repository to your Pi
9. We want to set up the ORB sensor’s official package repository to ensure that we can always download the latest version of Orb to our Raspberry Pi.
The first step in setting up this repository is to add its GPG key to our Raspberry Pi’s keyring. This key is used to verify the packages we are downloading from Orb are valid.
You can save this GPG key to your Raspberry Pi by using the following command.
curl -fsSL https://pkgs.orb.net/orbforge.noarmor.gpg | sudo tee /usr/share/keyrings/orbforge-keyring.gpg >/dev/null Copy9. With the GPG key now saved, we can add the ORB repository itself to our Raspberry Pi by simply running the command below within the terminal.
curl -fsSL https://pkgs.orb.net/stable/debian/debian.orbforge-keyring.list | sudo tee /etc/apt/sources.list.d/orb.listCopyInstalling the ORB sensor on the Raspberry Pi
10. Since we have made changes to the available package repositories on our Raspberry Pi, we will need to update the package list cache again by running the following command.
Updating this is important, as our operating system will not be aware that it can download the ORB sensor until we do this.
sudo apt updateCopy11. Once the update has been completed, install the ORB sensor onto your Raspberry Pi using the following command in the terminal.
The sensor will immediately start up after installation and begin monitoring your network, tracking reliability, responsiveness, and speed.
sudo apt install orbCopy12. As the ORB sensor may get updates fairly often, we will want to ensure that it is regularly updated. Luckily, the Orb team included a timer and updater that we can utilize to automatically update the software.
To enable this timer, we only need to use the following command in the terminal. Once enabled, your Raspberry Pi will automatically update to the latest Orb release once a day.
sudo systemctl enable --now orb-update.timerCopyLinking your ORB Sensor to your Account
13. Now that the ORB sensor is up and running on your Raspberry Pi, you will need to return to the Orb app to access the data it is producing.
Your app should automatically detect the Orb sensor that is now running on your network. You should also see a message stating that the Orb is currently not linked.
To link your Raspberry Pi ORB sensor to your account, simply click the “Link to my account” link (2.).

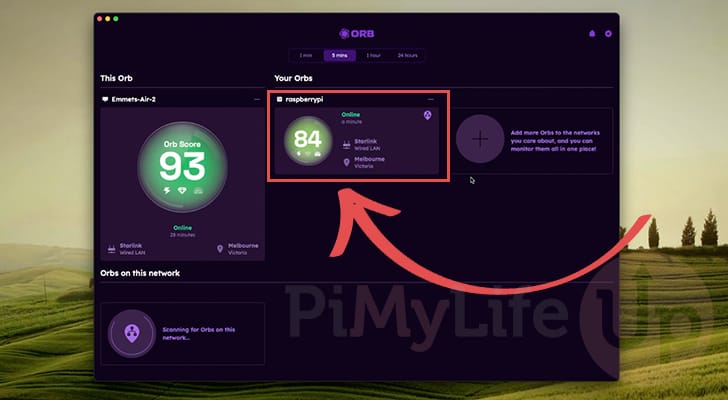
14. Once an Orb has been linked, it should be listed under the “Your Orbs” heading like ours is below.
Clicking this little card will give you more detailed information about how your network is performing.
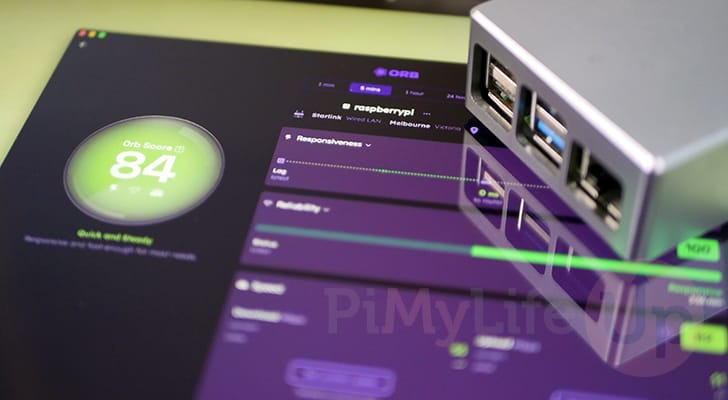
15. Here, you can see that our Raspberry Pi ORB sensor is now getting rather detailed information about our network, providing us with a fair bit of actionable data that isn’t provided through a typical internet speed test.
We can see how responsive our network is, its reliability, and our internet speed. We can even see how the network has been performing over the last 24 hours.
To make this even more useful, we could set up multiple Raspberry Pi’s around our network to monitor how each part performs. This can be particularly useful if you are trying to gauge the speed of something such as your Wi-Fi and identify potentially problematic areas.

Conclusion
If you have reached this point in the tutorial, you will hopefully understand how to install and run the ORB sensor on your Raspberry Pi.
Orb is a really neat network monitoring tool that can easily be expanded to track various parts of your home network. It has truly been built to be more than just a simple internet speed test, providing additional information such as your network’s responsiveness and reliability.
Please feel free to leave us a comment below if you have any questions about using ORB on your Pi.
If you found this helpful, we highly recommend exploring our many other Raspberry Pi projects.


The notion of having this information tied to a 3rd party, and to be dependent on a 3rd party service for analysis is a complete non-starter with me. Great tutorial (as always), but I’m gonna take a hard pass on this, and use one of your other solutions that’s entirely local.