In this tutorial, I will be looking at how to set up Raspberry Pi cayenne.
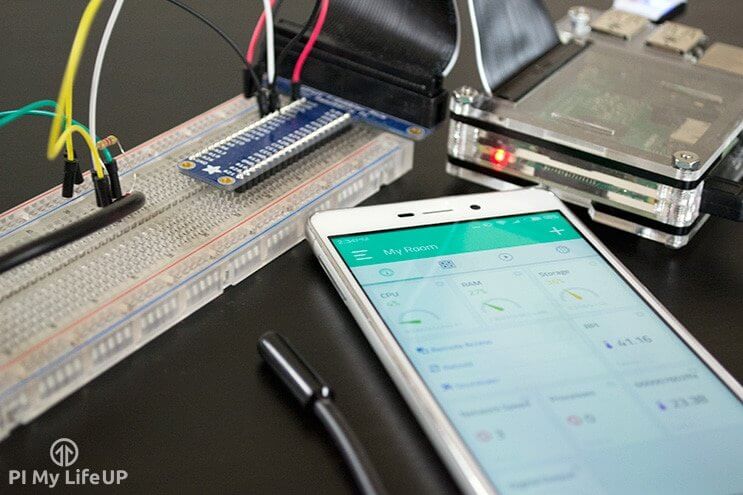
This tutorial is a pretty simple process and will give you access to a powerful IoT software package. If you’re a fan of sensors, collecting data and the overall concept of IoT then this is for you.
There are quite a few features and things you’re able to do with this software but to keep things relatively simple and straightforward I will just touch on the basics in this tutorial. I will be looking at doing further projects using this software in the near future.
One thing that you will probably like especially if you’re a beginner is that you don’t need to do any coding to get a project up and running.
All you need to do is connect the sensors up correctly and add the sensors/devices in Cayenne. In cayenne itself, you can create triggers, events, monitoring widgets and much more.
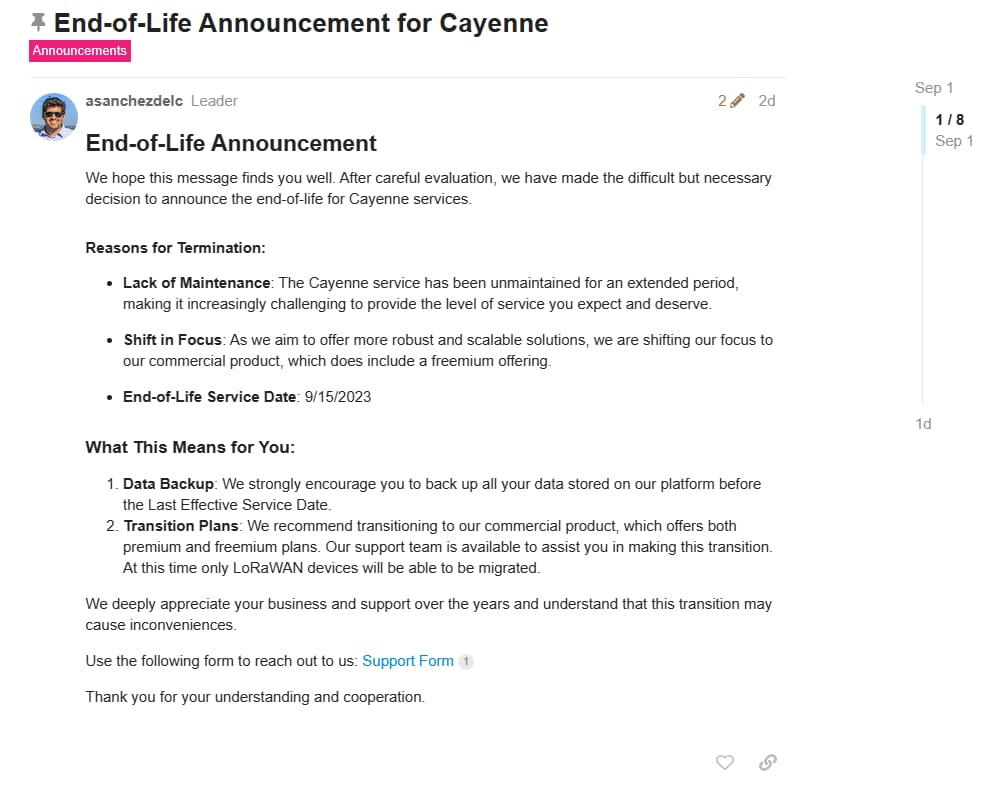
This tutorial is available for archive purposes only. We recommend taking a look at Node Red, Home Assistant, or a combination of both instead.
Equipment
Below is all the equipment that you will need for setting up myDevices Cayenne for the Raspberry Pi.
You may need extra parts if you’re looking to add more sensors, devices and anything else that you want to be connected to your Pi. You will also need to make sure you have an internet connection for the Pi.
Recommended
Optional
- Raspberry Pi Case Amazon
- USB Keyboard Amazon
- USB Mouse Amazon
- Below are the items used in the example circuit
- DS18B20 Temperature Sensor Amazon or similar
- 4v7k ohm Resistor Amazon
- GPIO breakout kit Amazon
- Breadboard Amazon
- Breadboard Wire Amazon
Video
If you want to see how to do this visually, then be sure to take a look at the video below.
I go through all the steps to set up the software correctly and how you can start building cool projects.
Installing Raspberry Pi Cayenne
The process of installing Cayenne onto the Raspberry Pi is pretty simple and shouldn’t take you too long to get it up and running.
You will need to make sure you have Raspbian installed on your Pi. If you’re unsure how to do this, then be sure to check out my tutorial on setting up Raspbian.
1. Unfortunately, Cayenne is no longer supported and will be unavailable soon. This tutorial is left up for archive purposes only. We recommend taking a look at Node Red, Home Assistant, or a combination of both instead.
Firstly, head over to myDevices Cayenne and sign up for a free account.
2. Once you’re signed up, you will need to register/connect the Pi up to the account you just created. To do this just copy the two command lines shown after you sign up. Enter these into the terminal for your Pi. (These files are unique for every new install)
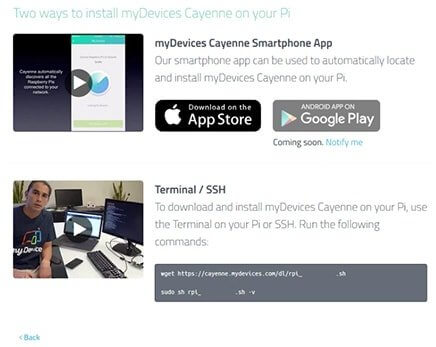
Alternatively, you can download the app, and it can automatically locate & install Cayenne onto your Pi. (Keep in mind SSH needs to be enabled)
3. It will take a few minutes to install onto your Pi depending on how fast your internet connection is. The web browser or app should automatically update with information on the installation process.
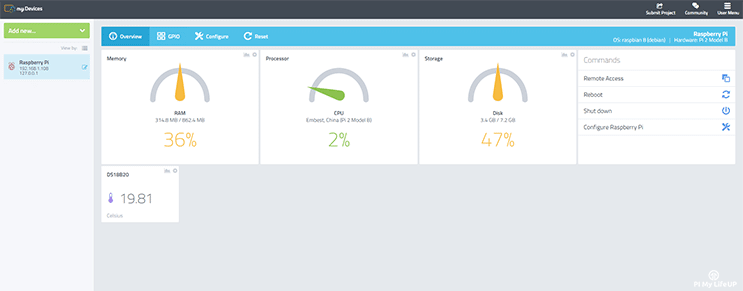
4. Once installed the dashboard will display and should look like something below.
Setting up your first sensor
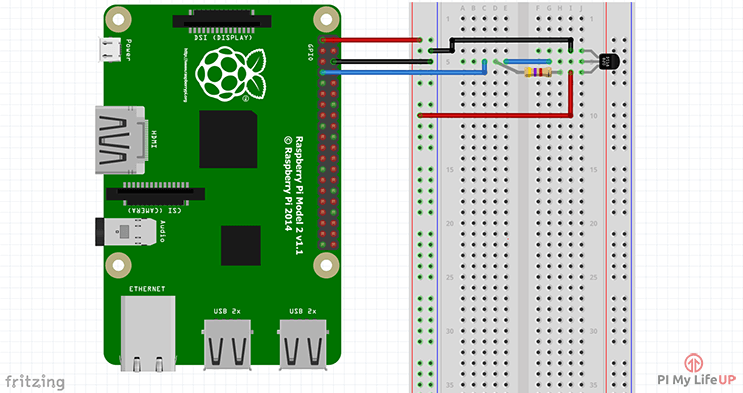
In this example, I am going to set up a temperature sensor. The sensor that I use is called DS18B20 and is the same sensor I did a tutorial on not that long ago. Now if you remember the process of setting this up was a little more in-depth but using cayenne makes it super simple.
All you need to do is set up the circuit and have it connected up to the Pi. If you need the full tutorial on how to do this, then be sure to check out my Raspberry Pi DS18B20 tutorial or if you know what you’re doing just check out the circuit diagram below. I also added an LED that is connected to pin #17 with a 100-ohm resistor to the ground rail.
Now when I set this up the sensor, it was automatically detected and added to my dashboard. Which is pretty cool, however, if it didn’t add automatically then you will need to add it manually. To add it manually just, do the following.
1. Go to add new in the upper left corner of the dashboard.
2. Select device from the drop-down box.
3. Find the device, in this case. It is a DS18B20 temperature sensor.
4. Add all the details of the device. In this case, you will need the slave address for the sensor. To get the slave address enter the following into the Pi’s terminal.
cd /sys/bus/w1/devices
lsCopy
5. The slave address will look similar to this 28-000007602ffa. Simply copy & paste this into the slave field within Cayenne dashboard.
6. Once entered select add sensor.
7. The sensor should now display on the dashboard.
8. If you need to customize your sensor press the cog and it will come up with some options.
9. You can also see stats/graphs. For example, the temperature sensor can plot data in real time and will keep historical data too.
If you also want to add an LED that you can turn on & off via the dashboard follow the next few instructions.
1. Now let’s add one more device. Except this one will be an LED.
2. So go back to add new device.
3. Now search for digital output and select it.
4. For this device select your Pi, widget type is button, icon can be whatever you want, and then select integrated GPIO. Finally, channel is the pin/channel that our LED is connected. For this example, it is pin #17. (This is the GPIO numbering of the pins).
5. Now press the add sensor button.
6. You can now turn the GPIO pin high & low from the dashboard and also use it in a trigger.
7. We’re now ready to set up our first trigger.
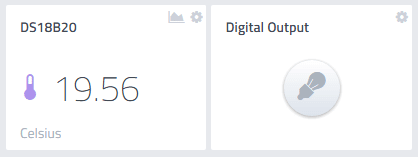
You should now have two devices on your dashboard that should look something like this.
If you’re completely new to setting up sensors and using the GPIO pins, then it might be worthwhile checking out my guide for the GPIO pins on the Raspberry Pi.
Setting up your first trigger
Triggers in Cayenne are a way to have your Pi react to a certain change on the Pi itself or through a sensor attached to it.
A trigger could be something as simple as a temperature exceeding a certain value or even just your Pi going offline. As you could imagine this can be quite powerful in creating smart devices that react to the surroundings. For example, If the room gets too cold, then turn a heater on so the room will heat.
The process of adding a trigger is super simple, and I will go through the basics of getting a couple of triggers set up.
1. Go to add new in the upper left corner of the dashboard.
2. Select trigger from the down box.
3. First name your trigger, I will call mine “too hot”
4. Now drag and drop your Raspberry Pi from the far left corner into the if box.
5. Underneath this select, the temperature sensor and have the checkbox next to “temperature above” selected. (If device options don’t display simply refresh the page)
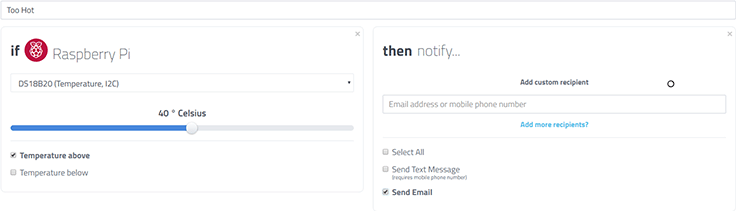
6. Now in the then box select notification and add an email address or your phone number for a text message (You can add both). Make sure you tick the checkboxes as well.
7. Now click “save trigger”.
8. It should now be saved and will send you an alert whenever the temperature sensor is over 40 degrees Celsius.
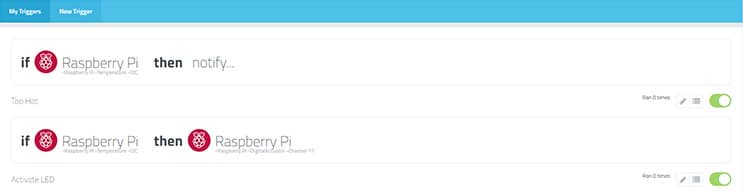
9. You can also drag the Raspberry Pi into the then box and have it do many things including controlling output devices. For example, in the circuit, I have an LED that will turn on when the temperature exceeds 40 degrees Celsius.
10. To make the LED trigger click on new trigger located in the upper part of the page. Name this trigger, activate LED.
11. Now drag the Pi into the if box and then select the temperature sensor again with 40 degrees above Celsius.
12. Next drag the Raspberry Pi into the then box. Select our digital output and have the on checkbox ticked.
13. Now click on save trigger.
14. Finally, now whenever our temperature sensor connected to the Pi reports a temperature of 40 degrees Celsius or higher, it will send an email and turn on the LED. You will also need to add another trigger to turn the LED off when it drops back below 40, but I will leave that for now and move on to events.
Events
Events in Raspberry Pi Cayenne is somewhat similar to triggers, but they are time dependent rather than relying on a change in a sensor or the device itself. Setting up an event is pretty easy, I will just quickly go through how to setup your Pi to restart once a month.
1. Go to add new in the upper left corner of the dashboard.
2. Select event from the down box.
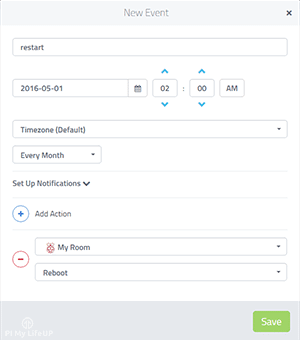
3. You should now see a screen with a calendar, and a popup called new event.
4. Enter the details of your event. For example, mine is called restart monthly and will happen on the first of every month at 2 am. Below is an example of the screen.
5. Once done, click on save.
6. You should now be able to see your event on the calendar. Simply click on it if you wish to edit it.
As you could imagine events can be pretty powerful so it would be worth looking into these more.
An excellent example of using events will be if you need something to run or turn on. A good example is something such as lights requiring to be turned on at a specific time.
GPIO Panel
The GPIO panel within Raspberry Pi Cayenne allows you to control and alter the pins on the Pi. For example, you can turn a pin from being input to an output and vice versa. You can also turn output pins both low & high.
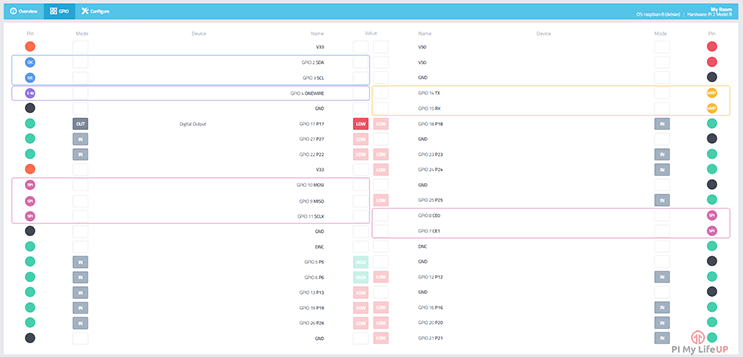
As you can see it also makes a great reference sheet if you need to refer back and see which pins are the ones you need.
You can also see the devices that are currently assigned to specific pins. You’re also able to see the current status of a pin. (e.g. Input or output & low or high)
Remote Desktop
I have touched on connecting remotely to the Pi twice before. The first time was via secure shell and the second was setting up VNC viewer.
If you install Cayenne, you can also remote desktop to your Raspberry Pi through either the web browser or via the mobile app. You can do this by simply doing the following.
1. On the dashboard find the widget that says “commands”.
2. Within this widget click on remote access.
3. It will now connect to the Pi and open a new window. If a new window doesn’t open, your browser most likely blocked it. Simply allow cayenne.mydevices to open new tabs.
4. Once done you can control your Pi like as if you were there with it.
5. One of the pros of using Cayenne for remote desktop is that you can access it anywhere in the world quite easily rather than needing to set up a VPN or open up ports on your network.
Future possibilities
Cayenne is still relatively new and has so much more coming in the future. It is already jam-packed full of features. I have read of future integrations with the Pi camera and other devices.
This software will open up to some pretty cool projects. As I mentioned earlier, I will be looking at doing more with Cayenne in the near future as home automation has been something I have wanted to cover for some time now.
I hope you have been able to get myDevices Cayenne installed onto your Raspberry Pi without any issues. If you haven’t already signed up, then be sure to go sign up and register a device over at their website.
If you do come across anything that I should’ve mentioned, have feedback or anything else then please feel free to leave a comment below.


It looks like Cayenne is shutting down. What alternative do you suggest? Thanks!
Hi Kent,
Thank you for letting us know, we have updated the tutorials to reflect this change.
We recommend taking a look at Node Red, Home Assistant, or a combination of both instead.
Before I try Cayenne, has the RAM performance issue been solved?
Correct me if i’m wrong, but has chayenne not implemented the ESP8266 / Arduino ?
Love your tutorials. Saving them for winter time. Keep sending them. Have a good day
I forgot to mention that in the ‘my devices’ section the pi is “greyed out” I have reformated the. CD but same problem!
The standard devices (CPU, temp,etc) values are not changing on either laptop or Android device ?????
I have an idea here help me out, I have 4 raspberry Pi’s and i have connect all together with ad hoc network, now I want to make 1 pi as master and others as slave and i want to read sensor values from slaves from the master and i wanted that to be uploaded into cayenne then reply to that value in the reverse manner
Can anybody help me for my idea please!
is anyone notice the RAM usage is in top performance after installing the cayenne?
Yes, they plan to fix that. When they do fix it then I will use their software.
Has anyone tried using a sound sensor with Cayenne? What values does Cayenne show for the input sound? Is it possible set up Cayenne to get/convert to decibel readout? Thanks
This is what I got after running the 1st line:
--2016-06-23 12:50:30-- https://cayenne.mydevices.com/dl/rpi_4zfvravw7h.shResolving cayenne.mydevices.com (cayenne.mydevices.com)... 52.4.134.119, 54.175.254.195
Connecting to cayenne.mydevices.com (cayenne.mydevices.com)|52.4.134.119|:443... connected.
HTTP request sent, awaiting response... 200 OK
Length: 422 [application/x-sh]
rpi_4zfvravw7h.sh: Permission denied
Cannot write to ‘rpi_4zfvravw7h.sh’ (Permission denied).
Hi Gus,
I appreciate your teaching efforts.
An FYI: I downloaded the cayenne program as per you directions using terminal and the program corrupted something on my micro SD. So I reformatted and re downloaded NOOBS and everything is great because this is a learning device.
What occurred is that the python programs I had saved would no longer run properly. I ran update and upgrade hoping for a miracle, but no go this time.
My above comment is wrong. I have a damaged pin #7. Everything works on another GPIO pin
Cayenne is doing something weird, after installing Cayenne it starts toggling between output and input and you can’t handle it.
Well i set up Led finr with no hiccups, but when i add an trigger like send ma an email when the led is on, i just have excessive loading, does this have any thing to do with my hardware? resistor? used a 1kohm as this is all i have i also have 220ohm guess higher is better than lower don’t want to buy a new pi every week.
Looks great, I have been playing with node-red which is similar but Cayenne looks a lot easier and a better looking interface. Thank you for the video will look at installing it now.
Hope it won’t clash with node-red.
Did you want us to share projects we do.
Thanks
Chris.
Just installed Cayenne and tested it with node-red and they both work together so far. So looks like you can use both. So far I can’t see the Arduino boards. So you could use node-red for Arduino and Cayenne for Pi stuff.
Looks good. Would be great for schools.
Thanks
Chris.
12.4.2016
A Good one and well written…well done. A useful addition to RPi information capturing. I have it on my RPi 2 now and will experiment further.
NT