In this tutorial, I will take you through the steps of installing the Nginx web server on macOS.
The Nginx is one of the world’s most utilized web server software packages. Many companies run their web services using Nginx as it is fast, lightweight, and versatile. Developers often use it as a reverse proxy, load balancer, HTTP cache, mail proxy, and a traditional web server.
If you are into web development or looking at getting into it, you will likely need to set up a web development environment on your computer. There are many ways you can achieve this, but for this tutorial, we will take you through the steps of installing Nginx directly on your Mac computer. If you want a more straightforward method, look at Xampp, docker, and other similar packages.
This guide will show you the steps to install Nginx on macOS via Homebrew. We will also take you through some of the basics of configuring the web server so you can set it up to your liking.
Table of Contents
Installing Nginx on macOS
The process of installing Nginx on macOS is straightforward, but you will need to make sure you have Homebrew installed. If you plan on doing a lot of development work, I recommend installing Homebrew, as it allows you to download and install thousands of useful packages.
1. To install Nginx on macOS, you will need to run the following command. Again, you will need to have Homebrew installed for this command to work correctly.
brew install nginxCopy2. By default, Homebrew will set the Nginx listening port to 8080. You should be able to access the default web page at either of the following addresses.
localhost:8080
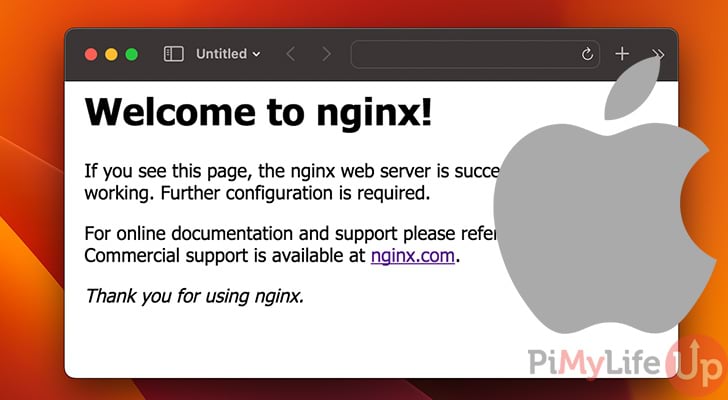
127.0.0.1:8080You should see a page that says “It Works” or “Welcome to Nginx” when you load either of the URLs mentioned above.
3. If you require additional packages, such as PHP, you may need to install them separately. Our installing PHP on macOS tutorial will take you through how to configure PHP for Nginx.
Configuring Nginx
It would be impossible to cover all the different settings you can configure within Nginx in a single tutorial, so we will touch on the basics. For example, we will discuss how to edit the default config, create a HTML file, and discuss the location of important files and directories.
Editing the Default Config for Nginx
One of the most important parts of Nginx is knowing how to edit the default Nginx file. This file allows you to alter the settings of the Nginx server, such as the root directory, server name, listening port, PHP, and more.
To edit the Nginx configuration file, run the following command. For an Apple silicon Mac, change /usr/local to /opt/homebrew.
nano /usr/local/etc/nginx/nginx.confCopyYou will want to issue a reload command to Nginx whenever you change the config file. You can do this by running the following line in the terminal.
brew services reload nginxCopyIf you want to test the changes made to the config file before you load them in, you can run the following command.
nginx -tCopyYou should get a couple of messages similar to the example below if your config file is fine.
Gus-MBP:~ gus$ nginx -t
nginx: the configuration file /usr/local/etc/nginx/nginx.conf syntax is ok
nginx: configuration file /usr/local/etc/nginx/nginx.conf test is successful
Copy
Creating your First HTML File
The default web directory for Nginx will be set to /usr/local/var/www (Intel) or /opt/homebrew/var/www (Apple Silicon). In this directory, you will be able to create new HTML files, store images, CSS, JS, and everything else you need to build a successful website.
To make and edit an HTML file, simply enter the following nano command.
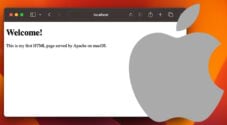
nano /usr/local/var/www/mynewpage.htmlCopyIn this file, you can add your HTML for your new page. Below is a very basic example.
<!DOCTYPE html>
<html>
<body>

<h1>My New Page</h1>
<p>This is my first HTML page served by Nginx on macOS.</p>

</body>
</html>Copy
Save and exit by pressing CTRL + X, Y, then ENTER
If you navigate to the URL of your new page, you should see a web page outputted into the browser. For example, localhost:8080/mynewpage.html should output the page we created above.
Nginx Important Files and Directory Locations
Below are the default locations of some of the important files and directories for Nginx on macOS.
Please note that you might need to update the path depending on the type of Mac you are using. For example, /usr/local/ (Intel) will need to be replaced with /opt/homebrew/ if you are using Apple Silicon (M1 or M2).
- Nginx base web directory –
/usr/local/var/www - Nginx config file –
/usr/local/etc/nginx/nginx.conf - Log directory –
/usr/local/var/log/nginx
Controlling Nginx on macOS
It is important to know how to control Nginx as it allows you to stop, start, restart, reload configs, or disable the service entirely. All these options may come in handy if you plan on using the web server only some of the time or if you need to load changes to the configuration.
Since we installed Nginx using brew, we will need to use the brew command to control the Nginx service.
Start
Starting Nginx on Mac is easy, but we need to use the brew command. Below is an example of how you can start Nginx.
brew services start nginxCopyIf Nginx is already running, brew will print a message to the terminal.
Stop
If you wish to stop Nginx, you can use the command below. Using the command will stop the Nginx web server and prevent any new requests from being received.
brew services stop nginxCopyRestart
Using the restart command will stop and start the Nginx web server. This command might be useful if you need to troubleshoot or need the server software restarted.
brew services restart nginxCopyReload
The reload command is similar to the restart command but is intended to be used to reload the configuration file. It is recommended that you run this command whenever you make changes to the config file. You can test that the config file is valid first using nginx -t.
brew services reload nginxCopyConclusion
I hope you have Nginx installed on your computer running macOS. The process is relatively straightforward and allows you to have a web server that you can use for development or production. However, we recommend only using it for development unless you understand how to configure macOS for production correctly.
If you love your Mac and want to learn more about developing on it, be sure to check out our ever-growing number of macOS tutorials. We cover topics such as setting up PHP, editing host files, and more.
Please let us know if you notice a mistake or if an important topic needs to be added to this tutorial.
I was searching for quite a few hours for Nginx config file, not realizing there is different directory for apple silicon M1,
Thanks a Lot, this is useful