In this tutorial, we will be showing you how to install and set up an SFTP Server on Ubuntu.
SFTP stands for Secure File Transfer Protocol or SSH File Transfer Protocol. It was designed as a secure way of transferring files between two devices.
It is considered a more secure alternative to FTP thanks to significant changes in how it handles the connection.
By utilizing SSH to create a secure channel and handle authentication, an SFTP server gains all the security benefits and rigorous testing of SSH.
SSH works by creating a secure tunnel between your device and the server. All communications between your devices are encrypted to keep them secure in transit and stop anyone from intercepting the connection.
With your installation of SSH on Ubuntu, you will find that SFTP is already enabled for all users on your system.
However, if you want a user to have access to your SFTP server but not your server, then there is some additional configuration you need to follow.
Over the following steps, we will show you how to install an SFTP server on Ubuntu and create a user to log in with. This user will only have access to its own upload directory and won’t be able to access the rest of the system.
Setting up an SFTP Server on Ubuntu
In the following sections, we will cover all the steps needed to get a functioning SFTP server up and running on your Ubuntu device.
These steps are all run within the terminal. If are using the desktop flavor of Ubuntu, you can open the terminal by pressing CTRL + ALT + T on your keyboard.
Ensuring SSH is Installed
1. Our first task is ensuring SSH is installed on your Ubuntu system. But before we can do that, we must update the package list cache.
You can update this cache by using the following command within the terminal.
sudo apt updateCopy2. All we need to do is install the SSH server by running the following command.
We need SSH on Ubuntu, as that is what our SFTP server will be utilizing. OpenSSH has one of the most tested implementations of SSH and, by connection, SFTP.
sudo apt install sshCopyConfiguring SSH for your SFTP Server on Ubuntu
3. Once you have SSH installed, we can start configuring SSH for SFTP by running the command below in the terminal.
While SFTP is enabled for all users by default on Ubuntu, we want to configure it to create users that are purely for uploading and downloading files through SFTP.
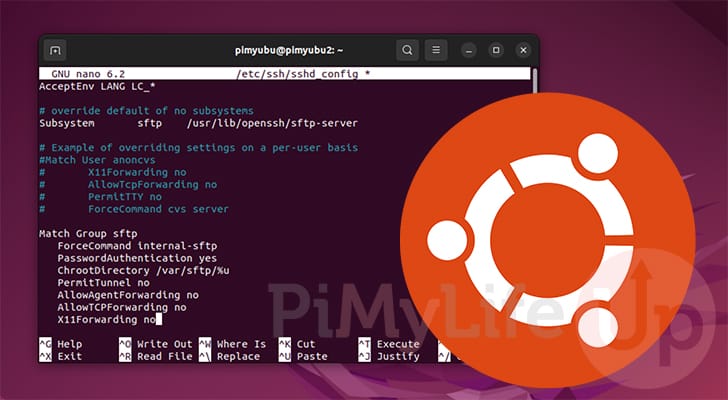
sudo nano /etc/ssh/sshd_configCopy4. Add the following lines to the bottom of this file.
At the start of these lines, we create a new configuration block that applies to any user in the “sftp” group.
Let us quickly run through the options we set for anyone in the “sftp” group.
- First, we use the “
force-command” option to force these users only to be able to use SFTP when they connect to our Ubuntu server. They won’t be able to use SSH to perform any other actions. - Next, we enforce password authentication for anyone in this group.
- We then use the “
ChrootDirectory” option to ensure the user is locked to their home directory. - The next four lines turn off particular features of SSH since we only want users in this group to utilize our Ubuntu server for SFTP.
Match Group sftp
    ForceCommand internal-sftp
    PasswordAuthentication yes
    ChrootDirectory /var/sftp/%u
    PermitTunnel no
    AllowAgentForwarding no
    AllowTcpForwarding no
    X11Forwarding no
5. After adding these lines to the file, save and quit by pressing CTRL + X, Y and then the ENTER key.
Restarting SSH
6. Since we changed the SSH configuration, we must restart its service for our SFTP changes to take effect.
You can restart the SSH service by using the following command in the terminal.
sudo systemctl restart sshCopySetting up the chroot jail
7. Part of the way you can improve the security of using SFTP on Ubuntu is by setting up a chroot jail.
What we are doing here is locking the SFTP user into a particular directory.
sudo mkdir -p /var/sftp/CopyCreating a Group for SFTP on Ubuntu
8. In our configuration changes to SSH, we added a specific block for any user in the “sftp” group.
These users can only use SFTP to connect to your Ubuntu server. But for this to all work, this group needs to exist.
Let us start by creating the “sftp” group using the addgroup command.
sudo addgroup sftpCopyCreating a New User for SFTP
9. For our next step, let us create the first user that we will be using for our SFTP server on Ubuntu.
- “
-G sftp“: With this first option, we add this user to the “sftp” group duration creation. - “
-b /var/sftp“: Next, we use this option to set the base home directory to the jail we set up earlier. - “
-s /sbin/nologin“: With the final option we are telling Ubuntu to set this users shell to “/sbin/nologin“. This will stop the user from being used to login to the system despite having a password.
Ensure that you replace “<USERNAME>” with the name you want to give your user. For example, we will use “pimysftp” as our username.
sudo useradd -G sftp -b /var/sftp -s /sbin/nologin <strong><USERNAME></strong>Copy10. To use this new user to log in to our SFTP server on Ubuntu, we must assign the user a password by running the following command in the terminal.
sudo passwd <strong><USERNAME></strong>Copy11. Since we use a non-standard home directory, we must create the directory for our new SFTP user.
We can create this directory by using the following command. You will notice we have an additional “uploads” directory here. This directory is where you will upload your files to.
sudo mkdir -p /var/sftp/<strong><USERNAME></strong>/uploadsCopy12. Our next step is to take ownership of the “uploads” directory we created with the previous command.
If we don’t do this, our SFTP user on Ubuntu won’t be able to upload or delete files from this directory.
sudo chown <strong><USERNAME></strong>: /var/sftp/<strong><USERNAME></strong>/uploadsCopy13. Lastly, we need to correct the permissions for the directory by using the following command.
sudo chmod 750 /var/sftp/<strong><USERNAME></strong>/uploadsCopyTesting your SFTP Server
14. Everything is now in place for you to test your SFTP server with your newly created user.
If you are using a Linux system, we can connect to your Ubuntu SFTP serve using the following command.
All you need to do is replace “<USERNAME>” with the name of the user you created and “<IPADDRESS>” with the IP of your server.
sftp <USERNAME>@<IPADDRESS>15. If everything is working, you can now interact with your Ubuntu server over SFTP.
Once you have connected, remember that files must be uploaded to the “/uploads” directory.
You can change into this directory within the sftp command line tool using the cd command.
cd uploadsCopy16. You can now use the “put” command to upload local files to your Ubuntu SFTP server.
For example, we could use the following command to upload a local script on our device.
put /local/path/to/file /server/directory/where/to/saveCopyConclusion
Hopefully, at this stage, you will now have an SFTP server up and running on your Ubuntu device.
We have also shown you how to create a user specifically to access your SFTP server. This includes the users having their own directories to which they can upload files.
Please feel free to comment below if you need help using SFTP on your Ubuntu server.
If you found this tutorial to be helpful, we recommend checking out our many other Ubuntu guides.