In this tutorial, we will show you how to set up Samba shares on Ubuntu.
Samba is a re-implementation of the SMB networking protocol that Windows uses for its file and printer sharing. The advantage of this protocol is that it allows a Linux system like Ubuntu easily talk with Windows.
While Samba or SMB is the popular name for this network sharing protocol, it can sometimes be referred to as CIFS (Common Internet File System).
Setting up your network shares using Samba is a great choice for anyone that wants their shared drives to be accessible on Windows. Samba is one of the best protocols just due to it being supported by the vast majority of operating systems.
Another advantage of using Samba on Ubuntu to set up network shares it that is relatively simple to set up. You will have others being able to access your shared data with just a few short steps.
If you would prefer to not have to install Samba directly to your machine, you can always use Docker and run a Samba container on Ubuntu instead.
Installing and Configuring Samba on Ubuntu
Over the following sections, we will be walking you through the process of using Samba to set up a network share on Ubuntu.
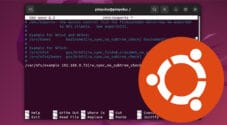
You will complete the steps within this tutorial within Ubuntu’s terminal. You can open the terminal on the desktop flavor by pressing CTRL + ALT + T on your keyboard.
Installing Samba on Ubuntu
1. Before we proceed with installing Samba on to Ubuntu, we will want to update any of the existing packages on your system. This will give us a nice clean setup to set up everything.
To update the package list cache and upgrade any out-of-date packages, use the following two commands in the terminal.
sudo apt update
sudo apt upgrade -yCopy
2. Once the package list update completes, we can move on to the incredibly simple and easy process of installing Samba on Ubuntu. This process is made simple as all the packages we need are available through the default package repository.
Use the following command to install Samba on to your device.
sudo apt install samba samba-common-binCopyAllowing Samba through the Ubuntu Firewall
3. If you are running a firewall such as UFW on your Ubuntu system, you will need to allow Samba through the firewall. To allow Samba, simply run the comamnd below in the terminal.
If you are using a different firewall, you will need to allow ports 139 and 445 using the TCP protocol and ports 137 and 138 using the UDP protocol.
sudo ufw allow sambaCopyCreating a Directory to Share
4. To give you an example of how to set up a network shareo n Ubuntu using Samba, we will be creating a directory. This folder can exist anywhere on your system, and you can even use an external drive if you really want.
However, to give you an example, we will be use the mkdir command to create a directory within our users home called “sambashare“.
mkdir ~/sambashareCopyConfiguring a Samba Share on Ubuntu
5. Now that we have Samba installed on Ubuntu, we can move on to configuring it. The file in particular we will want to edit is “smb.conf“. This config file is where you will specify any of your network shares.
We will begin editing this file using Nano, by running the command below.
sudo nano /etc/samba/smb.confCopySamba supports creating both public and private shares on your Ubuntu system. A private share is one that requires a username and password to be accessible.
Please note for a private share you will need to set a separate password for your user so you can access Samba shares remotely. We will explore exactly how this is done later on in the guide.
6. Creating a share is a straightforward process with Samba and involves adding a new section to the bottom of the file, as shown below.
Our example will focus on creating a private share on our Ubuntu system. However, as you will see, adjusting this to be a public share is a straightforward process.
[<SHARENAME>]
path = <PATH>
browseable = <BROWSEABLE>
read only = <READONLY>
guest ok = <PUBLIC>Copy<SHARENAME>: Here you will specify the name for your share. This needs to be in lowercase and not contain any symbols.
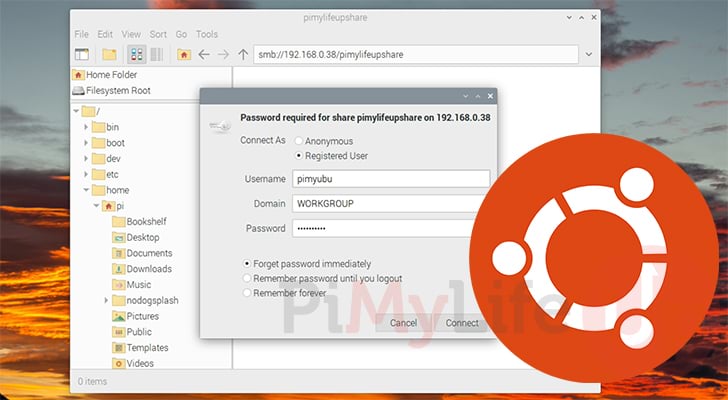
The name you give to your share is also what you will use when accessing the share. For example, if we called this share “pimylifeupshare” we would access that remotely by going to “\\<IPADDRESS>\pimylifeupshare“.<PATH>: The next thing you will want to specify is the path to the folder that you intend to share over your network using Samba.
This path needs to be a full path and not a relative one. For example, “/home/pimyubu/sambashare” is valid, but “~/sambashare” will be incorrect.<BROWSEABLE>: With this option you can control whether this specific Ubuntu Samba share is viewable or not.yes: By setting this to “yes”, other users will be able to list this share.no: Setting this to “no” will mean you ahve to manually type in the address for this network share to connect to it.
<READONLY>: The read only option allows you to enable or disable writing to the network drive.yes: With this option turned on, users will only be able to read data from the drive. This is useful when you want to share data but don’t want others to be able to modify it.no: Setting this to “no” will allow users to be able to write to the drive.
<PUBLIC>: Samba on Ubuntu supports both public and private shares. With a public share anyone can access the drive and no authentication is required.yes: To enable unauthenticated access to your network share, you will want to set this option to “yes“.no: Alternatively, you can force someone to log in to be able to access this network share setting this to “no“.
7. Below you can see an example of what this config might look like when setting up a private network share using Samba on Ubuntu.
[pimylifeupshare]
path = /home/pimyubu/sambashare
browseable = yes
read only = no
guest ok = noCopy
8. Once you have finished creating any additional Samba shares, you can save and quit out of the file.
You can quit and save by pressing CTRL + X, followed by Y, then finally the ENTER key.
Adding a New User to Samba on Ubuntu
8. If you created a new private Samba share, you will need to create an SMB user. Samba on Ubuntu does not use your system accounts, instead it uses specific ones created using the “smbpasswd” tool.
To begin creating a user that you will use to access your new Samba shares, run the following command within the terminal. While typing this command out, ensure that you replace “<USERNAME>” with your desired username.
By using the “-a” option, we are telling Samba that we are adding the specified user as a new SMB user.
sudo smbpasswd -a <USERNAME>Copy9. Upon running the above command, you will be immediately prompted to type in a new SMB password for this user.
To ensure you don’t make a mistake, you will be required to retype this password after first pressing ENTER.
New SMB password:
Retype new SMB password:
10. If you have successfully set a password for your account, you should see the following message printed to the terminal.
Added user USERNAMERestarting Samba for Changes to Take Effect
11. You must restart the service whenever you make changes to Samba on Ubuntu. If you don’t restart the service, it will not be aware of any changes you have made.
All you need to do to restart Samba is to use the following command within the terminal.
sudo systemctl restart smbdCopy12. Once Samba finishes restarting, you will now be able to access all of your newly set up Samba shares.
If you are using a Windows operating system, you can easily access shares by just using “\\<IPADDRESS>\SHARENAME” within the file browser.
Alternatively, for those running Ubuntu, we do have a guide that shows you how you can mount network shares like those shared using Samba.
Conclusion
Throughout this tutorial, we have shown you how to install and configure Samba on the Ubuntu operating system.
As mentioned, Samba is a server that re-implements the SMB protocol used by Windows operating systems. Using this, you can easily share files or printers from your system to Windows devices.
Please comment below if you have run into any issues getting Samba installed and running.
Be sure to check out our many other Ubuntu tutorials and our general Linux guides.

Great tutorial! Thank you for writing this.
Thank you for the most clear, concise, typo-free, and functional explanation I’ve run across so far on how to create basic Samba shares. I’ve been trying to figure this out for a while. This was exactly what I needed. It would have saved me a lot of time if this was the first thing that came up in my Google searches.