In this tutorial, we will be showing you the easiest way to install the latest version of Yarn on Ubuntu.
Yarn is a package manager for JavaScript that was developed as an alternative to Node.JS’s npm.
This manager was designed to solve a few problems the programmers encountered with npm.
For example, Yarn tries to offer better performance by installing packages in parallel and caching them locally so they can be quickly installed again later.
Over the following sections, you will learn the various ways you can install Yarn on the Ubuntu operating system. The officially recommended way to install this JavaScript package manager is to use NodeJS Corepack.
Using Corepack to Install Yarn on Ubuntu
New versions of NodeJS come with a feature called Corepack that allows you to install Yarn on Ubuntu very easily.
There is no need to set up the official yarn repository or to install npm. This method will install the modern version of Yarn that is meant to be installed per project rather than globally.
This is currently the only recommended installation method from the Yarn team. All other methods are currently considered obsolete, and against the current way Yarn is meant to be used.
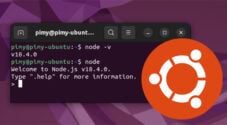
Before proceeding further, ensure you have Node.JS installed on your Ubuntu device. Corepack is a part of Node.JS, so you won’t have to do any other additional setup steps.
Preparing to Install Yarn on Ubuntu with Corepack
1. Before we proceed any further, you will need to quickly update the package list by using the following command.
sudo apt updateCopy2. After the updates completes, we should now install the “git” package to our system.
Yarn requires git to download itself when using Corepack.
sudo apt install gitCopyInstalling Yarn using Corepack
3. Once you have Node.JS installed on your Ubuntu system, run the following command to enable Corepack.
If you have already enabled Corepack previously, you can safely skip to the next step.
sudo corepack enableCopy4. Next, you must ensure that you are in the directory of the project where you want to use the Yarn package manager.
This is because the Yarn package manager is installed per project rather than globally when using this method.
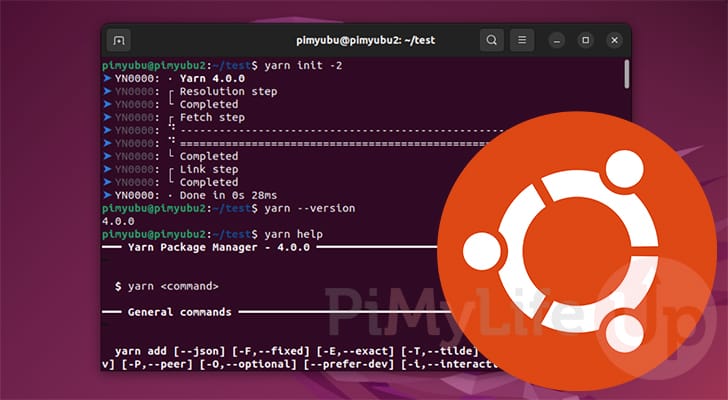
5. When you are in the correct directory, you can install Yarn to the current project on your Ubuntu system by using the following command.
Node.JS will automatically download and set up the latest stable version of Yarn.
yarn init -2CopyUpdating Yarn on Ubuntu using Corepack
6. Updating Yarn on your Ubuntu system is also a super straightforward process when using Corepack.
While you are in your project’s directory, first set the Yarn version to the current stable release.
yarn set version stableCopy7. After setting the version, you can re-initialize Yarn and get it to self-update by using the command below.
yarn init -2CopyInstalling Yarn to Ubuntu from the Official Package Repository
In this section we will be showing you how to install Yarn to your Ubuntu system using the official yarn package repository.
Adding the repository to Ubuntu is pretty straightforward but does require some extra steps that using Corepack doesn’t. Additionally, the “modern” versions of Yarn are recommended to be installed per project rather than globally. Only use this method if you need the classic variant of Yarn.
Preparing your Ubuntu Device
1. Our first step is to update the package list on our Ubuntu system. This list contains all the installable packages, their available version and where to download them.
To update the package list, use the following command in the terminal.
sudo apt updateCopy2. After the update, ensure you have installed curl by running the command below.
We will be using curl to help set up the Yarn repository on your Ubuntu device.
sudo apt install curlCopyAdding the Yarn Repository on Ubuntu
3. We must now download and save the Yarn package repositories GPG key to our Ubuntu device. A GPG key is used to help verify the repository’s contents and help prevent man-in-the-middle attacks.
Using the following command, we will be using curl to grab the key, and then have its “dearmored” version saved to the “/usr/share/keyrings/” directory.
curl https://dl.yarnpkg.com/debian/pubkey.gpg | sudo gpg --dearmor -o /usr/share/keyrings/yarn.gpg >/dev/nullCopy4. With the GPG key now saved, we can use the following command to add the Yarn repository to our sources list.
You can see with this line that we are referencing the GPG key we saved in the previous step.
echo "deb [signed-by=/usr/share/keyrings/yarn.gpg] https://dl.yarnpkg.com/debian/ stable main" | sudo tee /etc/apt/sources.list.d/yarn.listCopy5. Since we changed the available repositories, we must now run another update.
If we don’t perform this update, Ubuntu will be unaware that it can now install Yarn.
sudo apt updateCopyInstalling Yarn to Ubuntu
6. We are finally at the point where we can install Yarn to our Ubuntu operating system.
All you need to do now to install Yarn is to use the following command.
sudo apt install yarnCopyInstalling Yarn using NPM
If you have already installed npm to your Ubuntu device, you can install Yarn. It is far simpler than adding the official package repository, but it means you will have to have installed npm previously.
Ideally, you would use corepack instead of npm to install Yarn. Using this method, you will get “Yarn classic” rather than the modern versions of Yarn on your Ubuntu device.
To install Yarn using npm, all you must do is use the following command within the terminal.
npm install yarn --globalCopyConclusion
At this stage in the guide, you should now understand how to install the Yarn JavaScript package manger to Ubuntu.
Yarn is an alternative package manager for your JavaScript projects. It is meant to provide speed benefits when compared to the popular npm.
Please feel free to leave a comment below if you have any questions about installing Yarn.
If you found this tutorial to be helpful, be sure to check out our many other Ubuntu tutorials.