This guide will show you how to edit the hosts file on an Ubuntu-based system.
The Ubuntu operating system uses the hosts file to map an IP address to a hostname without performing a DNS lookup.
When your Ubuntu system makes a DNS lookup, it will first check to see if there is an available result within the hosts file.
If there is an entry within the file, it will use the IP address specified for that hostname.
In the following guide, we will show you how easy it is to modify the hosts file to add your own entry.
For these steps, you will need to have access to either the root user or a user with superuser privileges.
The following steps require you to use the command line. You can either physically access the terminal or access your Ubuntu device using SSH.
If you are using the Ubuntu desktop, you can press CTRL + ALT + T to open the terminal quickly.
Format of the Hosts File on Ubuntu
Entries within the hosts file on the Ubuntu system follow a particular format.
Below is the simple syntax that each line within the host file must follow.
IPADDRESS HOSTNAME [HOSTNAME ...]Looking at the syntax, you can see that two values are required at a bare minimum.
The first value that you must specify on the line is the IP Address (IPADDRESS) you want a hostname directed to.
Secondly, you must define the hostname (HOSTNAME) you want to be associated with the IP address you set.
If you want to associate multiple hostnames to an IP address, all you need to do is type them on the same line.
Make sure a single space separates all entries on the line.
Editing the Hosts file On Ubuntu
Now that you know what the syntax is for each line in the hosts file, we can now show you how to edit it.
On Ubuntu, the hosts file is located within the “/etc/” directory, specifically at “/etc/hosts“.
These steps for editing the hosts file should work on all versions of Ubuntu, including 20.04, 18.04, and 16.04.
1. Within the terminal, we can begin editing the hosts file by using the following command.
For our guide, we will edit this file using the nano text editor as it’s one of the most straightforward editors to use.
sudo nano /etc/hostsYou may be prompted to enter the password for your account to confirm its elevation to the super user.
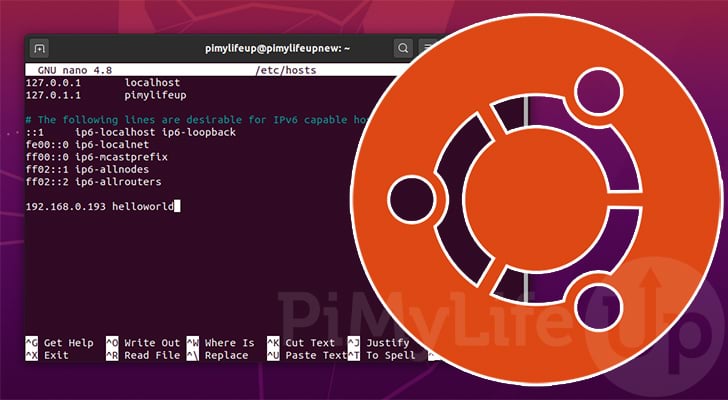
2. You should now see the contents of the hosts file on your Ubuntu system.
Within this, you will see some default entries, such as localhost being assigned to the loopback address.
Additionally, you will also see your Ubuntu device’s hostname pointed at the loopback address.
127.0.0.1       localhost
127.0.1.1       pimylifeup

# The following lines are desirable for IPv6 capable hosts
::1     ip6-localhost ip6-loopback
fe00::0 ip6-localnet
ff00::0 ip6-mcastprefix
ff02::1 ip6-allnodes
ff02::2 ip6-allrouters
3. Adding a new entry to the hosts file on Ubuntu is incredibly simple.
Referring to our syntax section earlier, we know that we need to add an IP address and a hostname.
For this example, let us point the hostname “helloworld“, to the IP address “192.168.0.101“.
192.168.0.193 helloworld4. With your new entry, your Ubuntu hosts file should end up looking a bit like what we have below.
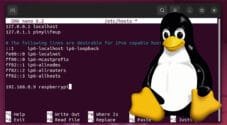
127.0.0.1       localhost
127.0.1.1       pimylifeup

# The following lines are desirable for IPv6 capable hosts
::1     ip6-localhost ip6-loopback
fe00::0 ip6-localnet
ff00::0 ip6-mcastprefix
ff02::1 ip6-allnodes
ff02::2 ip6-allrouters

192.168.0.193 helloworld
You can see that we have placed our new example hosts entry to the bottom of the file.
5. You can now save and quit out of the host file.
If you are using nano, you can quit and save by pressing CTRL + X, then Y
6. The easiest way to check if you have configured your hosts file correctly is to ping the new hostname.
For our example, we will use the ping command to see what IP address is being returned for the hostname.
ping helloworld7. From this command, you should see your Ubuntu device’s IP address is trying to connect to.
Additionally, if it is a device that accepts pings, you should start getting responses.
PING helloworld (192.168.0.193) 56(84) bytes of data.
64 bytes from helloworld (192.168.0.193): icmp_seq=1 ttl=63 time=0.477 ms
64 bytes from helloworld (192.168.0.193): icmp_seq=2 ttl=63 time=0.648 ms
In our case, you can see that our hostname, “helloworld” is successfully being routed to the IP we specified.
Conclusion
Hopefully, you will now know how to edit the hosts file on Ubuntu.
The hosts file is a critical aspect of most Linux-based operating systems and is even used as a part of Windows.
Using this file, you can easily route a hostname to a specific IP address without it ever needing to make a DNS request.
If you have run into any issues with modifying your hosts file on Ubuntu, please leave a comment below.
Be sure to check out some of our other Ubuntu guides to learn what else you can do with the operating system.


thanks!