In this tutorial, we will be showing you how to change the DNS settings on Ubuntu.
Changing your DNS settings within Ubuntu is a reasonably straightforward process and can be done within either the desktop interface or terminal.
The steps that we will be showing you should work on almost all recent releases of Ubuntu.
Suppose you are running a desktop version of Ubuntu. In that case, we do recommend sticking with that interface as it does make the process incredibly straightforward and is significantly harder to make mistakes.
There are many reasons why you might want to change the DNS settings. One of the reasons you might want to change this is to utilize a more privacy-orientated DNS service such as Cloudflare’s 1.1.1.1.
Table of Contents
- Setting the DNS using Ubuntu’s Desktop Interface
- Changing Ubuntu’s DNS Settings Using the Terminal
- Conclusion
Setting the DNS using Ubuntu’s Desktop Interface
This section will show you how to change the DNS settings utilizing Ubuntu’s desktop interface. These steps were written while using Ubuntu 22.04 but are still relevant for older releases of Ubuntu, such as 20.04.
Of course, to complete these steps, you will need to use a desktop variant of Ubuntu and have access to a mouse and keyboard.
1. On your desktop, start by clicking in the top-right corner of the screen. This is typically where you will see the network, volume, and power icons in the toolbar.
Clicking this will bring up a menu that we can use to access the settings page quickly.

2. You should now have a menu open in the top-right corner of your screen.
Within this menu, find and click the option labeled “Settings“.

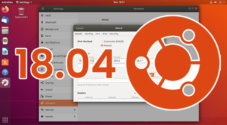
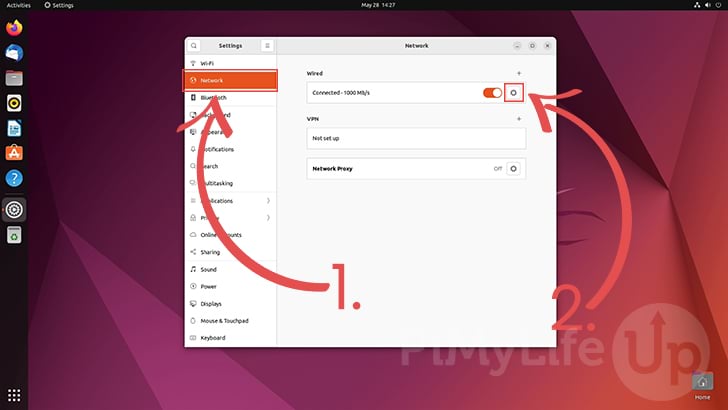
3. Now the settings menu is open, use the left-hand sidebar to find the “Network” settings tab (1.).
Once you have changed to the Network settings, identify your active connection and click the cog next to it (2.). In our example, we only have a single ethernet connection.
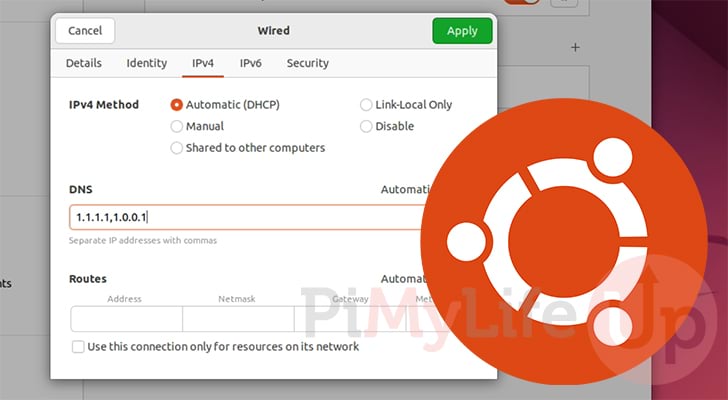
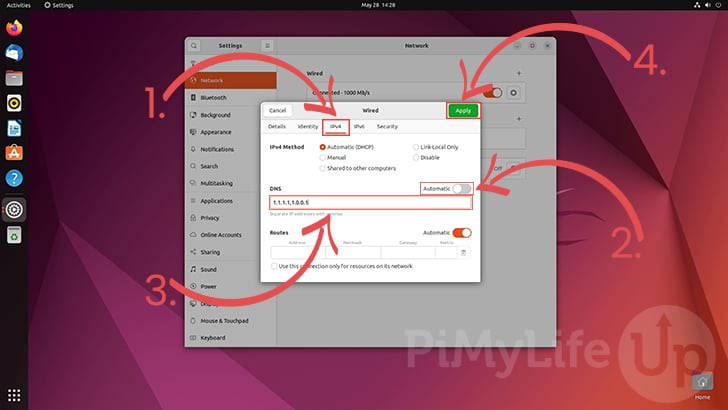
4. Next, we need to change to the IPv4 or IPv6 tabs (1.) to be able to change the DNS servers Ubuntu is utilizing. Most people will likely by utilizing an IPv4 connection.
Before setting the DNS servers, we need to click the “Automatic” toggle (2.), switching it off.
Finally, within the DNS textbox (3.), we can set the IP addresses for the DNS server we want Ubuntu to use. For our example, we will use Cloudflare’s 1.1.1.1 service.
To add multiple IP addresses, you must separate them with a comma (,). For our example we are using “1.1.1.1,1.0.0.1“.
Once you have set your new DNS servers for Ubuntu, you can apply them by clicking the “Apply” button (4.).
5. Your Ubuntu device should now utilize the DNS servers you just set.
If you utilize an ISP that supports both IPv4 and IPv6, you may want to set DNS servers in both tabs.
Changing Ubuntu’s DNS Settings Using the Terminal
In this section, you will learn how to change the DNS settings on Ubuntu from the terminal. This is more complicated than using the GUI but is still relatively straightforward.
The following steps will work on all versions of Ubuntu that utilize Netplan for their network configuration.
That means you can change your DNS settings on any version of Ubuntu newer than 18.04, including the LTS releases Ubuntu 20.04 and 22.04.
1. Start by opening up the terminal on your Ubuntu device or connecting over SSH.
If you use Ubuntu Desktop, you can open the terminal by pressing CTRL + ALT + T on your keyboard.
2. With the terminal open, we need first to work out what config files are available for you to edit. Depending on your Ubuntu distribution, the file present in the Netplan directory might differ.
Using the ls command as shown below we can see the file available within this directory.
ls /etc/netplan/Copy3. We should now check the contents of your chosen configuration file. If your system uses “NetworkManager” as the renderer, we will need to use different steps.
For our example, our file is called “01-netcfg.yaml” and we will open it using the nano text editor.
sudo nano /etc/netplan/01-netcfg.yamlCopy4. Before we proceed, we need to decide whether we can modify this file or not.
If your file contains “renderer: NetworkManager“, you must follow the “Changing Ubuntu’s DNS Settings using the Network Manager in the Terminal” section.
Alternatively, if your file contains “renderer: networkd“, you can continue to our “Set DNS Settings within Netplan” section.
Set DNS Settings within the Netplan Config File
If you see “renderer: networkd” within your Netplan configuration file, we can configure Ubuntu’s DNS servers within this file.
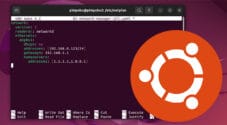
1. First, check if your file already has a network interface configured. You should see something like the following.
If you don’t see either “ethernets” or any devices underneath that header, you will need to get the network interfaces device name. You can get these device names by quitting out of the file and following step a.
If you see a network device, and it’s the one you want to set the DNS servers for, continue to step 2.
a. To get the network device names, you can run the following command in the terminal.
ip link showCopyAn example of a device name from this is “eth0“. In our example, this is the interface belonging to our ethernet internet connection.
Ignore the “lo” device. This device is the loopback interface.
2. With a network device name handy, we can now modify the configuration file so Ubuntu will use our DNS servers.
You will need to change the file to look something like we have shown below. In addition, you will need to make sure you change two things.
- Make sure “
<INTERFACENAME>” is the interface’s name you are setting the DNS servers for.
For example, our file contains “eth0” as the interface name. - Secondly, you will need to set the addresses field (
<NAMESERVERS...>). As this is an array of IP addresses, these must sit within the square brackets ([ ]).
You need to separate each additional DNS server with a comma (,). For example, using Cloudflare’s DNS service, you would use “[1.1.1.1,1.0.0.1]“.
network:
    version: 2
    renderer: networkd
    ethernets:
       <INTERFACENAME>:
          dhcp4: true
          nameservers:
             addresses: [<NAMESERVERS...>]
Below is an example of how this was configured within our Netplan configuration file.
network:
    version: 2
    renderer: networkd
    ethernets:
       <INTERFACENAME>:
          dhcp4: true
          nameservers:
             addresses: [<NAMESERVERS...>]
3. Once you have modified this file to point to your chosen DNS servers, you can save and quit by pressing CTRL + X, then Y, followed by the ENTER key.
4. For your Ubuntu device to start using these DNS servers, you must apply the changes.
You can apply the changes you made to the configuration file by utilizing the command below.
sudo netplan applyCopyChanging Ubuntu’s DNS Settings using the Network Manager
This section is for users whose Ubuntu system uses “NetworkManager” to manage their connection, including its DNS settings.
1. For this, you will need to quit out of the configuration file you opened previously. Instead, will need to use a different tool to set the DNS server.
If you are using the nano text editor, you can quit out of this file by pressing CTRL + X.
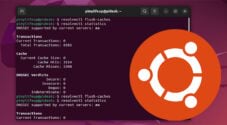
2. Since the system uses NetworkManager, we can utilize a tool called “nmcli” to set the DNS servers on Ubuntu.
The first command that we want to run will retrieve the current connection. Make a note of the “name” returned by this command
nmcli connectionCopyBelow is the result we got when running the above command on our system. This means we will need to use the name “Wired connection 1“.
NAME                UUID                                  TYPE      DEVICE
Wired connection 1  XXXXXXXX-XXXX-XXXX-XXXX-XXXXXXXXXXXX  ethernet  eth0
3. Now that we have a connection name, we can use this to change the DNS server Ubuntu is using for that connection.
You need to decide whether you want to set the DNS server for an IPv4 or IPv6 connection. These commands differ slightly.
When using either one of the following commands, replace “[NETWORKNAME]” with the name you got from the previous command.
Additionally, make sure you replace “[DNSSERVERS]” with the IP addresses belonging to your DNS server, separating multiple addresses with a comma (,).
a. Use the following command when you want to set the DNS servers for the IPv4 connection. The DNS servers specified here must be in IPv4 format (E.G 1.1.1.1).
nmcli connection modify "[NETWORKNAME]" ipv4.dns "[DNSSERVERS]"Copyb. if you want to change your Ubuntu DNS servers for an IPv6 connection, you will use the command below. Remember the DNS servers specified here must be in IPv6 format (E.G. 2606:4700:4700::1111).
nmcli connection modify "[NETWORKNAME]" ipv6.dns "[DNSSERVERS]"Copy4. For example, if we wanted to change the IPv4 DNS servers on our Ubuntu device to Cloudflare’s, we would use the following command.
Using “Wired connection 1” as our network name and “1.1.1.1,1.0.0.1” for our DNS servers.
nmcli connection modify "Wired connection 1" ipv4.dns "1.1.1.1,1.0.0.1"Copy5. You can verify that the changes have been applied using the command below. Make sure to replace “[NETWORKNAME]” with the interface you got earlier.
This command will show you a wealth of information about your connection. You should eventually see “ipv4.dns” with the value set to your provided servers.
nmcli connection show "[NETWORKNAME]"CopyConclusion
Throughout this tutorial, we have shown you how to change the DNS server on Ubuntu. These steps work for almost every recent iteration of Ubuntu. These versions include Ubuntu 18.04, 20.04, and 22.04.
The desktop interface is the easiest way to set the DNS servers but is only helpful if running a desktop variant of Ubuntu.
If you have any questions about setting the DNS servers on your version of Ubuntu, please comment below.
Be sure to check out our many other Ubuntu guides or explore a wealth of Linux command tutorials.