In this tutorial, we will be showing you how to edit the hosts file on the Windows operating system.
The hosts file is used on Windows when the system performs DNS lookups.
If your system finds a hostname within this file, it will use the defined IP address rather than an external server to perform the DNS lookup. Simply put, this allows you to override any hostname lookup without having to control the DNS server.
Editing this file is incredibly useful in a variety of cases. For example, you can use it to block a website or redirect it to a local equivalent.
Some game private servers require you to utilize the hosts file so you can be directed to their servers.
By the end of this tutorial, you should have a good idea of how to add any new hostname to the hosts file easily.
Exploring the Format of the hosts File on Windows
The format that the hosts file on Windows uses is straightforward to interpret and write. In fact, it is the same format used by other systems that implement the hosts file, such as Linux and macOS.
Each entry within the hosts file must be on a new line. Windows uses the new line to distinguish the separate entries.
You must start each line with an IP address. This IP address is where the defined hostnames will be directed.
After specifying an IP address, you must set at least one hostname. You can set as many hostnames as you like; just separate each hostname with a single space.
IPADDRESS HOSTNAME...For example, if we wanted to use the hosts file on Windows to direct the hostname “cloudflaredns” to “1.1.1.1“, we would add the following line.
1.1.1.1 cloudflarednsTaking this further, if we wanted to redirect two hostnames, for example “cloudflaredns” and “dnscloudflare“, we would add the following to the file instead.
1.1.1.1 cloudflaredns dnscloudflareEditing the hosts File on Windows
This section teaches you how to find and edit the hosts file on Windows. We will even show you an example of adding a basic entry to this file.
Since the system owns the hosts file, your user must have administrator privileges. While you can view the file as a normal user, you won’t be able to edit it.
Opening the Hosts File for Editing
The hosts file is stored within the “C:\Windows\System32\drivers\etc\” directory on Windows. While you can manually navigate to this directory and edit the file, there is an easier solution that we will be covering in the next couple of steps.
1. On your Windows device, you should bring up the “Run” screen by pressing the WINDOWS + R keys on your keyboard.
Alternatively, you can open the terminal to run this command; however, this tool is good enough for running a single command.

2. With the Run menu now open on your device, you can use the following command to open the hosts file for editing.
This command uses PowerShell to launch Notepad as an administrator, with it directly opening the hosts file.
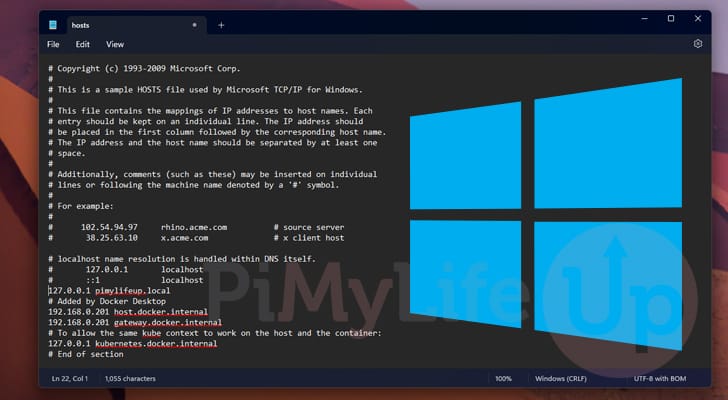
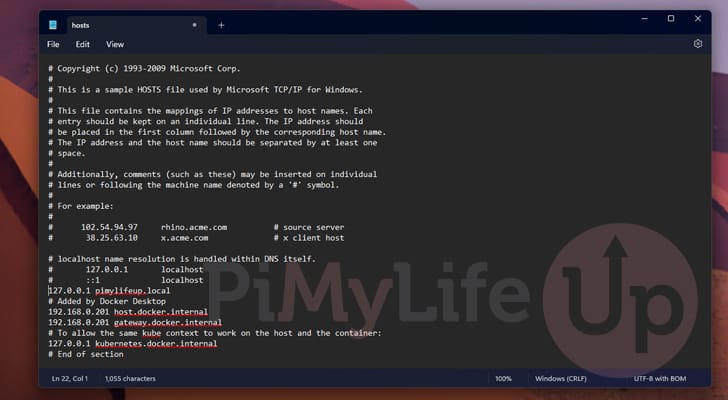
powershell -Command "Start-Process 'notepad.exe' -ArgumentList 'c:\Windows\System32\Drivers\etc\hosts' -Verb runAs"Copy3. As shown below, you should now have the hosts file open within Notepad. You can begin to add your new entries to this file.
Example of Adding a Host to the Windows Hosts file
4. We often need to access a web interface on a Raspberry Pi. Instead of remembering the IP address and typing it in whenever we want to access it, we can specify it within the hosts file on Windows.
For this example, we are adding the IP address “192.168.0.34” with the hostname “pimonitor” being redirected to it.
192.168.0.134 pimonitor5. Once you have finished making changes to this file, you can save by pressing CTRL + S or by quitting and clicking the “save” prompt.
Testing your hosts File Changes on Windows
6. Since changes to the hosts file on Windows take effect immediately, you don’t have to restart your device for it to take effect.
To test that the new hostname is directing to the correct IP address, we will use the built-in ping tool.
Before you can use this tool, you will need to open the command prompt. You can open this by typing in “cmd” into the RUN tool or by right clicking the Windows icon and clicking “Terminal”
7. With the command prompt open on your Windows device, you can test that everything is working correctly by attempting to ping the hostname
ping <HOSTNAME>CopyFor example, testing the hostname “pimonitor” we would use the following command.
ping pimonitorCopy8. If everything has worked correctly, you should see your hostname, followed by the IP address you set in brackets.
Pinging pimonitor [192.168.0.134] with 32 bytes of data:Conclusion
Hopefully, by this point in the guide, you will have a good idea of how to edit the hosts file on Windows.
This file is a super useful thing to learn how to edit, as you can easily route any hostname to an IP address of your sorting. You could even theoretically use this to block ads or websites.
Please feel free to drop a comment below if you have had any issues with editing this file.
If you found this tutorial helpful, consider checking out our many other Windows tutorials.