In this tutorial, we will show you how to edit the Hosts file on a Linux operating system.
The hosts file is a key component of the Linux operating system and allows a user to map an IP address to a hostname without Linux needing to perform an outbound DNS lookup.
When you try to visit a domain name, Linux will look up that domain name. Before your system resolves this domain name with a DNS server, it will first check the hosts file.
If that domain exists within that hosts file, it will use the IP address specified in that file and never attempt to resolve it externally.
By default, most Linux-based operating systems will use this file to map “localhost” and your device’s hostname to the loopback address, 127.0.0.1.
Using this hosts file, you can easily override any domain name to point to your desired address. It can even be used to block websites if you route that domain name to “127.0.0.1“.
In the following sections, we will show you how to edit the hosts file on your Linux system.
Please note that to edit the hosts file on Linux, you will need to have access to a user with superuser privileges. This can be the root user or a user with sudo privileges.
How the Hosts File is Formatted on Linux
Before we discuss how to edit the hosts file on your Linux system, we will explore the syntax of each line. Each line in the hosts file defines an IP address followed by hostnames you want to be pointed to that IP.
Below is the syntax of how this would be written within the file.
IPADDRESS HOSTNAME [HOSTNAME...]IPADDRESS: Every line within this file must start with an IP address that you want a hostname, or hostnames routed to.HOSTNAME [HOSTNAME...]: After the IP Address, you must specify one hostname that should be routed to the specified IP.
You can associate multiple host names with one IP; just add a single space after each one to separate them.
For example, if we wanted to route the domain names “localhost.pimylifeup.com” and “loopback.pimylifeup.com” to “127.0.0.1“, we would use the following line within this file.
127.0.0.1 localhost.pimylifeup.com loopback.pimylifeup.comHow to Edit the Hosts File on Linux
On most Linux operating systems, the hosts file is stored within the “/etc/” directory, specifically at “/etc/hosts.”
Luckily, editing this file is straightforward as long as you have superuser privileges and are comfortable using the terminal.
1. Before you start, you must open the terminal on your Linux machine.
If you are using a variant of Linux with a desktop interface, you can often press CTRL + ALT + T to open the terminal easily.
2. You can now edit the hosts file on Linux by running the following command within the terminal.
We are choosing to use the nano text editor because it is one of the easiest to use and is typically pre-installed on most operating systems. You can use others if you choose.
sudo nano /etc/hostsCopySince we are using “sudo” to run this command, you may be prompted to enter a password for your account.
3. Now that you have the hosts file open in the text editor, you should see something similar to what we have shown below.
Here, you will find some default hosts that have been specified. Most of these are for setting up loopback addresses.
For example, you can see that “localhost” and our machine’s hostname “pimylifeup” are routed to the loopback IP.
127.0.0.1       localhost
::1             localhost ip6-localhost ip6-loopback
ff02::1         ip6-allnodes
ff02::2         ip6-allrouters

127.0.1.1               pimylifeup
4. Let us now give you an example of how to add a new entry to your hosts file on Linux.
For this example, we will use the syntax mentioned earlier to point the hostname “raspberrypi” to the IP address “192.168.0.9“.
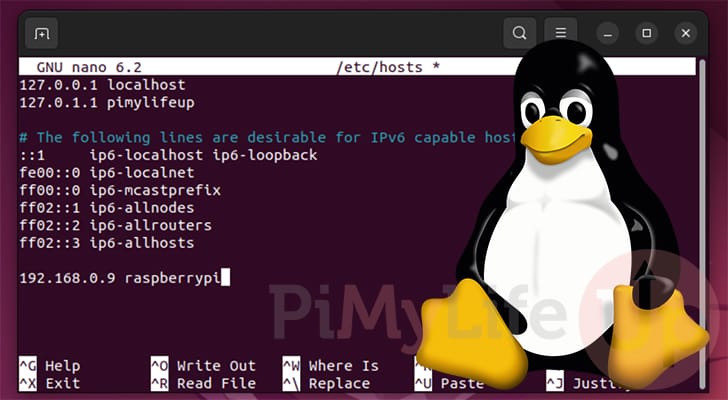
192.168.0.9 raspberrypi5. After editing the hosts file on Linux and adding a new entry, you should see something like what we have shown below.
You can see that our new hosts entry was added as a new line to the bottom of the file.
127.0.0.1       localhost
::1             localhost ip6-localhost ip6-loopback
ff02::1         ip6-allnodes
ff02::2         ip6-allrouters

127.0.1.1               pimylifeup
192.168.0.9 raspberrypi
6. Once you have finished adding new entries to your hosts file, you can save and quit by pressing CTRL + X, Y, and then ENTER.
7. After making any changes to the hosts file, there isn’t actually any need to restart any services or the operating system itself. The system will automatically poll the website whenever it looks up the domain name.
To show this, let us test it by using the ping command on our Linux system to ping the hostname we just added to our file.
ping raspberrypiCopy8. If you have configured everything correctly, you should start to see that your Linux device is successfully connecting through the hostname to the IP address you specified.
From our example, you can see that by connecting to “raspberrypi” our device is routing to the IP “192.168.0.9“.
PING raspberrypi (192.168.0.9) 56(84) bytes of data.
64 bytes from raspberrypi (192.168.0.9): icmp_seq=1 ttl=64 time=0.954 ms
64 bytes from raspberrypi (192.168.0.9): icmp_seq=2 ttl=64 time=0.478 ms
64 bytes from raspberrypi (192.168.0.9): icmp_seq=3 ttl=64 time=0.492 ms
64 bytes from raspberrypi (192.168.0.9): icmp_seq=4 ttl=64 time=0.567 ms
^C
--- raspberrypi ping statistics ---
4 packets transmitted, 4 received, 0% packet loss, time 3026ms
rtt min/avg/max/mdev = 0.478/0.622/0.954/0.194 ms
Conclusion
At this stage, you should now understand how to edit the hosts file on a Linux-based operating system.
This file is crucial to most operating systems and is even used in Windows. It allows a hostname to be routed to a particular IP address without needing control over the DNS server.
Please feel free to drop a comment below if you have any questions about editing the hosts file on Linux.
If you found this tutorial helpful, we recommend exploring our many other Linux guides.