This tutorial will show you how to install and use Fail2Ban on the Ubuntu operating system.
Fail2ban is a tool designed to help prevent intrusion into your system, focusing on preventing brute-force attacks. This tool works alongside your firewall to block anyone it detects as attacking your system.
If you aren’t familiar with security, a brute force attack is when an attacker spams your system with hundreds of login attempts to try to get a valid password and gain access to your server. Fail2ban helps prevent this by defining a set of rules for each connection. If a user breaks those rules, they are banned from any further connections for a specified amount of time.
If you are running an Ubuntu server, installing Fail2ban is a crucial way of protecting your system. Even if you are confident that your passwords are secure or you have moved to SSH keys these attackers can still be a liability.
Luckily, setting up a tool like Fail2ban on Ubuntu is straightforward. The tool is also super configurable, so you can configure it to protect different services and how fast and long it should ban a user.
While you can configure this tool to protect other services, we will focus purely on how to use Fail2ban to protect your SSH connection.
Installing and Configuring Fail2Ban on Ubuntu
In the following steps, we will show you how to install, enable, and configure the Fail2ban tool on Ubuntu.
Luckily, Fail2ban is available through the standard Ubuntu repositories, so installing the tool is really simple. Configuring it, however, can be a little tricky when you are just getting started with it.
Before proceeding further, you will need a firewall running on your system. Typically, on Ubuntu this will be UFW. Fail2ban uses your firewall to block incoming connections.
Installing Fail2Ban to Ubuntu
1. Before installing Fail2ban to our Ubuntu system, we will need to update our package list.
You can update the package list cache and upgrade out-of-date packages using the following two commands.
sudo apt update
sudo apt upgradeCopy
2. After updating your Ubuntu system, our next step is to install the Fail2ban software itself.
To install Fail2ban, you must run the command below within the terminal.
sudo apt install fail2banCopy3. Even though we have installed this intrusion prevention system, it will not yet be running.
To get Fail2ban to launch when Ubuntu powers on, and to get it to start immediately run the following command. The “--now” option is what tells the system manager to start the software now.
sudo systemctl enable fail2ban --nowCopyConfiguring Fail2Ban on Ubuntu
With Fail2ban running, you will still need to configure the software so that it will protect your services. In particular, we will adjust the configuration to enable brute force protection for the SSH service.
Editing the Configuration File
4. Because Fail2ban can update the “jail.conf” file every time it updates we must make a copy of it using the cp command.
This copy will be named “jail.local” and is what the Fail2ban software will read from when it launches.
sudo cp /etc/fail2ban/jail.conf /etc/fail2ban/jail.localCopy5. Once you have copied the configuration file, you can edit it by running the following command.
sudo nano /etc/fail2ban/jail.localCopyExploring the Default Configuration
6. The top half of this configuration is dedicated to default actions that Fail2ban should perform on Ubuntu.
It is well worth exploring these options as these will apply to all of your enabled rules.
[DEFAULT]Copy7. For example, let us run through a couple of options that you many want to configure. There is plenty more, and the config file explains what each option does well.
Each of these lines can be applied to a rule individually if you want certain services to have a longer ban time.
a. The first of these options specifies how long a host should be banned after triggering a rule.
bantime = 10mb. The “findtime” option lets you specify how long a “try” should be counted. After this time has passed, a try will no longer be counted.
For example, if you had the “maxretry” value set to 5, a user must make 6 attempts within the specified time to trigger a ban.
findtime = 10mc. The final option we will look at allows you to specify how many tries a user can attempt before a ban is triggered.
maxretry = 5Enabling the SSH Fail2Ban Rule
8. There are a variety of prewritten rules included within the Fail2ban configuration on Ubuntu. These are great to use as you know they should work out of the box.
By default, all of these prewritten rules are disabled, but luckily, you only need to add a single line to enable any of them.
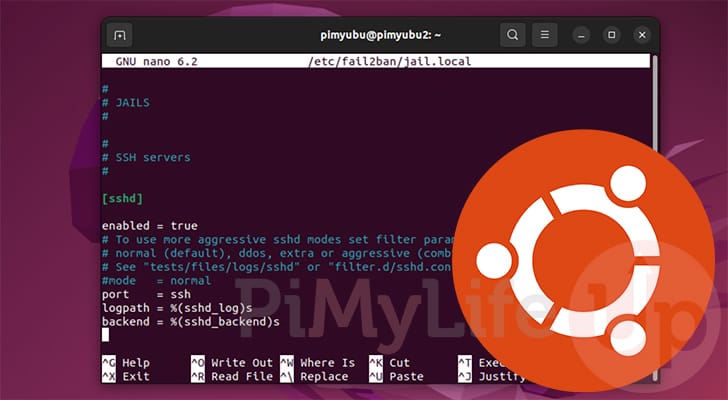
For this example, let’s enable the SSH Fail2ban rule on our Ubuntu system. To do so, find the following block.
[sshd]

# To use more aggressive sshd modes set filter parameter "mode" in jail.local:
# normal (default), ddos, extra or aggressive (combines all).
# See "tests/files/logs/sshd" or "filter.d/sshd.conf" for usage example and details.
#mode   = normal
port    = ssh
logpath = %(sshd_log)s
backend = %(sshd_backend)s
Copy
9. After finding a rule you want to enable. All you need to do is add the following line underneath its header.
enabled = trueCopyFor example, enabling the SSH rules will make the block look like what we have shown below.
[sshd]

enabled = true
# To use more aggressive sshd modes set filter parameter "mode" in jail.local:
# normal (default), ddos, extra or aggressive (combines all).
# See "tests/files/logs/sshd" or "filter.d/sshd.conf" for usage example and details.
#mode   = normal
port    = ssh
logpath = %(sshd_log)s
backend = %(sshd_backend)sCopy
Saving your Changes
10. After modifying the configuration file, you can save and quit by pressing CTRL + X, Y, and then ENTER.
11. None of our changes will take effect until you restart the Fail2ban service on Ubuntu.
You can restart the service by running the following command.
sudo systemctl restart fail2banCopyChecking for Banned users with Fail2ban
12. Fail2ban should now begin protecting your SSH service. To check for banned IP addresses, run the command below.
This command will output each Fail2ban rule you have enabled, followed by an IP address that triggered that rule.
sudo fail2ban-client bannedCopyFor example, this is what the output will look like when no IP addresses have been banned.
[{'sshd': []}]
Conclusion
Hopefully, by this point in the tutorial, you will have installed and configured Fail2ban on your Ubuntu system.
Fail2ban is an incredibly powerful tool for protecting your system from brute-force attacks.
Please feel free to comment below if you have any questions about getting Fail2ban to work on your Steam.
If you found our guide helpful, we highly recommend checking out our many other Ubuntu tutorials.