This guide will show you the simple steps of setting a static IP address on Ubuntu 18.04.
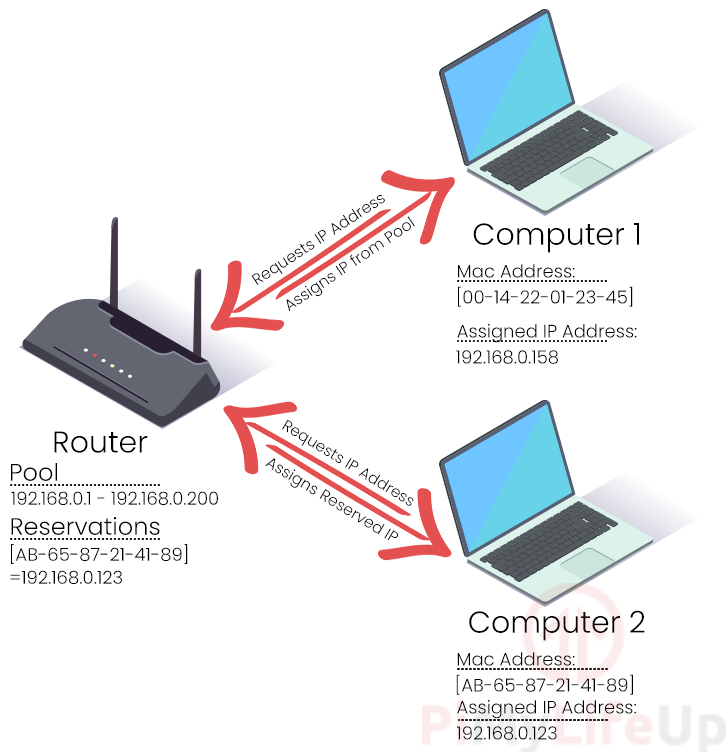
When your device first connects to your router, the DHCP (Dynamic Host Configuration Protocol) of your router will assign it an IP address.
Typically this IP address will be automatically be assigned to your device from a pool.
While some routers try to hand the same IP to the same device every restart, it is something that is never guaranteed.
There are two primary ways to work around the dynamic IP allocation behavior of your router.
Table of Contents
- Reserving a Static IP address using DHCP
- Requesting a Static IP Address
- Setting a Static IP Address on Ubuntu Server 18.04
- Setting a Static IP Address using the Desktop Interface
- Conclusion
Reserving a Static IP address using DHCP
The first way of assigning a static IP address is to make use of something called DHCP reservation.
DHCP reservation is typically the best way of setting a static IP address for your Ubuntu 18.04 device.
It is not specific to your OS and will guarantee that the router doesn’t give the IP to a different device.
When your device connects to your router, it will ask for an IP address while exposing your network interface’s MAC address.
The router will then check to see if an IP has been reserved for that MAC address. If it has been reserved, the router will give that IP to your device.
To configure DHCP reservation, you will need to utilize your router settings.
As the configuration for this will differ significantly between routers, we recommend consulting your model’s documentation.
You should note that your Wi-Fi and Ethernet connections are assigned two different MAC addresses. To retain the reserved IP address, you will need only to use one network interface.
Requesting a Static IP Address
The alternative way is to adjust your device to request a specific IP address from your router’s DHCP server.
When the device connects to the router, it will say that it wants to utilize a specific IP address.
If that IP address is available from the pool, it will be assigned to your Ubuntu 18.04 device.

The biggest drawback of this method is that the IP address is never guaranteed to be available. The router can easily assign the IP to another device as it isn’t reserved.
If the assignment fails, then the device will fail to connect to the network.
It will not fall back to retrieve an IP address from the router’s pool
In the next few sections, we will show how to set Ubuntu 18.04 to request a specific IP address from the router.
Setting a Static IP Address on Ubuntu Server 18.04
This section is going to show you how to set a static IP address on Ubuntu server 18.04.
Since the Ubuntu server operating system has no desktop interface, we will need to handle all of this using its terminal interface.
Identifying the Network Interface Name
Ubuntu 18.04 makes use of something called “Predictable Network Interfaces Name” by default.
Predictable interface names were designed to make it easier to know what name a network device would be assigned.
For example, we know that an ethernet interface will always start with en.
Likewise, a wireless network interface would have a name that starts with the text wl.
1. To get a list of our network interfaces on Ubuntu Server 18.04, we need to use the ip command.
Please run the following command on your device to list all of its currently active network interfaces.
ip linkCopy2. Using the ip link command, you should end up seeing something like we have below.
1: lo: <LOOPBACK,UP,LOWER_UP> mtu 65536 qdisc noqueue state UNKNOWN mode DEFAULT group default qlen 1000
    link/loopback 00:00:00:00:00:00 brd 00:00:00:00:00:00
2: enp0s3: <BROADCAST,MULTICAST,UP,LOWER_UP> mtu 1500 qdisc fq_codel state UP mode DEFAULT group default qlen 1000
    link/ether 08:00:27:2c:84:22 brd ff:ff:ff:ff:ff:ff
From our example you can see we have two network devices.
The first device identified by the name “lo” is the loopback device, which you can ignore safely.
Our second device is the one we are after and has the name “enp0s3“. This device is our computer’s ethernet network interface.
3. Before proceeding, make sure that you make a note of your network interface’s name.
In our case, this will be “enp0s3“, but yours will likely be different.
To set a static IP address on Ubuntu server 18.04, we will need this network interface name.
Using Netplan to Define a Static IP Address
Ubuntu Server 18.04 makes use of a network management tool called Netplan.
We will need to modify settings for Netplan so that it attempts to utilize the IP we set when it connects to the router.
1. Our first task will be to see what config files came with our installation of Ubuntu server 18.04.
Use the following ls command to list the files that sit in the “/etc/netplan/” directory.
ls /etc/netplan/CopyFrom this list, identify the configuration file containing your network interface’s settings.
In our case, this file was called “01-netcfg.yaml“, but there is a chance that it has a different name, such as “50-cloud-init.yaml“.
If no files exist within this directory, continue this tutorial as is. By the end, you should have a basic configuration setup.
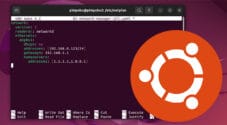
2. To edit the Netplan configuration, we will make use of the nano text editor.
sudo nano /etc/netplan/01-netcfg.yamlCopyMake sure you swap out the filename we are using with the one you identified in the previous step.
3. Within this file, you should see something similar to what we have below.
This bit of text is what tells Netplan how it should be handling the connection.
network:
  version: 2
  renderer: networkd
  ethernets:
    enp0s3:
      dhcp4: yes
Let us give you a quick rundown so that you get an idea of how these settings work.
network: – To configure network devices, the file must start with the network: block.
All of the configuration details for our network will be placed under this block.
version: – We can use “version:” to tell Netplan what configuration markup we are using.
In our case, this value will be 2, which is the current standard at the time of publishing.
renderer: – Using this option, you can define what backend will handle the connection.
There are only two possible settings for this, the default, which is networkd and NetworkManager.
ethernets: – Underneath this block is where you will define all of the settings for your ethernet interfaces.
If you are utilizing a wireless connection, you might see the text “wifis” instead of “ethernets“.
enp0s3: – Using our network interface name defines a new block where we can set options specific to that device.
Remember that this device might be called something different and will not exactly match what we have specified.
dhcp4: – Using this option, we can turn on or off our network interface automatically fetching an IP address from the router.
At the moment, you can see this option is set to yes. W will disable this option to make Ubuntu 18.04 utilize a static IP address.
Please note that if you are using IPv6, this will be referenced as dhcp6 instead.
4. We now need to modify this configuration file so that Ubuntu 18.04 will fetch a static IP address.
When editing this file, remember that indentation is important. Something that resides within a block needs to have an additional two spaces from the previous block.
For example, the “ethernets: block is spaced two spaces in from the start of the “network:” block.
a. First, we need to disable our network interface from interacting with the DHCP server.
To disable the DHCP functionality, you need to change the “dhcp4:” value from “yes” to “no“.
dhcp4: nob. Next, we can define the static IP address for your Ubuntu 18.04 computer.
To do this, we need to add a new “addresses:” option.
Next to this option, we need to specify each of the IPs you want to assign to your device.
These IP addresses need to be wrapped in square brackets ([ ]), with each separate IP separated by a comma (,).
In our example below, we are going to be assigning our network interface the IP 192.168.0.123.
addresses: [192.168.0.123/24]c. As we have disabled the DHCP functionality, we will need to use the “gateway4:” option to define the gateway address.
Typically the gateway address will be the internal IP address of the router your device is connected to.
If you are using IPv6, you will need to use the option “gateway6:” as well.
For our example, our router is accessible from the 192.168.1.1 address.
gateway4: 192.168.1.1d. The last thing we need to define the nameservers that we want to use for the server.
As “nameservers” is its own block, we need to add the following line before defining the DNS IPs.
nameservers:e. Within this block, we need to define the nameservers that we want to connect to by using the “addresses:” option.
As this option sits within the “nameservers:” block, it needs an additional two spaces.
Like with IP addresses, these need to be wrapped in square brackets ([ ]) with each nameserver separated by a comma (,).
For our example, we will be using Google’s DNS servers, those two IP addresses being “8.8.8.8” and “8.8.4.4“.
addresses: [8.8.8.8,8.8.4.4]5. By the end of this section, your configuration should end up looking a bit like what we have below.
network:
  version: 2
  renderer: networkd
  ethernets:
    enp0s3:
      dhcp4: no
      addresses: [192.168.0.123/24]
      gateway4: 192.168.1.1
      nameservers:
        addresses: [8.8.8.8,8.8.4.4]
Once you have finished editing the config file, you can save it by pressing CTRL + X, followed by Y, then the ENTER key.
6. Since we made changes to the configuration file, we will need to get Netplan to apply them.
To apply the changes, we need to run the following command.
sudo netplan apply7. You can verify that the Ubuntu 18.04 operating system uses your static IP address using the ip command.
Using the ip command, we can list all of the addresses that have been assigned to our network interface.
ip addrFrom this command, you should end up finding a result for your ethernet device.
2: enp0s3: <BROADCAST,MULTICAST,UP,LOWER_UP> mtu 1500 qdisc mq state UP group default qlen 1000
    link/ether dc:a6:32:d3:28:88 brd ff:ff:ff:ff:ff:ff
    inet 192.168.0.123/24 brd 192.168.0.255 scope global dynamic enp0s3
       valid_lft 86353sec preferred_lft 86353sec
    inet6 fe80::5054:ff:feb0:f500/64 scope link
       valid_lft forever preferred_lft forever
Above, you can see that our value for inet is now the static IP address that we set within the configuration file.
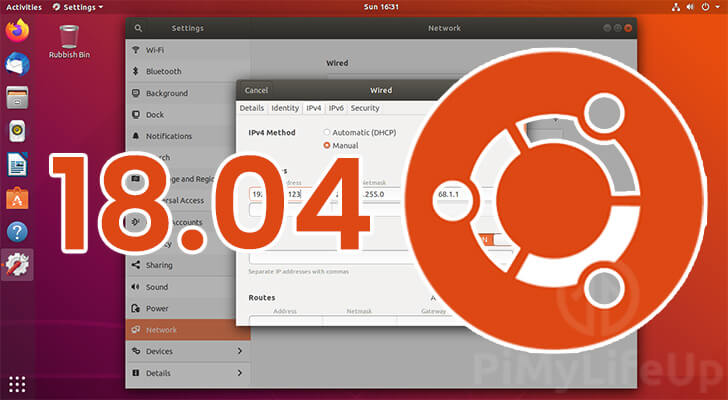
Setting a Static IP Address using the Desktop Interface
This section will show you how to set a static IP address while using the desktop version of Ubuntu 18.04.
This process is more straightforward than the one needed for the server edition of Ubuntu, as it’s done purely through the settings interface.
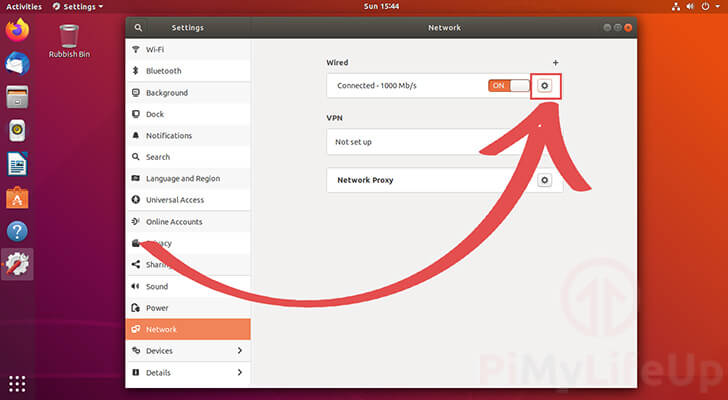
1. Before we can set a static IP address, we need to get to the settings screen.
While using the desktop interface, click the right side of the taskbar where the sound, power, and network icons are.

2. In the drop-down box that appears, you should see an icon with a wrench and spanner.
You need to click this icon to open up the settings page.
3. Now that we have the settings page opened, we need to change to the networking tab.
Find and click the “Networking” option in the left-hand sidebar.
4. On this screen, you should see a list of your network interfaces.
Identify the one you are using for your internet connection and click the cog next to it.
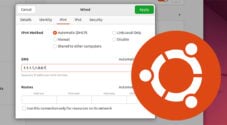
5. Next, we need to change to the IPv4 tab.
Find IPv4 in the menu bar of the current window and click it.
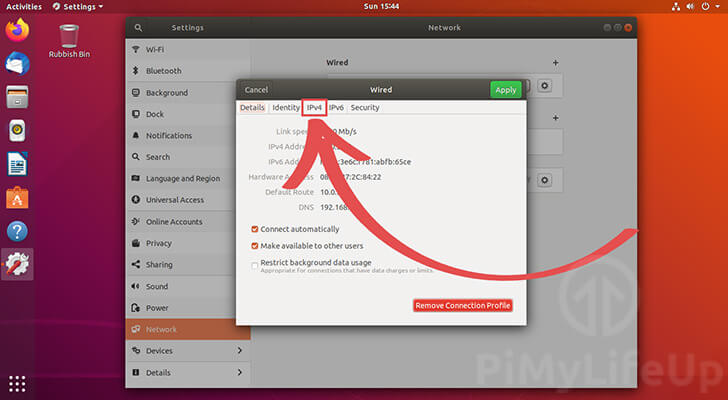
Please note that if you are using IPv6, you should change to that tab instead.
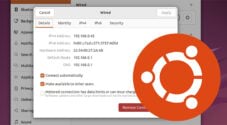
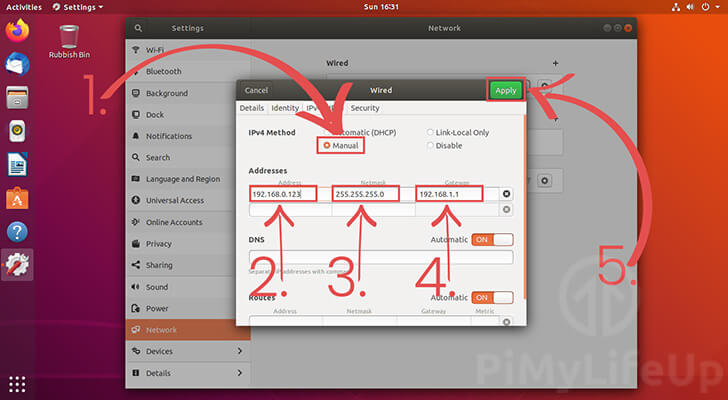
6. Finally, we are in the right menu on Ubuntu 18.04 to set a static IP address.
There are several things you will need to do on this screen.
First, you need to change the DHCP mode from automatic to manual (1.).
Once in manual mode, you will need to define the address (2.), netmask (3.), and gateway (4.).
Address – This is the IP address you want to be assigned when your computer connects to the network.
Netmask – The netmask is used to divide an IP address into subnets. In our case, we will be using the netmask “255.255.255.0” to put us in the last subnet.
Gateway – You need to set the gateway to the local IP address where your router sits. The gateway is where your device connects through to reach the rest of the network.
Once you have set all three of these values, click the “Apply” button (5.) in the window’s top right corner.
7. To ensure everything is working as it should be, restart your device.
Once it has restarted you can verify the IP address that it has been assigned by opening up the terminal.
The easiest way to open up the terminal when running Ubuntu 18.04 is to use CTRL + ALT + T.
8. Within the terminal, run the following command to show the status of all of your configured network devices.
ip addrIf everything has worked correctly you should see your IP address listed as inet YOURSTATICIPADDRESS.
Conclusion
Hopefully, you now will have set up your Ubuntu 18.04 installation with a static IP address.
If you have had any issues with getting your installation to utilize a static IP address, please leave a comment below.
Be sure to check out some of our other Linux or Ubuntu tutorials.