In this quick guide, we will be showing you how to quickly and easily check the status of the firewall on Ubuntu.

Knowing how to easily check the status of the firewall on your Ubuntu system is fairly important.
A firewall is one of the key ways that your system can protect itself from network-based attacks. It decides whether a network connection can be made to your system
The key tool you use to check and manage your firewall on Ubuntu is Uncomplicated Firewall or UFW for short. This isn’t a firewall in itself but a very easy-to-use management tool. Underneath the hood, your system still uses iptables and Linux Netfilter for the actual firewall itself.
We have a more in-depth guide on using UFW, but in the next section, we will show you how to use UFW to check the status of the Ubuntu firewall.
Please note that the following steps are all run entirely within the terminal. If you are using Ubuntu desktop, you can typically open the terminal by pressing CTRL + ALT + T.


Checking the Status of the Firewall on Ubuntu
Over the following sections, we will be showing you three different ways that you can use in the terminal to check the status of the firewall on Ubuntu.
Please note that you will be required to be using a superuser to check on your firewall. Normal users do not have access to this information.
Using UFW To get your Firewall Status on Ubuntu
1. As mentioned at the start of this quick guide, checking the status of the firewall on Ubuntu is as simple as running a single command within the terminal.
With this command, all we are doing is getting UFW to output the status of the firewall. That’s as simple as it is.
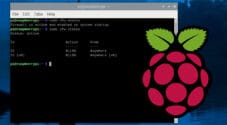
sudo ufw statusa. If the firewall on your Ubuntu system is disabled, you will see the following message indicating that it is “inactive“.
This means that anyone attempting to connect to your machine can access it through any port.
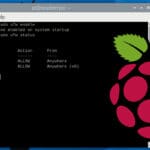
Status: inactiveb. If your firewall is enabled, will get a much larger response. It will start off by indicating that the Ubuntu firewall is “active“.
After checking the status of your firewall, you will see every port that has either been allowed or blocked. This allows you to quickly see what ports someone can use to access your machine and the services that you may have exposed.
In our example below, you can see that our SSH service is allowed through the firewall.
Please note that if you are using Docker on your system, more ports are likely exposed than shown here. Docker adds allowed ports directly into iptables, making UFW unaware of them.
Status: active

To                         Action      From
--                         ------      ----
22/tcp                     ALLOW       Anywhere
22/tcp (v6)                ALLOW       Anywhere (v6)
Getting a Verbose Status of your Firewall
1. You can get additional information about the status of your firewall by including the “verbose” option at the end of the status command.
sudo ufw status verboseCopya. If the status of your firewall is inactive on Ubuntu, you won’t get any additional information by using the verbose information. It will simply display that the status is “inactive“.
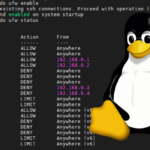
Status: inactiveb. The big change when using verbose mode comes when your firewall is active. Here, you can see that our firewall is “active,” but there is now some additional information.
Here, we can see whether logging is enabled, the firewall’s default behavior, and whether UFW is using any profiles created for it.
Status: active
Logging: on (low)
Default: deny (incoming), allow (outgoing), deny (routed)
New profiles: skip

To                         Action      From
--                         ------      ----
22/tcp                     ALLOW IN    Anywhere
22/tcp (v6)                ALLOW IN    Anywhere (v6)
Using IPTables to Check the Status of your Firewall on Ubuntu
1. The other way that you can check the status of your firewall on Ubuntu is to utilize IPTables directly. This is definitely not a recommended path for most users as you will need an understanding of how to read iptables firewall rules.
To get iptables to list out all the set firewall rules, you will want to use the following command.
sudo iptables -LCopy2. From this command you will see every rule that has been set within the Ubuntu firewall. This will include rules that have been set with applications that don’t use UFW to manage your firewall.
While this is the best way to check the actual status of the firewall on Ubuntu, you must have a bit of knowledge of how iptables rules are written.
pimyubu@pimyubu2:~$ sudo iptables -L
Chain INPUT (policy DROP)
target     prot opt source               destination
ts-input   all  --  anywhere             anywhere
ufw-before-logging-input  all  --  anywhere             anywhere
ufw-before-input  all  --  anywhere             anywhere
ufw-after-input  all  --  anywhere             anywhere
ufw-after-logging-input  all  --  anywhere             anywhere
ufw-reject-input  all  --  anywhere             anywhere
ufw-track-input  all  --  anywhere             anywhere

Chain FORWARD (policy DROP)
target     prot opt source               destination
DOCKER-USER  all  --  anywhere             anywhere
DOCKER-ISOLATION-STAGE-1  all  --  anywhere             anywhere
ACCEPT     all  --  anywhere             anywhere             ctstate RELATED,ESTABLISHED
DOCKER     all  --  anywhere             anywhere
ACCEPT     all  --  anywhere             anywhere
ACCEPT     all  --  anywhere             anywhere
ACCEPT     all  --  anywhere             anywhere             ctstate RELATED,ESTABLISHED
DOCKER     all  --  anywhere             anywhere
ACCEPT     all  --  anywhere             anywhere
ACCEPT     all  --  anywhere             anywhereCopy
Conclusion
By this point, you should hopefully have a good understanding of how to check the status of your firewall on Ubuntu.
A firewall is a crucial part of helping keep your system safe and secure. Knowing how to check in on the status of your firewall
If these steps don’t work for you, please feel free to drop a comment below.
If you liked this quick guide, we highly recommend you take a few minutes to explore our other Ubuntu tutorials.