In this guide, you will learn how to grant users sudo privileges on an Ubuntu system using the sudoers file and the sudo group.

sudo is a unique piece of software included on Ubuntu systems that allows specific users to run commands as either the root user or another user.
There are two different ways to grant a user sudo privileges. The easiest of those is to add the user to the sudo group.
On Ubuntu, the sudo group is preconfigured within the sudoers file to grant access to the sudo utility.
The sudoers file is the second method that we can use to grant our user sudo privileges on our Ubuntu system.
This file is what contains the information used to indicate which users and groups are granted the ability to use sudo on Ubuntu. By modifying this file, we can grant our user or group sudo privileges with fine-grained control.
Please note for these steps, you will need to be either using the root user or already have sudo access.
If you want, you can complete these steps remotely by using an SSH connection to your Ubuntu system.
Adding a User to the sudo Group
The easiest method to give a user sudo privileges is to add that user to the sudo group on your Ubuntu system.
Users that are a member of the sudo group can execute commands as the root user.
When the user uses the sudo utility, they will be required to re-authenticate themselves by entering their password.
1. To add a user to the sudo group, we will be using the usermod tool.
This tool allows us to modify the attributes of a user, such as its groups.
Using the command below, we can add a user to the sudo group. The sudo group exists by default on Ubuntu systems.
usermod -a -G sudo USERNAMEWhen using this command, make sure that you replace “USERNAME” with the user’s name to add to the sudo group.
We use the “-a” attribute to tell the command that we want to add a new attribute to our user.
Afterward, we use the “-G” option to let it know that we will be adding a group to the user we are modifying.
2. We can now verify that our user can now elevate itself to the superuser.
The easiest way to do this is to run a command, as we have below.
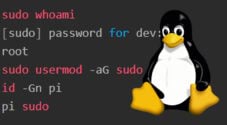
sudo whoamiThe whoami command prints the effective username of the current user.
3. As we ran the whoami command using sudo, you shouldn’t see your user’s username.
Instead, you should see the name of the superuser. In the case of your Ubuntu system, this superuser will likely be called root.
rootIf you see root appear in your command line, you have successfully given the user sudo privileges.
Adding a User to the sudoers File on Ubuntu
The alternate way to give a user sudo privileges on Ubuntu is to modify the sudoers file.
This file is where you can define which users and groups should have the privilege of using the sudo command.
An advantage of using this file is that you have more fine-grained control over how a user or group can utilize the sudo tool.
1. To modify the sudoers file on Ubuntu, we will be using a special command.
This command is called visudo and is used to modify the sudoers file and ensure your edits don’t cause syntax errors.
To use this command, you will need to be using a user that already has sudo privileges.
sudo visudoIf you are prompted to choose what editor to use to edit the file, we recommend using the nano text editor as it’s the easiest to use.
2. When you add a new entry to the sudoers file on Ubuntu, you should always make sure it is on a new line.
The simplest way to add a new user to the sudoers file is to use the following syntax. When typing in this line, make sure that “USERNAME” is the user you want to give sudo privileges.
USERNAME ALL=(ALL) ALLThere are four different fields that we are entering with this line.
- The first field is the user or group that will be able to grant themselves increased privileges for the specified commands.
- You can use the second field to specify a list of hostnames on which this sudoers entry is valid. Typically this field isn’t used and is set to “
ALL“. -
The third field is the one wrapped in brackets (
( )).Using this field, you can specify specific users and groups that you can elevate your privileges to.
By setting this value to “
ALL“, you can usesudoto elevate to any user or group. -
The fourth and final field allows you to specify the commands the user/group can run with superuser privileges.
If this field is set to “
ALL“, then the user can use elevated privileges for any command.
3. Once you have added your new line to your Ubuntu’s sudoers file, you can now save and quit.
If you are using nano to edit the file, you can save and quit by pressing CTRL + X, then Y, followed by the ENTER key.
4. Now, you can use sudo to elevate your chosen user with your defined settings within the sudoers file.
The sudoers file is one of the best ways for configuring sudo access on Ubuntu. It allows you to finely control what the user or group can do while being simple to use.
Conclusion
Hopefully, this guide has shown you how to give a user on Ubuntu sudo privileges.
The easiest of the two methods we have shown you is to add your user to the default sudo group on Ubunutu.
Alternatively, if you want more fine-grained control you can also modify Ubuntu sudoers file. The sudo command uses the sudoers file to understand what your users are allowed to do.
If you have had any issues with the sudoers file on Ubuntu, please feel free to comment below.
Be sure to check out our other Ubuntu guides, such as learning how to create a new user.