This quick guide will show how you can set up NFS on your Synology NAS.
NFS stands for network file system. It is a way of sharing files over a network and is commonly used by Linux-based operating systems.
By default, a Synology NAS typically has Samba (SMB) enabled which is usually good enough for most users and is supported by almost all devices. It is also typically easier to connect to an SMB share than an NFS one.
While both SMB and NFS have some similar functionality, there are some critical differences in the way that they operate that we won’t be covering in this guide. Some users report faster speeds when transferring with NFS due to some overhead of the SMB protocol. However, the downside is that Windows devices do not natively support this protocol.
If you have to use NFS, don’t worry. Like most things, the Synology team has made it really simple to enable and use.
How to Set Up an NFS Share on your Synology NAS
Over the next few steps, we will show you how to enable the NFS protocol on your Synology NAS. We will walk you through how to set NFS permissions for a particular shared folder.
Turning on NFS on your Synology NAS
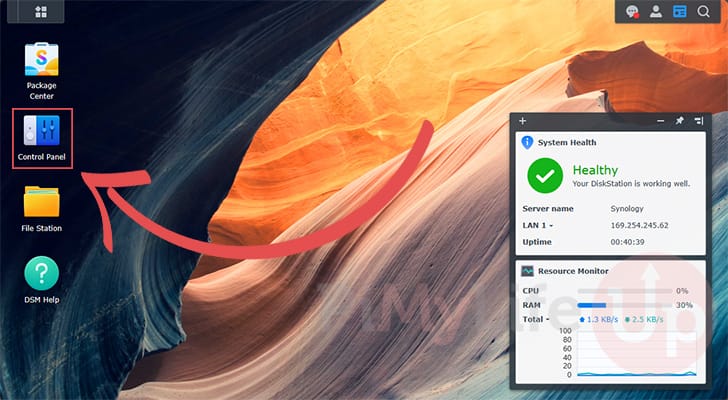
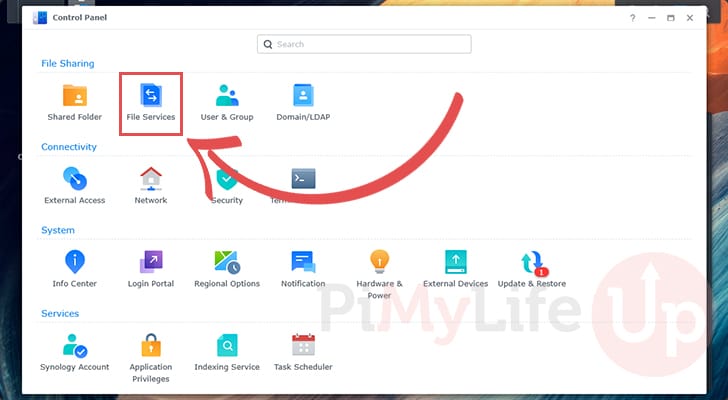
1. To enable NFS on your Synology NAS, you will first need to open the control panel.
You can open this by clicking the “Control Panel” icon on the desktop.
2. With the control panel open, our next step is to open the “File Services” option.
This will take you to the screen where you can enable functionality such as the FTP server and the NFS protocol.
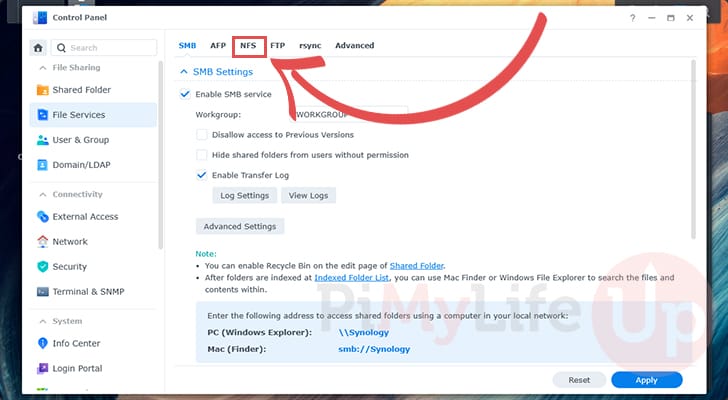
3. With the file services screen now open, change to the “NFS” tab.
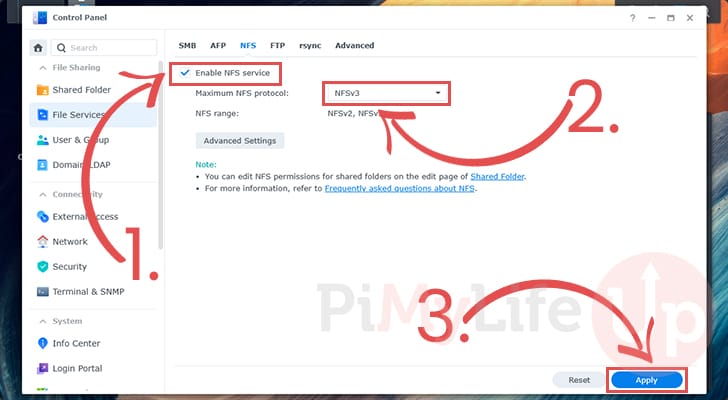
4. Now to enable NFS on your Synology NAS, all you need to do is tick the checkbox next to the “Enable NFS service” option (1.).
If you require support for a particular version of NFS, use the provided select box (2.). For this guide, we are sticking with NFSv3 as our Raspberry Pi supports it, and we will be connecting that to our NAS using it.
Once the NFS option is ticked, click the “Apply” option (3.) to turn the service on.
Setting NFS Permissions for a Shared Folder
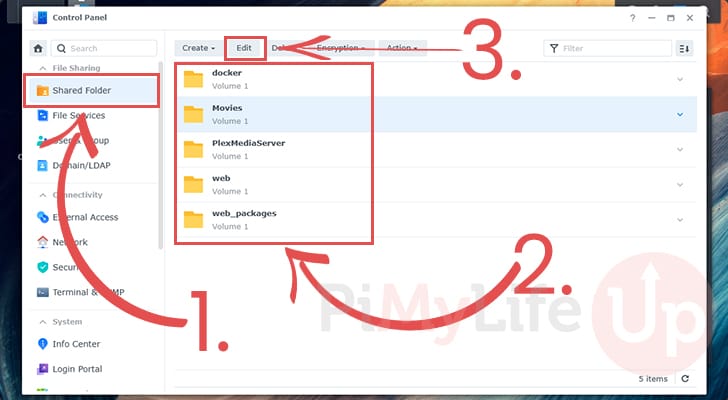
5. NFS requires you to set permissions for each of your shared folders to connect. To set permissions for a folder, change to the “Shared Folder” tab (1.) within the Control Panel.
On this screen, you will find all of the shared folders on your NAS. Click the folder (2.) you want to set up NFS permissions for.
Once a folder is selected, click the “Edit” button (3.).
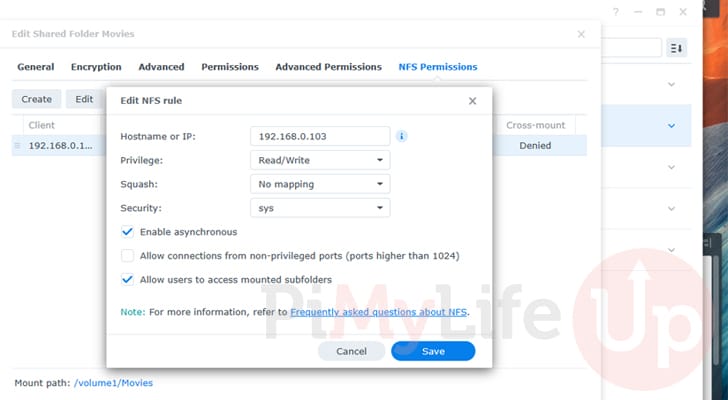
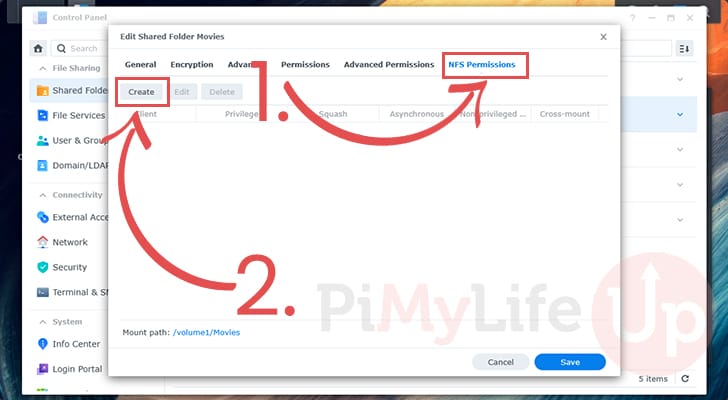
6. Now that you are editing one of your Synology NAS’s shared folders, swap to the “NFS Permissions” tab (1.).
Once you have swapped tabs, click the “Create” button to add permissions to this folder (2.).
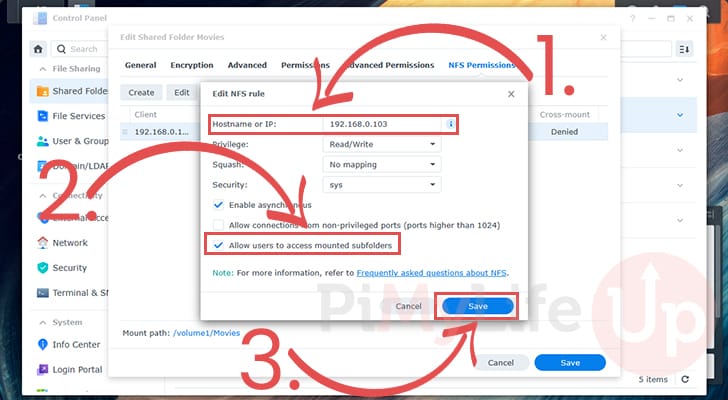
7. These next steps are some of the most important for setting up NFS on your Synology NAS so that a device can connect. Synology provides documentation that covers each possible option here. We will only touch on some of the key options.
The first thing you must do is specify the IP or hostname of the device that will connect to your NAS over the NFS protocol (1.). If you want to allow access from all devices, you can use a wildcard (*) instead, but this is unrecommended as anyone could then connect to this share.
Secondly, you will likely want to tick the “Allows users to access mounted subfolders” option (2.) so that you can browse folders within this shared folder.
To add this permission to your shared folder, click the “Save” button (3.).
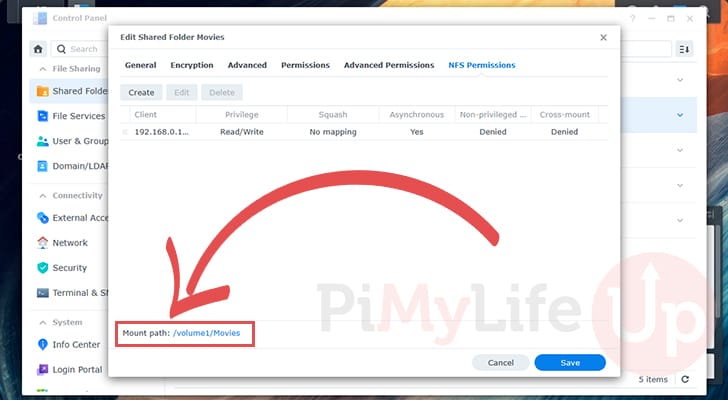
8. Now that your folder has NFS permissions you will want to take a note of the “Mount path” in the bottom left corner of the screen.
You will need this mount path whenever you mount your Synology NFS share.
Connecting to your Synology NAS NFS Share
In this section, we will show you how to connect to your Synology NAS using the NFS protocol we just set up.
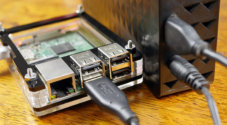
For the following example, we used a Raspberry Pi running on our home network. This Pi is running a version of Debian, so the steps should work for other operating systems, such as Ubuntu.
Installing the NFS Client
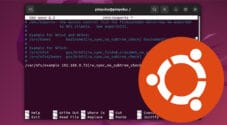
1. Your first step is to ensure that your Linux device is up to date.
If you are using a Debian based operating system you can upgrade out-of-date packages by running the following command.
sudo apt update
sudo apt upgradeCopy
2. Once your device is up to date, you will want to install the “nfs-common” package. This package includes both the NFS server and client.
sudo apt install nfs-commonCopyCreating a Mount Path
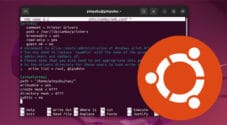
3. Now that your device is ready, let us create a directory to which we will mount our NFS share.
For our example, we will create this directory at “/mnt/movies” using the mkdir command.
sudo mkdir -p /mnt/moviesCopyMounting the Synology NFS Share
4. With the directory created, our next step is to mount our Synology NFS share to our Linux device.
Below, you can see the syntax for mounting this share to our device. You require a few key pieces of information.
[IPADDRESS]: Replace this with the IP address of your Synology NAS that you are attempting to connect to over the NFS protocol.[REMOTEVOLUME]: You are required to specify the remote volume path. You will have seen the required directory within DSM. Typically, this starts with “/volume1/” followed by the shared folder name.[MOUNTPATH]: Finally, specify where this share will be mounted on your local machine.
sudo mount -t nfs [IPADDRESS]:[REMOTEVOLUME] [MOUNTPATH]CopyFor this example, we will connect to our Synology NAS that sits on the local IP “192.168.0.48“.
On that Synology NAS, we want to mount the volume where we set the NFS permissions, which in our example is “/volume1/Movies“.
Finally, we want to mount that NFS share to the “/mnt/movies” directory on our Linux machine.
sudo mount -t nfs 192.168.0.48:/volume1/Movies /mnt/moviesCopyTesting out the new NFS Connection
5. To test out our new mounted NFS drive, let’s first change to our root user by using the following command.
sudo suCopy6. After swapping to the super user, let us change to the directory where we mounted our Synology NAS’s NFS share on our Linux device.
To swap to this directory, we will use the cd command.
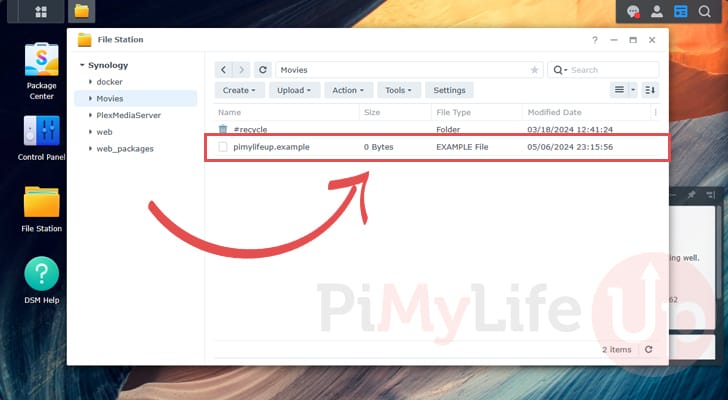
cd /mnt/moviesCopy7. Now that we are on the NFS share, let us test it by creating a simple blank file.
Using the command below, we will create a file called “pimylifeup.example” on our NAS.
touch pimylifeup.exampleCopy8. If we load up DSM again and change it to the folder we shared over NFS, we should now see the empty file we created.
Conclusion
Hopefully, by this stage of the tutorial, you should have an idea of how to set up and use NFS shares on your Synology NAS.
While a Samba (SMB) share will work well enough for most users, there are scenarios where you might be required to use NFS. Luckily, it isn’t the most complicated thing to set up on your NAS.
Please feel free to leave a comment below if you have any questions about setting up NFS on your NAS.
If you found this tutorial helpful, we highly recommend checking out our other Synology guides.