In this quick guide, we will show you how to enable and use the FTP service on a Synology NAS.
FTP stands for File Transfer Protocol, and it is a great protocol for uploading and downloading files from a device such as a Synology NAS. It is well-supported, and compatible clients are available on almost all devices.
In this guide, we won’t be using the FTP protocol. Instead, we will be using a variant called SFTP. This is a more secure version of FTP as it operates over a secure tunnel and has various other improvements.
Luckily, the vast majority, if not all, modern FTP clients can connect to SFTP servers, so using this more secure protocol shouldn’t affect compatibility.
If you want to be able to download and upload files remotely, you will need to port forward port 22.
Enabling and using the FTP Server on your Synology NAS
Over the following sections, we will show you how to enable and use the FTP server on your Synology NAS.
The NAS comes with all of this functionality built into it; we simply need to enable it. We will also show you how to create a user that you can use just for FTP.
Enabling the FTP Server on a Synology NAS
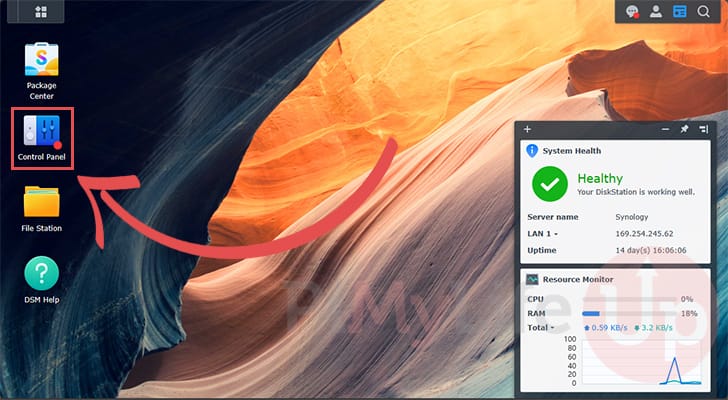
1. With the Synology NAS interface open, the first thing you will want to do is open up the “Control Panel“.
This panel is what allows you to easily adjust settings on your NAS including enabling the FTP server.
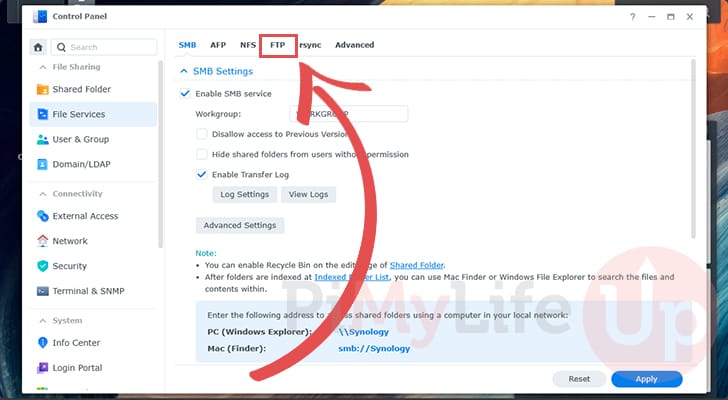
2. Within the Control Panel, find and click the option labeled “File Services“.
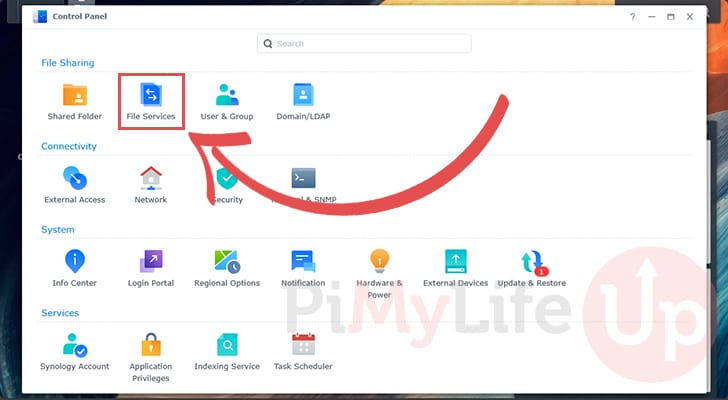
3. Once in the “File Services” tab, change to the “FTP” tab.
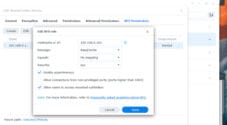
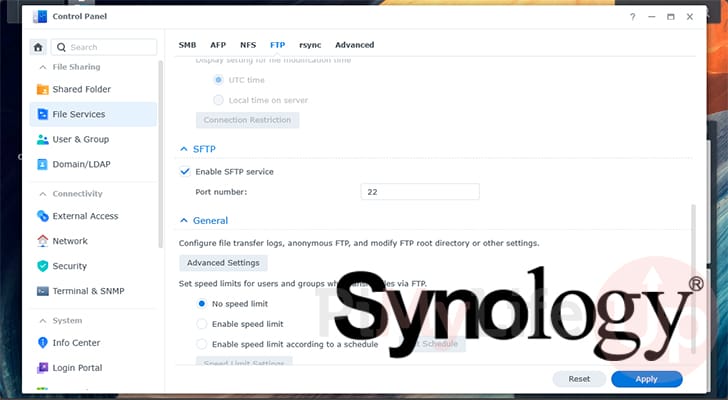
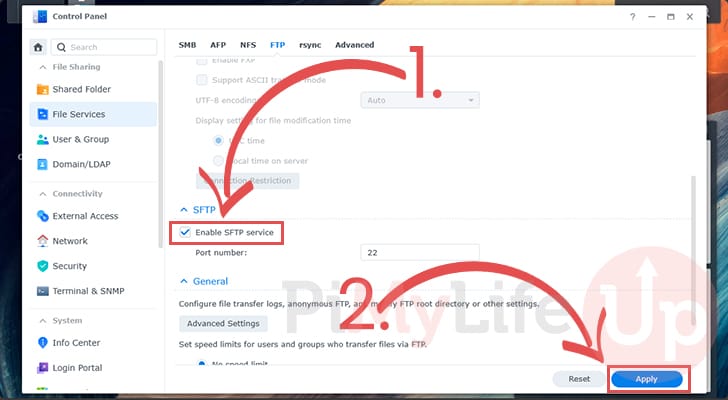
4. Now that you are in the FTP tab, we can enable the FTP server on our Synology NAS. In this case, you will want to ignore the initial options and scroll down until you see the heading labeled “SFTP.”
We are using SFTP as it is a more secure implementation of the FTP protocol as it runs through an SSH tunnel. Additionally, most FTP clients support the SFTP protocol, so you won’t have any compatibility issues connecting.
Once you have found the “SFTP” header, find the option labeled “Enable SFTP Service” and tick the checkbox next to it (1.).
With the FTP service checkbox ticked, click the “Apply” button (2.) to enable the service.
Creating a Synology User to use FTP
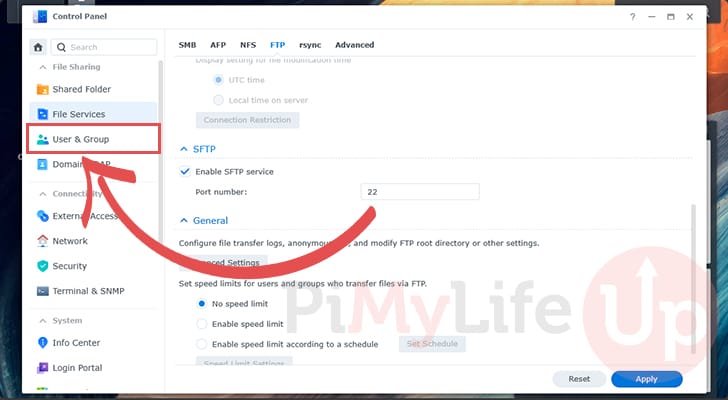
5. With the FTP server now running on your Synology NAS, we can move on to create a user to access it.
While you can use your regular user, making a different one allows you to lock them to particular shared folders. To begin this process, change to the “User & Group” tab.
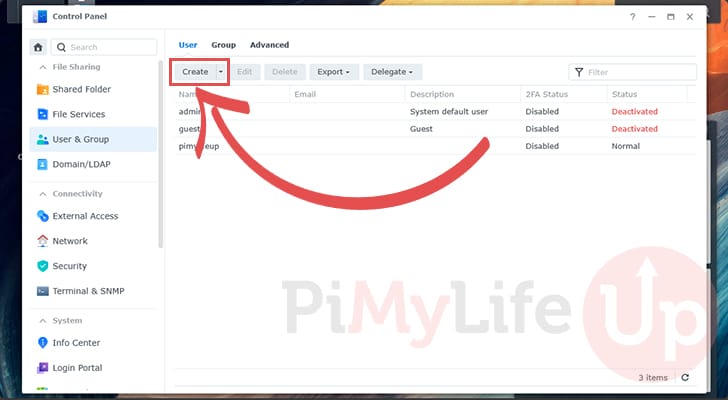
6. On this screen, you can begin creating a new user by clicking the “Create” button.
7. The first screen allows you to fill out information for your new FTP user (1.). Fill in information such as a name and password.
Once you have filled out details for your user, click the “Next” button (2.).

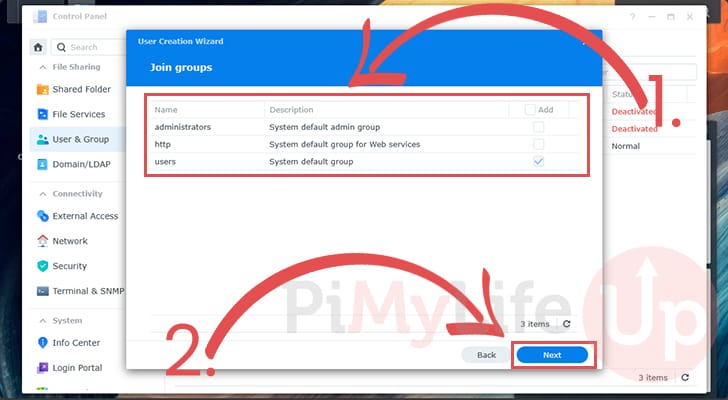
8. This next screen will allow you to select a group to assign this user to (1.). We are just sticking with the default “users” group.
After selecting a group or groups, click the “Next” button (2.).
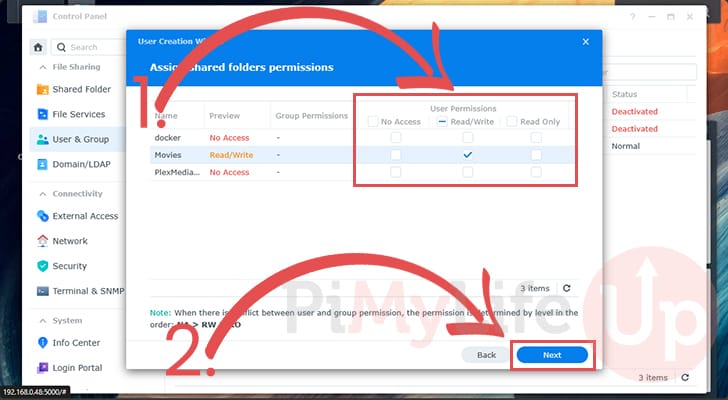
9. Next, you can select the shared folders this user can access (1.). You can decide whether the user can only read from the folder or can also read and write.
Once you have enabled read or read/write permissions on your folders, click the “Next” button (2.).
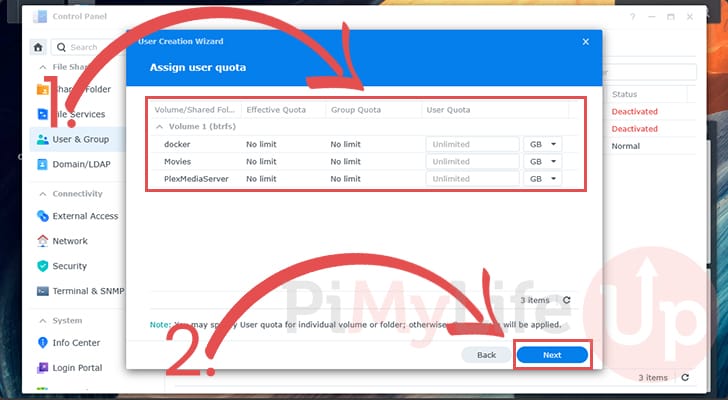
10. You can now restrict this user so they can only use a certain amount of space on each of your shares (1.). This is useful if you want to limit the amount of space that can be gobbled up by this one user. If you want the quota to be unlimited, leave them blank.
After filling out this screen, click the “Next” button (2.) to proceed.
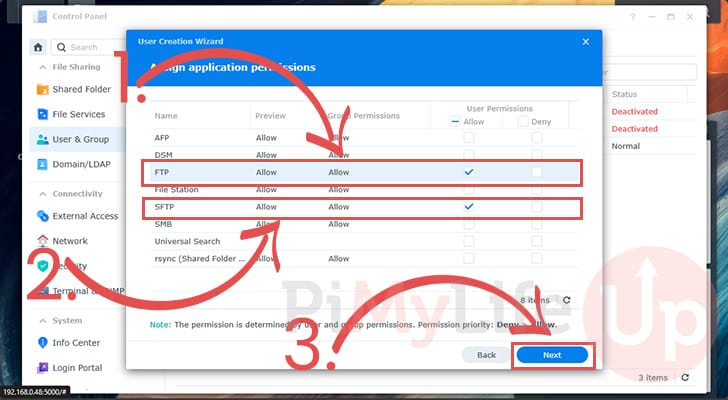
11. This next screen is important as it is what you will use to let your user access the FTP (1.) and SFTP (2.) services running off your Synology NAS.
Once you have allowed both services, click the “Next” button (3.) to continue.
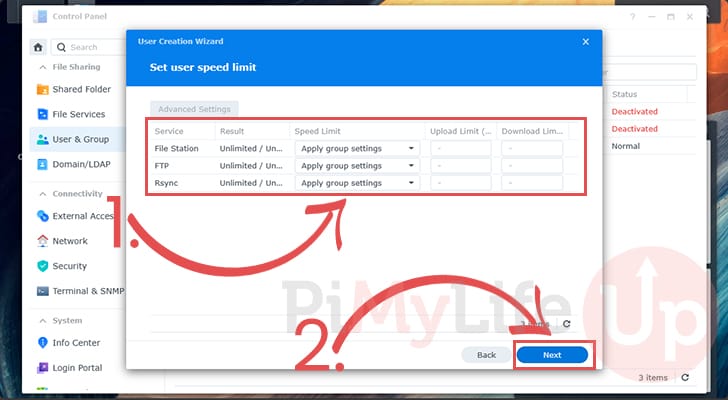
12. This next screen allows you to limit the download and upload speed for this user. This can be controlled for each service (1.).
To proceed, click the “Next” button (2.).
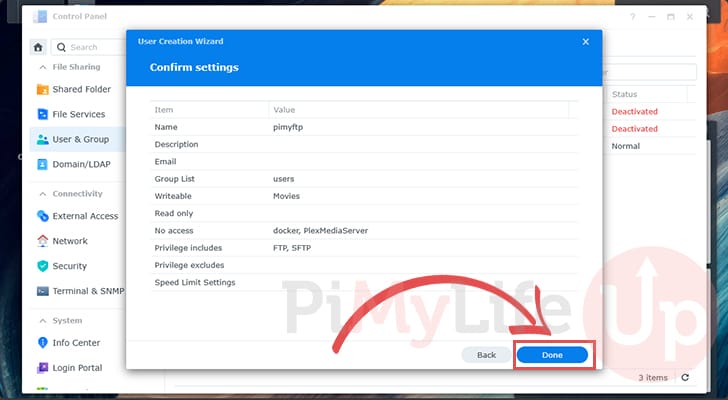
13. You can finish creating your user by clicking the “Done” button.
Connecting to your NAS over FTP
14. Now that the FTP server on your Synology NAS is up and running, let us show you how to connect to it. For this example, we will be using the FileZilla client, but you can use any client you desire as long as it supports SFTP.
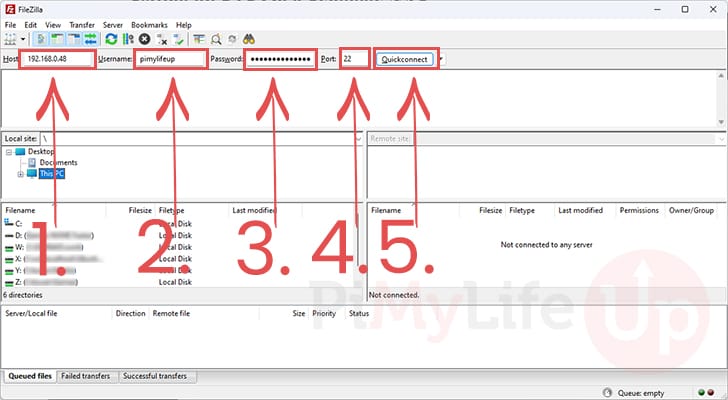
At the top of the FileZilla screen, you will find four text boxes and a button. You can use these to quickly fill out your connection information.
- Enter the IP address of your Synology NAS in the first textbox. In our case, we are using the local IP address
192.168.0.48. - The next textbox is where you will specify the name of the user you created to access FTP.
- Of course, you will also need to type in this user’s password.
- Finally, the next super important field is the “Port”. For this field, type in “
22“. This is the default port that SFTP operates over.
Once you have filled out all four of the textboxes, click the “Quickconnect” button (5.).
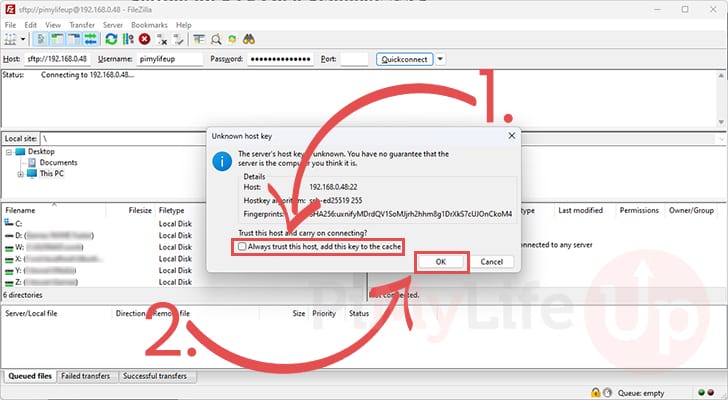
15. When connecting to your Synology NAS over FTP for the first time you will get an “Unknown host key” message.
If you are confident you are connecting to the right server, tick the “Always trust this host, add this key to the cache” checkbox (1.).
To connect using FTP, click the “OK” button (2.).
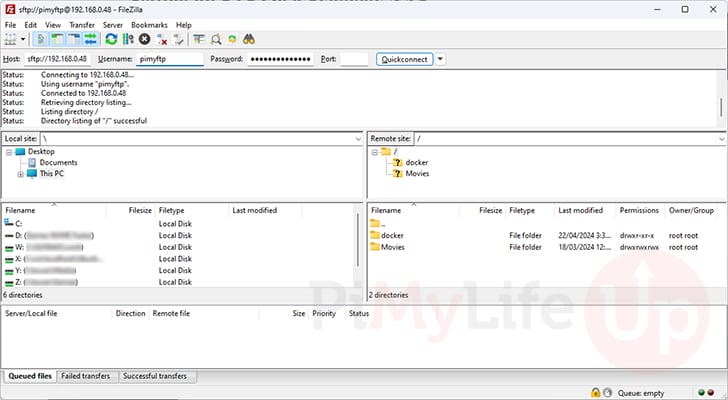
16. Below you can see that we have now successfully connected to our Synology NAS. We can see the two shared folders we gave our FTP user access to.
We can now download and upload files to our NAS using this client.
Conclusion
By this point in the tutorial, you should have a good idea of how you can enable and use the FTP server on your Synology NAS.
FTP can be a super convenient protocol for uploading and downloading files from your Synology. It is well supported by most clients, and with the implementation of SFTP, it is now somewhat secure.
Please post a comment below if you have had any issues with getting the FTP server to work on your Synology NAS.
If you liked this tutorial, we recommend checking out our many other Synology NAS guides.